Adding an outlet inside a kitchen drawer is a brilliant DIY upgrade that eliminates countertop clutter and creates hidden charging or appliance stations. This guide walks you through the entire process, from planning and safety checks to the actual wiring and finishing touches. You’ll learn the essential tools, how to choose the right electrical box, and critical safety steps like turning off the power and using a GFCI. With careful execution, you can modernize your kitchen’s functionality while maintaining a sleek, organized aesthetic.
Key Takeaways
- Safety is non-negotiable: Always turn off the correct circuit breaker at the panel and verify power is off with a voltage tester before touching any wires.
- Use a shallow “old work” electrical box: These are designed to mount in existing drywall without removing large sections, perfect for retrofitting behind a drawer.
- Plan your drawer’s path carefully: The outlet must be positioned where the drawer’s back panel or a modified front panel allows access, and wiring must run cleanly inside the drawer’s cavity.
- A GFCI outlet is required by code in kitchens: For any new outlet in a kitchen, a Ground Fault Circuit Interrupter protects against shocks, especially important near potential water sources.
- Secure all wire connections: Use wire nuts and ensure no copper is exposed. The outlet must be firmly mounted, and the drawer’s interior should have a cover plate for a finished look.
- Test thoroughly before finalizing: After installation, restore power and test the outlet with a receptacle tester before closing up the wall and drawer.
- Know when to call a pro: If you are uncomfortable with electrical work, your circuit is already full, or local codes require a permit, hire a licensed electrician.
📑 Table of Contents
- Why Add an Outlet Inside Your Kitchen Drawer?
- Essential Tools and Materials You’ll Need
- Planning and Safety First: The Most Critical Phase
- Step-by-Step Installation Guide
- Finishing Touches and Aesthetic Considerations
- Creative Ways to Use Your New Drawer Outlet
- Conclusion: A Modern Upgrade with Lasting Value
Why Add an Outlet Inside Your Kitchen Drawer?
Imagine your kitchen counter. It’s likely a busy zone of toasters, coffee makers, phone chargers, and stand mixers. What if you could tuck all those cords and plugs away, leaving a perfectly clean, serene surface? That’s the magic of a drawer outlet. It’s a subtle, high-impact upgrade that transforms a standard drawer into a dedicated, hidden power station. This isn’t just about hiding clutter; it’s about rethinking how you use your kitchen space. You create a dedicated spot for charging devices, powering a hidden appliance, or even installing a small, drawer-friendly microwave or warming drawer. The result is a more organized, safer, and aesthetically pleasing kitchen where form meets function seamlessly.
The Allure of Hidden Power
We’ve all experienced cord chaos. Multiple plugs fighting for space on a power strip, cords dangling precariously, and the constant visual noise of technology in a room meant for cooking and gathering. A drawer outlet solves this elegantly. The power source lives behind the drawer front or within the drawer’s back wall, completely out of sight. When the drawer is closed, all evidence of electronics vanishes. This is especially valuable in open-concept kitchens where the counter is always on display. It aligns perfectly with minimalist and modern decor principles, where “everything in its place” is the golden rule. Beyond aesthetics, it’s a safety feature. It keeps hot plugs and frayed cords away from curious children and pets, and protects connections from spills and splashes that are common on countertops.
Practical Use Cases That Transform Your Routine
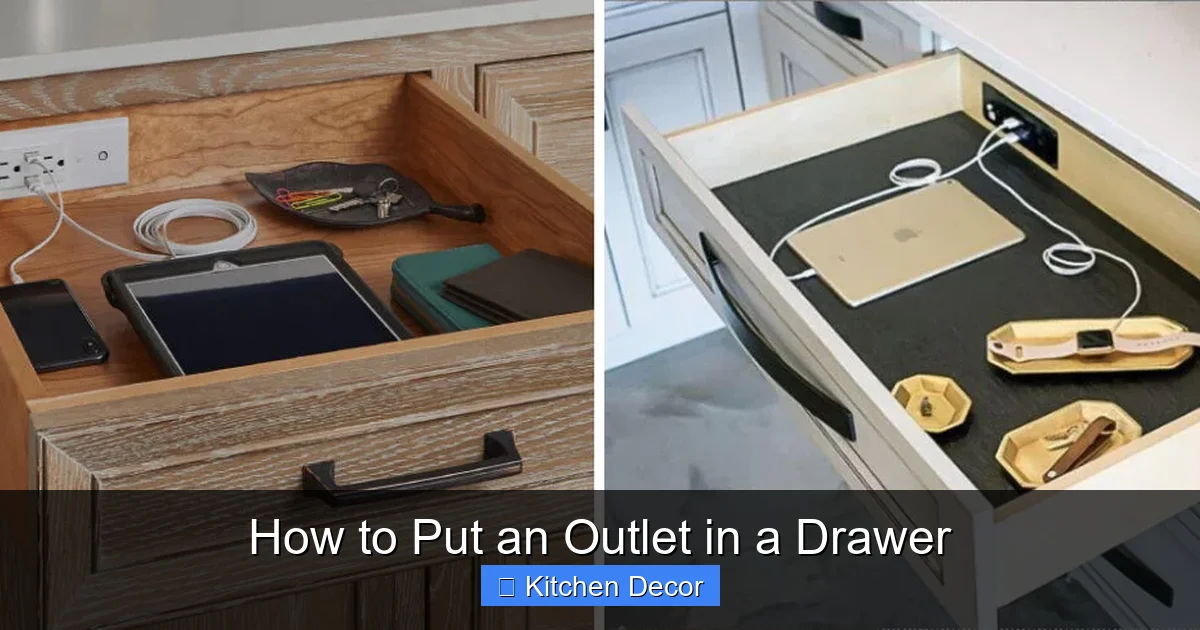
This project opens up a world of convenience. The most popular use is a charging station. Designate a drawer for all family devices—phones, tablets, smartwatches, and Bluetooth speakers. Install a small, multi-port USB charger inside, plug it into your new outlet, and close the drawer. No more tangled cords on the breakfast nook table. For the home baker or chef, a stand mixer or food processor dock is a game-changer. Keep the heavy appliance in the drawer, plug it in once, and simply lift the drawer front to use it. No more hauling the mixer out, finding space on the counter, and wrestling with the cord. Other ideas include powering a hidden trash compactor or recycling bin drawer, a warm drawer for plates (with proper insulation and a dedicated appliance), or even a small coffee station where the machine sits inside the drawer, ready to brew with a simple pull. The key is matching the drawer’s size and location to the appliance’s needs.
Essential Tools and Materials You’ll Need
Before you make a single cut, gathering the right supplies is crucial. A well-stocked toolkit prevents frustrating mid-project trips to the hardware store and ensures a clean, professional result. The list isn’t overly long, but each item has a specific purpose. Using the wrong type of electrical box or a flimsy mounting bracket can lead to a wobbly outlet or, worse, an unsafe connection. Think of this as building a solid foundation—you wouldn’t build a house on sand, so don’t install an outlet on an unstable base.
Visual guide about How to Put an Outlet in a Drawer
Image source: cdn.shopify.com
Core Electrical Components
The heart of the project is the electrical box. You must use a “shallow old work” or “remodel” box. These are specifically designed for retrofit situations where you can’t access the space behind the wall from above (like from an attic or basement). They have flexible “wings” or clamps that tighten against the back of the drywall when you screw the box in, creating a secure mount. Measure your drawer’s depth carefully. Standard old work boxes are about 2.5 to 3 inches deep. If your drawer is shallower, you may need a specialized ultra-shallow box or have to modify the drawer’s back. You’ll also need a GFCI receptacle. Kitchens require Ground Fault Circuit Interrupter protection for all countertop outlets, and this extends to dedicated appliance circuits. A GFCI detects imbalances in current (like a shock hazard) and cuts power instantly. Don’t use a standard outlet here. Finally, get a cover plate. This is the finishing trim that screws to the outlet and covers the gap between the box and the drawer’s interior wall. You can choose a standard white or ivory plate, or even a paintable one to perfectly match your drawer’s interior.
Tools of the Trade
Your toolbox checklist should include: a stud finder (to locate any studs or pipes behind the wall where you’ll be cutting), a voltage tester (absolutely essential for safety), a utility knife (for scoring drywall), a drywall saw or keyhole saw (to cut the opening for the box), a drill with a long auger bit or flex bit (to drill through studs and fire blocks behind the wall to pull wire), needle-nose pliers (for bending and shaping wire), wire strippers (to remove insulation from wire ends), screwdrivers (flathead and Phillips), a level (to ensure your box is straight), and electrical tape. For wire, you’ll need a length of 12/2 NM cable (Romex) with ground, rated for a 20-amp kitchen circuit. Always match the wire gauge to the circuit breaker (12-gauge for 20 amps, 14-gauge for 15 amps).
Consumables and Finishing Touches
Don’t forget the small stuff. Wire nuts (color-coded by size) are a must for connecting wires safely. Have a few cable clamps or connectors that came with your old work box to secure the incoming cable. You might need a short pigtail (a short piece of wire) to connect the outlet’s ground or hot/neutral if your circuit wiring is in a different configuration. Drywall repair supplies—a small tub of joint compound and a putty knife—are wise to have on hand in case your cut isn’t perfect. Finally, consider cord management inside the drawer. Small adhesive-backed cable clips or a simple fabric sleeve can keep the appliance cord neatly coiled and out of the way when the drawer is closed.
Planning and Safety First: The Most Critical Phase
Rushing into a cut is the single biggest mistake in DIY electrical work. Proper planning is what separates a safe, code-compliant job from a hazardous one. This phase is about observation, verification, and understanding your home’s electrical system. Skipping it risks damaging your home’s wiring, creating a fire hazard, or getting a nasty shock. Take your time here. A well-planned project is a successful project.

Visual guide about How to Put an Outlet in a Drawer
Image source: thekitchenix.com
Locating the Perfect Spot and Checking for Obstructions
First, decide which drawer will become your power hub. Consider its depth and height. A deep drawer is better for bulky appliances. The outlet will typically be installed in the back panel of the drawer or, more commonly, in the wall behind the drawer at the height where the drawer’s front panel sits when closed. The latter is cleaner, as the outlet is hidden behind the drawer face. Use your stud finder on the wall *behind* the drawer’s location. Scan horizontally and vertically. Mark any studs, fire blocks, or plumbing pipes. You need to find a clear, open cavity between studs to install your electrical box without hitting anything. If your ideal spot hits a stud, you’ll need to move left or right a few inches. Also, look at the drawer’s construction. Does it have a solid wood back? A thin panel? You may need to drill a small hole in the drawer’s back to route the cord through, or plan to have the cord exit the front of the drawer and run along its side inside.
Identifying Your Power Source and Circuit Capacity
You can’t create power from nothing. You must tap into an existing, properly sized electrical circuit. The best source is an existing outlet on the same wall, ideally within a few feet vertically. You will be running a new cable from that source outlet to your new drawer outlet. This is the most technical part. You must ensure the circuit you’re tapping into has enough capacity for the additional load. Kitchen small appliance circuits are typically 20-amp circuits. The National Electrical Code (NEC) allows you to fill a circuit to 80% of its capacity for continuous loads. For a 20-amp circuit, that’s 16 amps. A standard kitchen circuit usually serves multiple countertop outlets. Use the “two-outlet rule” as a rough guide: if the circuit already powers 10 or more outlets, it may be near capacity, and adding another could overload it. If you’re unsure, consult an electrician. Overloading a circuit causes breakers to trip constantly and can overheat wires, posing a fire risk. Also, your new outlet must be on a dedicated GFCI-protected circuit or be a GFCI outlet itself. If the source outlet isn’t a GFCI, you must install one at the new location.
The Non-Negotiable Safety Protocol
Before you touch a single wire, you must perform these steps in order:
- Turn Off the Breaker: Go to your main electrical panel. Identify the breaker that controls the circuit you’re tapping into. Flip it to the OFF position. If the panel is unlabeled, turn on a radio plugged into the source outlet; you’ll hear it stop when you find the right breaker.
- Verify Power is Off: Return to the source outlet. Insert your non-contact voltage tester into each slot. It should NOT light up or beep. Then, use your multimeter or a plug-in receptacle tester to double-check. Never assume the breaker is correct.
- Secure the Breaker: If possible, tape a note over the breaker in the panel saying “WORK IN PROGRESS – DO NOT TURN ON” to prevent someone else from accidentally restoring power.
- Use Safety Gear: Wear insulated gloves and safety glasses. Work in a dry area. Have a fire extinguisher rated for electrical fires (Class C) nearby.
If at any point you are uncertain about the wiring, the circuit capacity, or local building codes, STOP and call a licensed electrician. The cost of a professional is far less than the cost of a fire or a severe shock.
Step-by-Step Installation Guide
With planning complete and power confirmed off, we move to the hands-on phase. This is where your careful measurements pay off. Go slowly, double-check each step, and don’t force anything. The process follows a logical flow: create the opening, mount the box, run the wire, make connections, and test. Each step builds on the last. A mistake in measuring the box hole will make mounting impossible. A loose wire connection will cause arcing and heat. Precision and care are your best tools.
Visual guide about How to Put an Outlet in a Drawer
Image source: thekitchenix.com
Step 1: Cutting the Wall Opening
With your old work box as a template, hold it against the wall at your pre-determined, obstruction-free location. The front edge of the box should sit flush against the drywall. Trace the outline firmly with a pencil. Now, using your utility knife, score along this line deeply. This prevents the drywall from chipping when you saw. Next, use your drywall saw or keyhole saw. Start cutting inside the scored line. Cut slowly and steadily, feeling for the resistance change as you break through the drywall. You’re cutting through about 1/2 inch of material. Once the initial cut is made, you can often push gently on the cut piece from behind the wall (if there’s cavity space) to knock it out, or cut the corners with the saw and pull the piece free. Keep the cut piece; you may need it for patching if your hole is oversized. Clean any rough edges from the hole with your utility knife.
Step 2: Feeding the Cable and Mounting the Box
This is the trickiest part: getting the new cable from your source outlet to the new hole. You will need to drill through any fire blocks or studs in the wall cavity. From the source outlet’s box, carefully pull the existing cable bundle aside. Using your long drill bit, drill a series of holes through the centers of any studs or blocks between the source and your new hole. Always drill through the center of the stud, at least 1.5 inches from the edge, to avoid nails or screws. You can now feed your new 12/2 cable from the new hole back towards the source. A helper with a vacuum cleaner with a long crevice tool can sometimes “vacuum” a wire tie attached to the cable through the cavity, but often you’ll need to fish it manually with a flexible bit or a fish tape. Once the cable is pulled through the new hole with several feet of slack, you can begin mounting the box. Feed the cable end through the knockout hole in the back of the old work box. Pull about 6 inches of cable into the box. Now, insert the box into the wall hole. You’ll feel resistance as the box’s “wings” hit the back of the drywall. Tighten the mounting screws on the box. As you do, the wings will clamp tightly against the drywall, securing the box firmly. Use your level to ensure the box is perfectly straight before the screws are fully tight. Trim any excess cable sheath with a utility knife, leaving about 1/2 inch of bare cable inside the box.
Step 3: Making the Wire Connections
Now, with both the source outlet box (power off!) and your new box accessible, you make the connections. The standard method is to add the new outlet onto the existing circuit by “pigtailing.” At the source outlet:
- Carefully pull the outlet out of its box (it’s held by screws). You’ll see wires connected to it: a black (hot), white (neutral), and bare copper or green (ground).
- Disconnect these wires from the outlet. You will now have a bundle of wires in the box: the incoming cable from the panel and the outgoing cable to other outlets.
- Take your new 12/2 cable and bring its end into this box.
- Using wire nuts, connect all the black (hot) wires together: the incoming, outgoing, and the new black. Do the same for all white (neutral) wires. Finally, connect all ground wires (bare/green) together. You may need to add a short green/bare pigtail to this ground bundle to connect to the source outlet’s ground screw.
- Carefully push all wires back into the source box and remount the original outlet. This outlet now feeds power to the new circuit.
- Strip about 3/4 inch of insulation from the ends of the black, white, and ground wires from your new cable.
- Connect the black wire to the brass (hot) screw terminal on the GFCI outlet. Connect the white wire to the silver (neutral) screw terminal. Connect the bare/green wire to the green ground screw.
- Ensure no copper is exposed beyond the screw terminals. Give each connection a gentle tug to ensure it’s secure.
- Carefully fold the wires back into the electrical box, ensuring the outlet’s mounting lugs clear the box’s edges.
- Screw the GFCI outlet to the box using the provided screws.
At your new drawer outlet box:
Step 4: Installing the Cover Plate and Final Wall Check
Screw your chosen cover plate onto the GFCI outlet. For a drawer application, you might use a standard plate or a “blank” plate if you want the outlet to be hidden entirely behind the drawer front. If the outlet is inside the drawer, you may want a low-profile plate. Once the outlet is secure, go back to your electrical panel. Do not restore power yet. Grab your receptacle tester. Plug it into the new outlet. It should indicate “open ground” or “wrong” because it’s not powered, but this confirms you have a physical connection. Now, you can restore power by flipping the breaker back on. Immediately return to the new outlet and test again with your receptacle tester. It should now show “correct” or “GFCI protected.” If it shows “open neutral” or “open hot,” turn the breaker off immediately and re-check your connections. If the GFCI trips immediately upon power-up, there is a short or ground fault—re-inspect all wiring. Once the tester shows correct wiring, press the “Test” and “Reset” buttons on the GFCI to ensure its internal mechanism works. Finally, patch any gaps around the electrical box on the wall with a little caulk for a clean look, especially if the outlet is behind a drawer front.
Finishing Touches and Aesthetic Considerations
The electrical work is done, but the project isn’t truly finished until the drawer itself is perfectly integrated. This is where you transition from a functional utility to a seamless part of your kitchen decor. The goal is for no one to even know there’s an outlet in there unless they need it. This involves thinking about how the drawer’s interior is finished, how cords are managed, and how the drawer operates with an appliance inside.
Modifying the Drawer for Power Access
How does the cord get out? You have two main options. Option 1: The Back Panel Exit. If your outlet is mounted on the wall behind the drawer, the cord will emerge from the wall into the drawer’s back. You’ll need to drill a hole in the drawer’s solid back panel, near the top or side, to feed the cord through. Use a hole saw bit for a clean round hole. You can then install a simple rubber grommet (available at hardware stores) to protect the cord from fraying against the wood edge. Option 2: The Front Panel Exit. This is cleaner if you want the cord to run along the outside of the drawer. Here, you mount the electrical box *inside* the drawer’s front frame. You’ll cut a hole in the drawer’s front panel for the outlet and cover plate. This requires more precise cutting of the drawer front but results in a very clean look where the outlet is visible only when the drawer is open. For either method, plan the cord’s path inside the drawer. Use adhesive-backed cable clips on the drawer’s interior sides to route the cord neatly to the outlet location. Consider a small cord wrap or sleeve to bundle excess cord length so it doesn’t dangle and jam the drawer.
Choosing the Right Drawer and Appliance
Not every drawer is a good candidate. A deep, full-extension drawer is ideal. Avoid shallow drawers (less than 6 inches deep) or drawers with complex slide mechanisms that might interfere with a bulky plug or cord. The drawer’s interior material matters too. A bare wood or melamine interior is easy to drill and modify. A drawer with a fabric liner might need the liner cut or removed around the outlet area. For the appliance, measure its cord length and plug size. Some large appliance plugs (like for a stand mixer) are bulky. Ensure your chosen drawer has enough clearance when closed—the plug must not press against the drawer back or the cabinet wall, which could damage the cord or connection over time. You may need to use a short, heavy-duty extension cord *inside* the drawer to position the plug away from pinch points, but ensure the total cord length doesn’t exceed safe limits for the appliance.
Integrating with Kitchen Decor
Your final step is making it look intentional. If the outlet is visible inside the drawer, consider painting the cover plate to match the drawer’s interior, or use a decorative plate. Some people install a small USB charging hub that sits over the outlet, providing multiple ports and a clean, tech-forward look. You can also add a small LED strip light inside the drawer, powered by the outlet, to illuminate contents—perfect for a charging station. The key is that the modification should feel like it was always part of the design. If you’re painting your cabinets, do so *before* installing the electrical components, or be meticulous with taping off the new outlet area.
Creative Ways to Use Your New Drawer Outlet
Once the technical work is done, the fun begins: dreaming up how to use this new feature. The possibilities extend far beyond a simple charging station. This is about enhancing your kitchen’s workflow and tailoring it to your family’s specific habits. Think about the tools and devices you use daily but hate to see on the counter. This hidden outlet is their new home.
The Ultimate Charging Hub
This is the most common and universally useful application. Dedicate one drawer—perhaps a shallow one near the breakfast area—as the family’s command center. Install a small, multi-port USB charging block (like an Anker or similar 40W+ model) into the outlet. Use short, braided cables for each family member’s devices. Add a small cable organizer tray or a 3D-printed holder to keep each phone or tablet upright and neatly separated. When devices are not in use, they sit docked and charging, invisible. No more “Where’s my charger?” frantic searches. For a more integrated look, you can even build a simple wooden insert for the drawer with slots to hold each device at a perfect viewing angle.
Appliance Docking Station for Heavy Tools
If you bake, cook, or craft, you have heavy, countertop-consuming appliances. A stand mixer is the classic example. It’s heavy, takes up prime real estate, and its cord is always in the way. By placing it in a deep drawer, you solve all this. The drawer becomes its permanent home. You simply pull the drawer open, plug the mixer into the now-ready outlet (use a short, dedicated cord if needed), and start mixing. When done, unplug, tuck the cord, and close the drawer. The counter is instantly clear. This works brilliantly for a food processor, immersion blender base, or even a heavy-duty electric kettle. Ensure the drawer is strong enough to hold the appliance’s weight and that the cord exit (from the back or front) allows the appliance to sit flat without straining the plug.
Hidden Coffee or Beverage Station
For the coffee aficionado, a dedicated coffee maker in a drawer is a sleek luxury. A small pod-based machine (like a Nespresso) or a compact pour-over setup with an electric kettle can fit in a medium drawer. Run the cord out the back. The drawer front becomes the “face” of your station. You could even attach a small, magnetic knife strip to the inside of the drawer front to hold a coffee scoop or stirrer. When you want coffee, open the drawer, add your pod or grounds, and press brew. The steam and aroma are contained, and the machine is out of sight when not in use. This concept also works for a hot water dispenser or a small smoothie blender.
Specialty and Seasonal Storage
Think beyond daily use. A drawer outlet is perfect for powering seasonal items you only use occasionally. Store a small holiday cookie press or electric carving knife in a drawer, ready for Thanksgiving and Christmas. Keep a handheld vacuum for quick crumb cleanups. Store a wax warmer or electric aromatherapy diffuser in a drawer by the dining area, pulling it out only when entertaining. This keeps rarely-used gadgets from cluttering your precious counter space year-round, yet makes them incredibly accessible when the time comes.
Conclusion: A Modern Upgrade with Lasting Value
Learning how to put an outlet in a drawer is more than just a DIY project; it’s an investment in the livability and value of your kitchen. It represents a shift from accepting standard layouts to actively customizing your space for your real-life habits. The benefits are immediate and tangible: a dramatically less cluttered countertop, a safer environment away from spills, and the sheer joy of having a hidden, dedicated power source exactly where you need it. While the process involves careful planning and a respect for electrical safety, the steps are logical and achievable for a confident DIYer with the right tools and mindset. Remember the golden rules: always verify power is off, use a GFCI, size your circuit correctly, and don’t hesitate to call a professional for the parts that make you uneasy. The moment you close that drawer on a tangle of cords and reveal a pristine countertop, you’ll understand why this upgrade is considered a hidden gem of kitchen remodeling. It’s the subtle, smart detail that makes a house feel truly modern and thoughtfully designed.
Frequently Asked Questions
Is it legal to install an outlet inside a drawer myself?
Yes, it is generally legal for a homeowner to perform this work on their own property in most jurisdictions, provided it meets the National Electrical Code (NEC) and local amendments. However, many areas require a permit for any new electrical work, and the work may need to be inspected. You must follow all code requirements, especially using a GFCI receptacle and ensuring the circuit isn’t overloaded. When in doubt, check with your local building department or hire a licensed electrician.
Can I tap into any existing outlet for my drawer outlet?
No. You can only tap into an outlet on a circuit that has sufficient capacity for the additional load. You must also ensure the circuit is a dedicated 20-amp small appliance circuit (common in kitchens) and that the wiring method (running through walls/ceilings) is allowed. You cannot tap into a lighting circuit or a circuit already near its maximum load. An electrician can perform a load calculation to be sure.
What gauge wire should I use for the new outlet?
For a kitchen small appliance circuit, you must use 12-gauge (12/2 with ground) NM cable. Kitchen circuits are typically 20-amp breakers, and 12-gauge wire is rated for 20 amps. Using thinner 14-gauge wire (rated for 15 amps) on a 20-amp circuit is a code violation and a fire hazard. Always match the wire gauge to the breaker’s amperage.
How do I hide the cord from the outlet to the appliance inside the drawer?
Plan the cord path during installation. The most common method is to have the cord exit the drawer’s back panel (via a grommeted hole) and plug into the wall-mounted outlet. Inside the drawer, use adhesive-backed cable clips on the sides or back to secure the cord in a neat loop or run. You can also use a fabric cord sleeve or a simple zip tie to bundle excess cord. Ensure the cord is not pinched by the drawer’s back or its slide mechanism when closing.
Do I really need a GFCI outlet for a drawer?
Absolutely, yes. The NEC requires GFCI protection for all outlets in kitchens, not just those above the counter. A drawer outlet is considered part of the kitchen’s countertop space and must be GFCI-protected. This is a critical safety feature that protects against electric shock, especially important in a room with water sources. You can install a GFCI receptacle at the drawer location or ensure the circuit is protected by a GFCI breaker upstream.
What is the estimated cost if I hire an electrician instead of DIY?
Costs vary widely by region and electrician, but for a simple retrofit like this (tapping into a nearby circuit, running a short cable, installing one GFCI outlet), you can expect to pay between $150 and $350 for labor and materials if the circuit has capacity. The price increases significantly if a new dedicated circuit from the panel is needed ($400-$800+), or if your home has outdated wiring (like knob-and-tube or aluminum). Always get a detailed quote. For the DIY route, material costs are typically $30-$75 for the box, outlet, cover plate, cable, and connectors.