Wire shelves offer fantastic visibility and airflow but can be tricky to organize. The key is to create zones, use the right containers to prevent items from tipping or falling through, and implement a clear labeling system. By assessing your space, decluttering completely, and using a mix of bins, baskets, and racks, you can build a pantry that is both highly functional and visually appealing. Consistent maintenance is the final step to keeping your wire shelf pantry perfectly organized long-term.
Let’s be honest: a pantry with open wire shelves can feel like a beautiful, breathable, and slightly terrifying storage solution. You can see everything! That’s the dream. But you also see every single cereal box slightly askew, bags of chips threatening to topple, and tiny packets of seasoning teetering on the brink of disaster. The gap between the wires is both a blessing for airflow and a curse for small items. If you’ve ever sighed at the sight of your wire shelf pantry, wondering how to make it work for you instead of against you, you’re in the right place. Organizing a pantry with wire shelves isn’t about fighting the shelves; it’s about working with them. It’s a project of containment, zoning, and clever use of accessories that transforms that grid of metal into a model of efficiency and calm. This guide will walk you through every single step, from the initial purge to the final label, so you can love your pantry again.
The philosophy is simple: wire shelves provide the skeleton. It’s up to you to give it a skin and a system. We’re going to build a pantry where every item has a designated home, where finding a jar of cumin is a 5-second task, and where the simple act of opening the door brings a sense of order instead of stress. Forget expensive custom cabinetry—your wire shelves are a blank canvas. With some strategic planning and a few key tools, you can create a pantry that is both supremely functional and surprisingly beautiful. Ready to roll up your sleeves? Let’s begin.
Key Takeaways
- Assess & Measure First: Before buying anything, measure your shelf dimensions and depth, and take inventory of what you actually store to plan your zones.
- Declutter Ruthlessly: Remove everything from the pantry. Toss expired items, donate unused foods, and consolidate duplicates to create a clean slate.
- Create Logical Zones: Group like items (baking, snacks, breakfast, canned goods) together in designated areas for intuitive access and efficient restocking.
- Contain Everything: Use bins, baskets, and containers with solid sides to prevent small items from falling through wire shelves and to create a uniform, tidy look.
- Label Relentlessly: Label every container, bin, and shelf edge. This is non-negotiable for maintaining order and helping every household member find and replace items correctly.
- Maximize Vertical & Door Space: Utilize shelf risers, over-the-door racks, and hanging baskets to exploit every inch of available storage space in your wire shelf pantry.
- Maintain Regularly: Schedule a quick 10-minute weekly reset to straighten items, check for spills, and ensure everything is in its designated zone.
📑 Table of Contents
- Step 1: The Great Pantry Assessment & Planning Phase
- Step 2: The Ruthless Declutter & Purge
- Step 3: Designing Your Pantry Zones
- Step 4: The Container Solution: What to Buy & Why
- Step 5: The Labeling Imperative
- Step 6: Final Placement, Styling & Maintenance
- Conclusion: Your Wire Shelf Pantry, Perfected
Step 1: The Great Pantry Assessment & Planning Phase
Before you buy a single bin or move one can, you must become the architect of your own pantry. Rushing into organization without a plan is how you end up with mismatched containers and wasted space. This phase is all about information gathering. It’s the least glamorous part, but it’s the foundation for a system that actually lasts.
Take Precise Measurements
Grab a tape measure. You need to know the exact width, depth, and height between each shelf. Wire shelves often have a slight lip or bracket at the front, so measure the usable depth from the back wall to the inner edge of that lip. Note the height clearance between shelves—this is crucial for determining how tall your containers can be. Write these measurements down in a notebook or on your phone. Also, measure the full interior width of the pantry to understand your total real estate.
Conduct a Full Inventory
Now, take everything out. Yes, everything. As you empty the pantry, sort items into broad categories on a table or the floor: Canned Goods, Baking Supplies, Pasta & Grains, Snacks, Breakfast Items (cereal, oatmeal), Spices, Sauces & Condiments, Paper Goods, Pet Food, etc. This isn’t about putting things away yet; it’s about seeing the full scope of what you own. Count how many soup cans you have. How many boxes of pasta? This inventory tells you what your zones will need to accommodate. You might discover you have seven half-used bags of flour. This is your wake-up call.
Analyze Your Habits & Family Needs
Think about who uses the pantry and how. Do you have small children who need snacks on a lower, accessible shelf? Is someone in a wheelchair? Is the pantry a high-traffic zone for morning coffee prep and after-school snacks? Place the most frequently used items at waist to eye level—the “golden zone.” Heavy items like bulk pet food or cases of water should go on the bottom shelf for safety and ease. Your pantry should serve your life, not the other way around.
Step 2: The Ruthless Declutter & Purge
With your inventory and zones in mind, it’s time for the purge. This is the make-or-break step for long-term success. A clean, organized pantry starts with only the items you actually use and love.
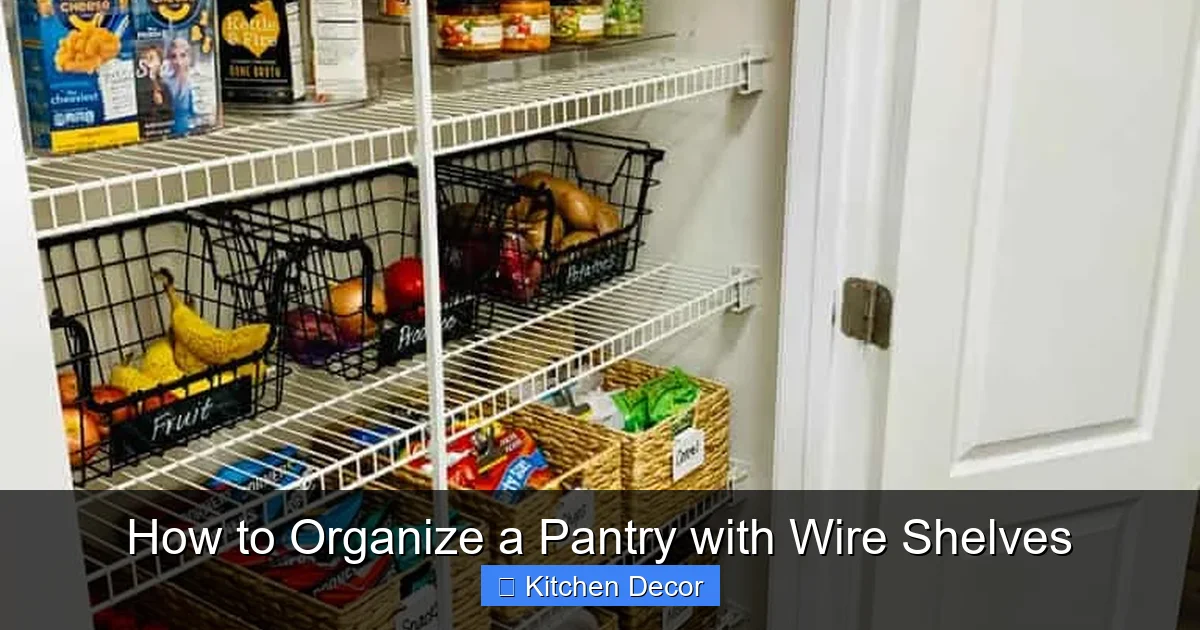
Visual guide about How to Organize a Pantry with Wire Shelves
Image source: organizedmarie.com
The Expiration Date Excavation
Go through every single package, can, and jar. Check “best by,” “use by,” and expiration dates. Be merciless. Toss anything expired. For items past their “best by” date but not expired, use your judgment. Is that five-year-old baking powder still potent? Probably not. When in doubt, throw it out. This is also the time to open suspicious packages. That bag of chips from last summer’s party? Check for staleness or bugs. This process can be gross, but it’s essential for a hygienic, fresh pantry.
The “Do I Use This?” Interrogation
For everything else, ask the hard questions. When was the last time I used this? Do I have a specific recipe in mind for this unique ingredient? Is this a healthy item or a “pantry filler” that’s undermining my goals? Be honest. If you haven’t used that giant can of creamed corn in two years, donate it to a food bank (if unexpired) or compost it. The goal is to reduce volume. A smaller collection of items you actually use is infinitely easier to organize than a crowded, chaotic hoard.
Consolidate and Combine
You likely have duplicates. Five boxes of the same tea? Three open bags of rice? Combine them into one container. For items that come in flimsy boxes (like cereal or crackers), consider transferring them to airtight containers now. This immediately makes them more stable and stackable on your wire shelves. Take a moment to wipe down all the shelves and the pantry walls with a damp cloth and a mild cleaner. You’ve earned a clean slate.
Step 3: Designing Your Pantry Zones
Now for the fun part: designing your layout. Your zones should be intuitive. When you need to bake a cake, all your flour, sugar, baking powder, and sprinkles should be in one general area. When you’re packing lunches, snack items should be together. This is the system that will dictate your container purchases.
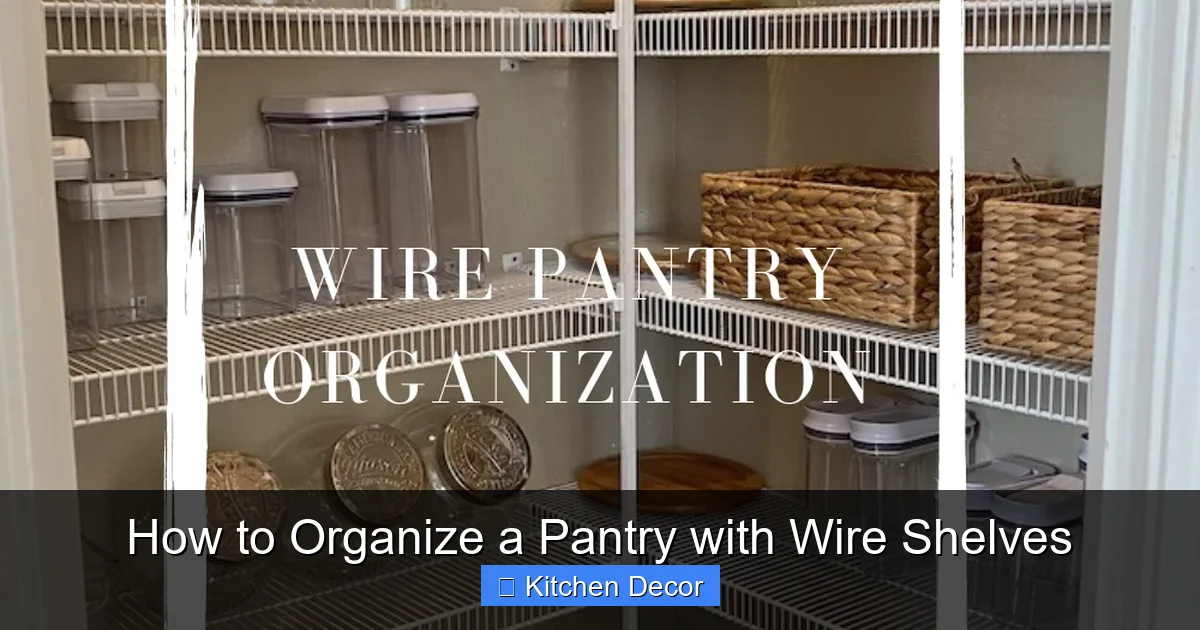
Visual guide about How to Organize a Pantry with Wire Shelves
Image source: i.pinimg.com
Common Zone Ideas for Wire Shelves
Baking Zone: Flour, sugar, baking powder/soda, vanilla, sprinkles, chocolate chips. This zone needs sturdy, airtight containers for dry goods.
Canned Goods Zone: All soups, vegetables, fruits, and beans. A deep shelf or a specialized can rack works well here. Consider a front-loading can organizer to see labels without moving cans.
Snack Zone: Chips, crackers, granola bars, nuts, popcorn. This is often a high-traffic area for kids. Use low, open bins for easy access.
Breakfast Zone: Cereal, oatmeal, pancake mix, syrup. Keep this at an accessible height for morning rush hour.
Spice Zone: This is critical. A dedicated spice rack or a tiered shelf insert on a shallow shelf is perfect. Spices are small and get lost easily on wire.
Pasta & Grain Zone: Spaghetti, elbows, rice, quinoa, lentils. Use tall, narrow containers.
Mapping Zones to Shelf Space
Look at your measured shelf plan. Which zones need more square footage? Baking supplies often take up significant space. Snacks might only need half a shelf. Assign zones to specific shelves. For example: Top shelf = least-used items (holiday baking supplies, overflow paper goods). Middle shelves = prime real estate for daily-use zones like Breakfast and Snacks. Bottom shelf = heavy, bulky items like pet food, cases of water, or bulk potatoes/onions in a basket. The door, if you have one, is prime space for a spice rack or small hanging organizer for frequently used items like oil or honey.
Step 4: The Container Solution: What to Buy & Why
This is the magic step for wire shelves. The right containers solve the two main problems: items falling through the gaps and looking messy. You need a mix of solutions.
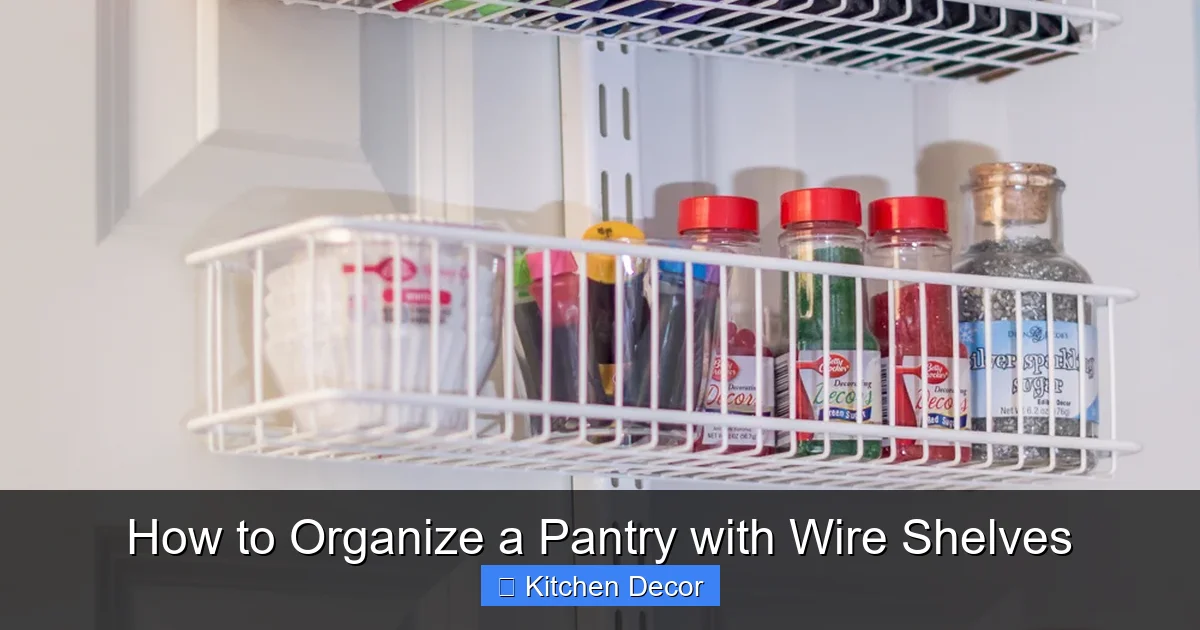
Visual guide about How to Organize a Pantry with Wire Shelves
Image source: kelleynan.com
Bins & Baskets: The Workhorses
These are your best friends. Use rectangular or square fabric bins or sturdy plastic baskets to create “sub-zones” within a shelf. For example, a large bin on a shelf can hold all your pasta and grain containers. A smaller bin can corral all the seasoning packets (taco mix, gravy packets, etc.). The bin contains the chaos. Key tip: Ensure the bins you choose have a solid bottom or a very tight weave. Flimsy fabric bins with large holes will still let small items like pasta or cereal pieces sift through onto the shelf below. Look for bins with reinforced bottoms. Place these bins on the shelf first, then fill them.
Airtight Canisters: For Dry Goods
For flour, sugar, rice, cereal, and coffee, invest in a set of uniform, airtight plastic or glass canisters. They keep food fresh, prevent pests, and stack beautifully on wire shelves. Their solid sides contain contents perfectly. The uniformity creates a clean, streamlined look that is visually calming. Choose a shape that maximizes your shelf depth—often a square or rectangle is better than a round canister on a deep shelf. Label these clearly.
Specialty Racks & Organizers
Don’t forget the accessories designed specifically for wire shelves!
- Can Racks: These can be front-loading (like a mini fridge door) or simple tiered racks that let you see labels without shifting cans.
- Spice Racks: Tiered shelf inserts that sit on your wire shelf, creating a stepped display so every spice label is visible. Some magnetize to the shelf if it’s metal.
- Wine Racks / Bottle Holders: Great for storing olive oil, vinegar, and wine bottles on their sides, preventing rolls.
- Shelf Risers: These double your usable space by creating a raised platform. Place a riser on a shelf, put shorter items (like spices or cans) underneath, and taller items (like cereal boxes) on top.
- Hanging Baskets: These hook onto the underside of a wire shelf, creating a “second shelf” below. Perfect for onions, potatoes, or fruit.
Step 5: The Labeling Imperative
You could have the most beautiful bins and perfect zones, but without labels, your system will collapse in a week. Labeling is the contract between you and your future self (and your family). It tells everyone where things belong.
What to Label
Label everything. The front edge of each shelf (e.g., “Canned Goods,” “Snacks”). The outside of every bin and basket. Every single canister. Use a label maker for crisp, professional, uniform labels. It’s a small investment that makes a huge difference. Alternatively, use a nice pen and adhesive labels, or chalkboard labels for a rustic look. Consistency is key—use the same font and style throughout.
How to Label Effectively
Be specific but concise. “Pasta” is okay, but “Pasta: Elbow, Spaghetti, Penne” is better. “Snacks” could be “Kids’ Snacks: Chips, Bars, Nuts.” For canisters, include the item and the date you filled it (especially for bulk items). This helps with rotation (“use the older flour first”). Label the front of the bin or canister so it’s readable from the front of the pantry. For shelf-edge labels, place them consistently—either all on the left or centered.
Making Labels Part of the Aesthetic
Don’t see labels as a chore; see them as a design element. A uniform row of crisp, white labels on clear canisters or black labels on natural fiber bins looks intentional, tidy, and professional. It signals that this space is cared for and organized. It’s a small detail that elevates the entire look from “storage” to “styled.”
Step 6: Final Placement, Styling & Maintenance
Now, bring it all together. Place your empty bins and canisters on the shelves according to your zone map. Fill them with the items from your sorted inventory. Stand back and assess.
Principles of Styling on Wire
Height & Visual Weight: Use shorter items in front and taller items in back within a bin to create a “layered” look so you can see everything. Place like items together by color if possible—all the red cans together, all the blue boxes—this creates visual rhythm.
The “One In, One Out” Rule: As you put items away, be mindful of space. If a new item doesn’t fit comfortably in its zone, it’s a sign you may need to declutter another category to make room.
Leave Breathing Room: Don’t cram shelves to absolute capacity. Leave a little wiggle room. It makes it easier to take things in and out and prevents the whole shelf from collapsing when you touch one item.
The Weekly 10-Minute Reset
Organization is not a one-time event; it’s a habit. Schedule a 10-minute pantry walk-through once a week, perhaps on grocery day. Do a quick scan: Are any bins spilling over? Are cereal boxes left open? Did someone put the pasta in the snack bin? Straighten, reseal, and gently correct any misfires. This tiny maintenance prevents the need for another massive purge and reorganization every six months. It keeps your system running smoothly.
Conclusion: Your Wire Shelf Pantry, Perfected
Organizing a pantry with wire shelves is a deeply satisfying project that pays dividends every single day. It turns a functional but frustrating space into a source of calm and efficiency. You’ve done the hard work: you assessed, purged, planned, contained, and labeled. You’ve transformed that grid of metal into a personalized, zone-based system that works for your family’s unique habits and needs. The open wire, once a source of anxiety, now offers perfect visibility—you can see every label, every container, and exactly where everything belongs. The airy design prevents moisture buildup, and the system you’ve built is adaptable. As your family’s needs change, you can easily swap zones or containers. You haven’t just organized a closet; you’ve built a foundational system for a more orderly kitchen and a less stressful home. Now, take a deep breath, open that pantry door, and enjoy the beautiful, functional order you’ve created. You’ve earned it.
Frequently Asked Questions
What are the best containers to use on wire shelves to prevent items from falling through?
The best containers are those with solid, sealed bottoms. Use rectangular fabric bins with reinforced bottoms, sturdy plastic baskets, or airtight canisters for dry goods. For very small items like spice packets or tea bags, use small, solid-sided drawer organizers or bins within a larger basket to create a nested system that contains everything securely.
How do I deal with the dust and crumbs that settle on wire shelves?
Regularly wipe down the shelves with a damp microfiber cloth. For crumbs, use a handheld vacuum or a small brush and dustpan. To minimize dust, keep all dry goods in airtight containers. Consider lining the back of the shelf with a thin, removable shelf liner that can be easily pulled out and shaken out or washed periodically.
Can I use wire shelves for heavy items like bulk pet food or cases of water?
Yes, but with caution. Wire shelves are typically very strong, but you must check the weight limit specified by the manufacturer. Always place the heaviest items on the bottom shelf to lower the center of gravity and prevent tipping or strain on the shelf supports. Use sturdy bins or keep items in their original, secure packaging on the bottom shelf.
What’s the best way to organize spices on a deep wire shelf?
A tiered spice rack insert is the gold standard. It sits directly on the wire shelf and creates a stepped display, allowing you to see every spice label without moving containers. For a more flexible solution, use a narrow, long bin to hold all your spice jars and place it at the front of the shelf. Alternatively, use a magnetic spice rack on the side of the shelf if it’s metal, or install a spice rack on the inside of the pantry door.
How do I make my pantry look “styled” and not just functional with wire shelves?
Uniformity is key. Use a matching set of containers (same color or material). Label consistently with a label maker. Group items by color within their zones. Use natural fiber baskets for a warm, organic look. Remove all commercial packaging by transferring items to clear or uniform containers. Finally, leave a little intentional empty space; it looks curated, not crowded.
What if my wire shelves are very deep and items get lost in the back?
This is a common problem! Use shelf risers to create a second level, bringing items forward. Use a “first-in, first-out” system by placing new items behind older ones. For deep shelves, consider using a pull-out basket or a lazy Susan (turntable) in the back corner. You can place a small, non-slip liner on the shelf and tilt it slightly backward so items gently slide to the front when you remove the item in front of them.