Properly installing your dishwasher drain hose to a double sink is crucial to prevent leaks, smells, and backflow. The process typically involves connecting the hose to either a garbage disposal inlet or the sink’s tailpiece, ensuring a high loop to prevent siphoning, and securing all connections. Always check local plumbing codes and test thoroughly with water before finishing. With the right tools and careful steps, this is a manageable DIY project for most homeowners.
Key Takeaways
- Identify Your Connection Point: Your drain hose will connect either to the dishwasher inlet on a garbage disposal or directly to the sink’s tailpiece if there is no disposal.
- The High Loop is Non-Negotiable: Securing the dishwasher drain hose in a high loop under the countertop is the single most important step to prevent sink water from backflowing into your dishwasher.
- Use the Correct Fittings and Sealants: A hose clamp and, if needed, a appropriate adapter (e.g., 7/8″ to 1-1/2″) are required. Use plumber’s putty or thread sealant on threaded connections to ensure a watertight seal.
- Test Before You Finish: Always run a test cycle with the dishwasher empty and check all connection points for leaks before securing the hose permanently or installing the dishwasher panels.
- Mind Local Codes: Some areas require an air gap device for dishwasher drains. Check your local plumbing code to ensure your installation method is compliant.
- Prepare the Area: Clear everything from under the sink, turn off the water and power to the dishwasher, and have towels ready before starting.
- Kinks Are the Enemy: Ensure the drain hose has a smooth, gradual path without any sharp bends or kinks that could restrict wastewater flow.
📑 Table of Contents
- Introduction: Why This Connection Matters
- Understanding Your Double Sink’s Drain Setup
- Tools and Materials: Your Shopping and Prep List
- Step-by-Step Installation: Connecting to a Garbage Disposal
- Step-by-Step Installation: Connecting to a Tailpiece (No Disposal)
- Step 5: Final Connections, Testing, and Troubleshooting
- Maintenance and Best Practices for Long-Term Success
- Conclusion: Confidence Through Preparation
Introduction: Why This Connection Matters
So, you’ve got your shiny new dishwasher, or maybe you’re reinstalling an old one after a kitchen remodel. You’ve got the water lines sorted, the power is ready, but that last pesky drain hose is just dangling. Connecting it to a double sink might seem like a simple final step, but doing it wrong is a one-way ticket to a kitchen floor covered in dirty, soapy water, or worse, a smelly, unhygienic dishwasher. The goal is simple: create a secure, leak-proof path for your dishwasher’s dirty water to exit, while making absolutely sure that water from your sink can never, ever find its way back in. This guide will walk you through every single step, from identifying your sink’s configuration to the final tighten of a hose clamp. We’ll talk about garbage disposals, tailpieces, air gaps, and the legendary high loop. By the end, you’ll approach this task with confidence, not dread.
Understanding Your Double Sink’s Drain Setup
Before you buy a single fitting or move a wrench, you need to know exactly what you’re connecting to. A standard double sink has two separate drain setups that usually merge into a single waste line leading to the P-trap and out of your house. There are two primary configurations you’ll encounter. Getting this right is the foundation of the entire installation.

Visual guide about How to Install Dishwasher Drain to Double Sink
Image source: theplumbero.com
Scenario 1: The Garbage Disposal Connection (Most Common)
This is the setup you’ll find in the vast majority of modern kitchens with a double sink. One bowl (usually the one on the right) has a garbage disposal mounted underneath it. The disposal has a dedicated inlet port, often called the “dishwasher inlet,” specifically designed for this purpose. It’s a 1-inch or 1-1/4-inch threaded nipple, usually located on the side or top of the disposal unit, near where the drain pipe connects. The dishwasher drain hose connects here. The disposal then grinds up any food particles from the dishwasher and pumps everything out with its own powerful motor.
Scenario 2: The Tailpiece Connection (No Disposal)
If your double sink has no garbage disposal, you’ll be connecting to the sink’s tailpiece. The tailpiece is the short, vertical pipe that hangs down from the sink’s drain basket. On a double sink, the tailpieces from each bowl connect to a horizontal “tee” fitting, which then runs to the P-trap. You will connect the dishwasher drain hose to this horizontal tee or, more commonly, to a dedicated “wye” or “air gap” fitting that is installed on the tailpiece between the sink and the tee. This setup requires more careful planning to ensure the high loop is effective and to prevent any chance of backflow from one sink bowl to the dishwasher.
What About an Air Gap?
An air gap is a small, cylindrical device that mounts on the countertop or sink rim. It has two hoses: one from the dishwasher (inlet) and one to the drain (outlet). Its physical presence creates an unbreakable air seal, making backflow impossible. Some local plumbing codes mandate an air gap for dishwasher drains. If you have one installed, your job is simply to connect one hose to the dishwasher and the other to the sink’s drain tailpiece or disposal inlet. We’ll cover this in the troubleshooting section.
Tools and Materials: Your Shopping and Prep List
Having everything you need within arm’s reach will make this a smooth, frustration-free project. Don’t start until you’ve gathered the following. A quick trip to the hardware store now saves multiple trips later.

Visual guide about How to Install Dishwasher Drain to Double Sink
Image source: thekitchenix.com
Essential Tools
- Adjustable Wrench or Channel Lock Pliers: For tightening nuts on the disposal inlet or tailpiece connections. A small basin wrench can be a lifesaver in the tight space under the sink.
- Screwdriver: Both flathead and Phillips. For securing hose clamps and possibly removing a disposal knock-out plug.
- Flashlight or Headlamp: It’s always dark and cramped under the sink. You need to see what you’re doing.
- Bucket or Large Bowl: To catch any residual water in the drain pipes when you disconnect them.
- Towel or Rags: For cleanup and to dry connections.
- Utility Knife or Scissors: To trim the drain hose if necessary.
- Drill (Optional): If you need to create a new hole in a cabinet wall for the drain hose to pass through.
Essential Materials & Fittings
- Dishwasher Drain Hose: Your dishwasher likely came with one. It’s typically 5/8″ or 7/8″ in inner diameter. If it’s damaged or too short, replacements are inexpensive.
- Hose Clamps: At least two, stainless steel screw-type. One for the connection to the sink/disposal, one for securing the high loop.
- Adapter Fittings (If Needed): This is the most common point of confusion. You may need a dishwasher inlet adapter (e.g., 7/8″ hose to 1″ NPT thread) or a tailpiece adapter (e.g., 1-1/2″ slip nut to 7/8″ hose). Take a photo of your connection point to the hardware store for a perfect match.
- Plumber’s Putty or Thread Seal Tape (Teflon Tape): Putty for sink strainer/tailpiece joints, tape for threaded pipe connections (like on a disposal inlet).
- Air Gap Device (If Required): A simple, inexpensive part if your code calls for it.
Step-by-Step Installation: Connecting to a Garbage Disposal
Let’s tackle the most common scenario. Remember: safety first. Turn off the dishwasher’s power at the breaker and shut off its water supply valve under the sink before starting.
Visual guide about How to Install Dishwasher Drain to Double Sink
Image source: thekitchenix.com
Step 1: Prepare the Disposal Inlet
Locate the dishwasher inlet on your garbage disposal. It’s a threaded nipple, often with a small plastic cap or knockout plug. If there’s a plastic cap, simply unscrew it by hand. If it’s a knockout plug (a metal disc inside the threaded opening), you’ll need to knock it out. This is a critical step. Find the small square indentation on the side of the plug. Use a hammer and a flathead screwdriver to firmly tap the indentation, breaking the disc inward. You’ll hear it fall into the disposal’s grinding chamber. Use a flashlight to confirm the hole is clear. Note: If you ever sell the house, you should reinstall the knockout plug if the new owner doesn’t have a dishwasher.
Step 2: Install the Adapter (If Required)
Your dishwasher drain hose likely has a 7/8″ inner diameter. The disposal inlet is usually 1″ NPT (National Pipe Thread) thread. You’ll need a reducing adapter that screws onto the disposal’s male threads and provides a smooth barbed or threaded outlet for the hose. Hand-tighten the adapter onto the disposal inlet, then give it a solid quarter-turn with a wrench. Don’t overtighten and crack the disposal’s housing.
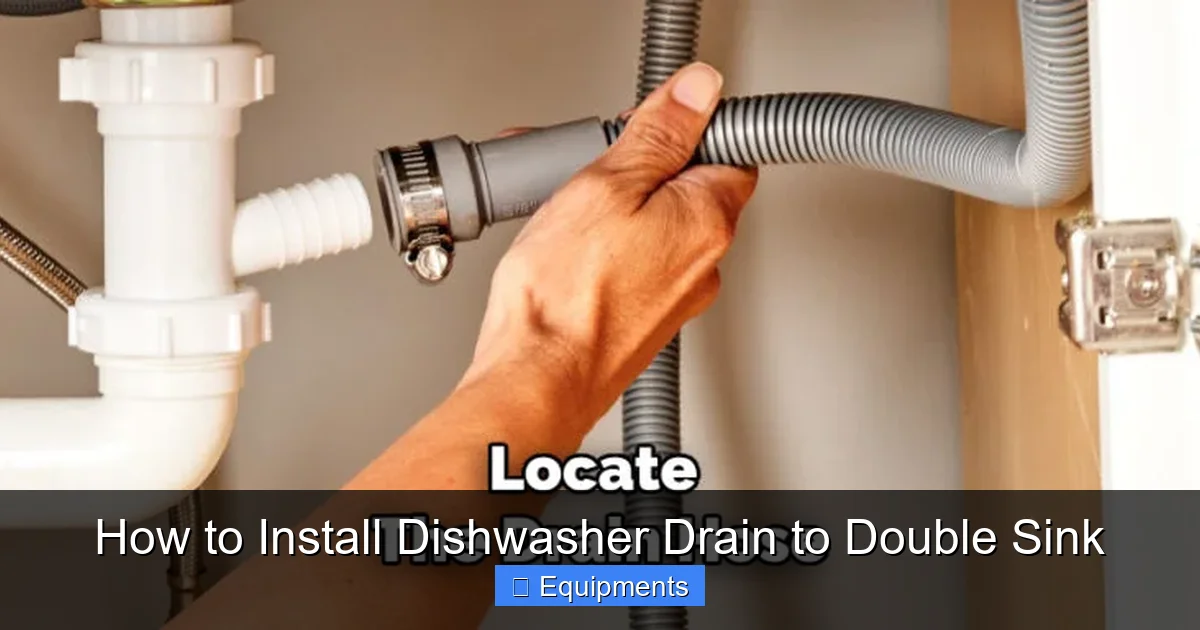
Step 3: Attach the Drain Hose
Slide a hose clamp onto the end of your dishwasher drain hose. Fit the hose firmly over the barbed end of the adapter (or directly onto the disposal inlet if no adapter is needed). The hose should go on at least 1-1/2 inches for a good seal. Position the hose clamp about 1/4 inch from the end of the hose and tighten it securely with a screwdriver. You should feel a firm, even compression. Give the hose a good tug to ensure it’s not going to slip off.
Step 4: Create and Secure the High Loop
This is the step that prevents disaster. The high loop is a simple arch in the drain hose that must be secured at its highest point, which should be at least 20 inches above the floor (or higher than the bottom of the sink). The purpose is to create a siphon break. If the hose just drooped into the sink drain, dirty sink water could siphon back up into your dishwasher when the disposal or sink is draining.
- Run the drain hose from the disposal, up and over to the side, and then back down to its final destination. The highest point of this arch must be well above the sink’s drain line.
- Use a second hose clamp and a sturdy screw or hook attached to the underside of the countertop or a cabinet wall to secure the hose at this peak. The clamp should hold the hose firmly in its arched position. You can also use a special “high loop” bracket or a length of wire (like a coat hanger) formed into a hook.
- From this high point, the hose can then run down to connect to its final point (often the same disposal inlet, using a “Y” fitting, or to a separate tailpiece). The key is that the arch itself is fixed and does not sag.
Step-by-Step Installation: Connecting to a Tailpiece (No Disposal)
If you don’t have a disposal, your connection point is the horizontal pipe (tailpiece) between the two sink bowls and the P-trap. This is often a 1-1/2″ PVC or brass pipe. You’ll need a different adapter.
Step 1: Install a Tailpiece Adapter or Wye
You need a fitting that taps into the existing tailpiece. The most common is a 1-1/2″ slip-joint tailpiece adapter. This fitting has a slip nut that fits over the existing tailpiece and a threaded outlet for your dishwasher hose. You may also find a “wye” fitting that creates a new branch.
- Unscrew the slip nut from the adapter. Slide it onto the existing tailpiece, followed by the rubber washer (beveled side facing the sink).
- Push the adapter onto the tailpiece until it seats against the sink’s drain fitting.
- Hand-tighten the slip nut underneath. Then use a basin wrench to give it a final snug turn. Do not overtighten and crack the porcelain sink fitting.
- If your adapter has a threaded outlet, wrap it with Teflon tape (clockwise) and screw on any necessary reducing bushing or connect the hose directly if sizes match.
Step 2: Connect the Hose and Form the High Loop
The process is the same as with the disposal: attach the hose with a clamp, but the high loop is even more critical here because there’s no disposal grinding chamber to act as a minor barrier. You must secure the hose’s peak so it’s higher than the sink’s flood rim (the top edge of the sink bowl). This is the absolute maximum water level the sink can hold. If your high loop is lower than this, a completely backed-up sink could still overflow into the dishwasher. Secure this loop meticulously to the cabinet wall or back wall.
Step 5: Final Connections, Testing, and Troubleshooting
With the hose connected and the high loop secured, it’s time for the moment of truth.
Reassemble and Power Up
Ensure the other end of the drain hose is properly connected to your dishwasher’s drain outlet (usually a simple clamp-on connection at the back of the unit). Make sure all water supply lines are tight. Turn the water supply valve back on. Restore power to the dishwasher at the breaker. Do not install the dishwasher’s toe-kick panel or fully secure it to the cabinet yet—you need access.
The Crucial Test Cycle
Run the dishwasher on a short cycle (rinse or quick wash) with no dishes and no detergent. You just want to pump a small amount of water through the system. As it runs, get under the sink with a flashlight. Watch every connection point: the adapter on the disposal or tailpiece, every hose clamp, and the P-trap itself. Look for any drips or seeps. Also, listen. Gurgling sounds from the sink drain are normal. Hissing or spraying sounds indicate a restriction or loose connection.
Common Issues and Fixes
- Leak at the Disposal Adapter: Tighten the adapter a bit more. If it persists, the threads may be cross-threaded or the disposal housing cracked (rare). Re-seat the adapter with fresh Teflon tape.
- Leak at the Hose Clamp: The hose may not be seated far enough on the barb. Loosen the clamp, push the hose on further, and retighten. Ensure the clamp is positioned correctly over the barbed area.
- Water Backing Up into Sink: This is a high loop failure. The loop is too low or not secured, allowing a siphon. Re-secure the hose higher. Check for kinks downstream of the loop.
- Dishwasher Not Draining: Could be a kink in the hose, a clog in the disposal inlet (run the disposal with cold water), or a clog in the sink’s drain line. Disconnect the hose from the adapter and blow into it to check for obstruction.
- Bad Smells: A proper high loop and secure connection should prevent sewer gases from entering the dishwasher. If smells persist, the P-trap may be dry (run water in the sink) or there could be a venting issue.
Maintenance and Best Practices for Long-Term Success
You’ve installed it, tested it, and it’s leak-free. Great! But your job isn’t entirely done. A little periodic maintenance will keep this connection reliable for years.
Annual Inspection
Once a year, pull the dishwasher out slightly (unplug it first!) and visually inspect the entire length of the drain hose. Look for cracks, brittleness, or small animal chew marks. Check the hose clamps for rust and tightness. Ensure the high loop is still securely fastened and hasn’t sagged over time.
Keeping it Clean
Food particles can build up in the disposal inlet or the tailpiece adapter. Periodically, remove the dishwasher drain hose from its connection (have a bucket ready) and use a small bottle brush or a straightened wire coat hanger to gently clean out the inlet port. Run your disposal with cold water and a few ice cubes to scour its interior. You can also pour a mix of baking soda and vinegar down the sink drain followed by hot water to help dissolve organic gunk in the pipes.
When to Call a Professional
While this is a classic DIY project, there are times to call a plumber. If you discover your sink’s drain lines are severely corroded, if you have no idea where the drain goes and suspect it’s not properly vented, if local code explicitly requires an air gap and you’re unsure how to install it, or if you simply feel uncomfortable working with plumbing and electrical systems in a confined space, a professional can ensure it’s done safely and to code. The cost of a service call is far less than repairing water damage from a failed installation.
Conclusion: Confidence Through Preparation
Installing a dishwasher drain to a double sink is a satisfying project that demystifies a critical part of your kitchen’s plumbing. The core principles are universal: find the correct connection point, use the right adapter, and absolutely, positively create and secure a high loop. Take your time, work methodically, and test thoroughly before declaring victory. A properly installed dishwasher drain is silent, invisible, and reliable—exactly how you want it. It handles the dirty work so you can enjoy clean dishes without a second thought. Now, go ahead, get under that sink, and make that connection with confidence. You’ve got this.
Frequently Asked Questions
Can I connect my dishwasher drain directly to the sink drain without a garbage disposal?
Yes, you connect to the sink’s tailpiece using a special slip-joint adapter. This adapter screws onto the existing tailpiece between the sink and the P-trap, providing a threaded outlet for your dishwasher hose. The high loop is especially important in this configuration.
What is the “high loop” and why is it so important?
The high loop is an arch in the dishwasher drain hose that is secured at its highest point, which must be higher than the sink’s flood rim. It acts as a siphon break. Without it, water from a clogged or full sink can siphon backwards into your dishwasher, filling it with dirty, contaminated water.
My dishwasher hose is too short. What should I do?
>Do not stretch or kink the hose. Purchase a new, correct-length dishwasher drain hose. They are inexpensive and designed for this purpose. Using a hose that’s too short will strain the connection and likely cause leaks.
Do I need an air gap if I have a garbage disposal?
It depends on your local plumbing code. Many areas allow the “high loop” method as an alternative to a physical air gap device when connected to a garbage disposal. However, some jurisdictions still require an air gap. Always check your local code. An air gap provides the highest level of backflow protection.
The connection to my disposal is leaking. Is it okay to just tighten it more?
You can try tightening it a quarter-turn more. If it still leaks, unscrew it, check the threads for damage or debris, re-wrap with fresh Teflon tape (if it’s a threaded connection), and reinstall. Overtightening can crack the disposal’s housing, so snug is the goal, not “cranked.”
My dishwasher smells musty even after cleaning. Could the drain be the issue?
Yes, a common cause is a lack of a proper high loop, allowing dirty sink water to sit in the drain hose. Another cause is a kink or clog in the hose preventing water from fully draining, leaving stagnant water. Verify your high loop is correct and check the hose for obstructions or sags.
