Cleaning the suction motor on your Shark Ion Robot is a critical maintenance task that restores lost suction power and prevents damage. Unlike standard filters, the motor chamber requires careful disassembly and dry cleaning methods to avoid harming internal components. This guide provides a detailed, safe process using simple tools to remove hair, dust, and debris from the motor fan and housing, ensuring your robot runs efficiently for years.
Is your trusty Shark Ion Robot vacuum cleaner starting to feel more like a gentle breeze than the powerful cleaning dynamo it used to be? That frustrating loss of suction is often the first sign that your robot’s heart—its suction motor—is struggling under a blanket of dust, hair, and debris. While emptying the dustbin and rinsing filters are routine, many owners overlook the most critical component: the internal suction motor and its fan assembly. Cleaning this area is not just about restoring power; it’s a vital part of Shark Ion Robot maintenance that protects a costly component from premature wear and failure. This comprehensive, step-by-step guide will walk you through the entire process of safely accessing, inspecting, and cleaning your Shark Ion Robot’s suction motor, using simple tools and careful techniques. Let’s get your robot back to its peak performance.
Key Takeaways
- Power Disconnection is Mandatory: Always remove the robot from its charging base and ensure it is completely powered off before any internal cleaning to prevent electrical shock or motor damage.
- Dry Cleaning Only: The suction motor and its internal components must never be exposed to water or liquid cleaners. Use only dry tools like compressed air, soft brushes, and hand tools.
- Target the Fan and Housing: The primary cleaning targets are the motor fan blades and the surrounding housing, where hair and fiber wrap create the most common clogs and strain.
- Filter Maintenance is Complementary: Cleaning the motor is not a substitute for regularly washing and replacing the main and pre-motor filters, which are the first line of defense for the motor.
- Reassembly Must Be Secure: Ensure all screws, clips, and seals are properly replaced and tightened to maintain the robot’s suction integrity and prevent dust leaks.
- Regular Schedule Prevents Major Clogs: Performing a motor inspection and light cleaning every 1-2 months, depending on usage and home environment, prevents severe blockages.
- Know When to Seek Help: If you notice grinding noises, burning smells, or complete power failure after cleaning, the motor may be damaged and require professional assessment.
📑 Table of Contents
- Why Cleaning the Suction Motor is Non-Negotiable
- Essential Tools and Safety Precautions
- Step-by-Step Disassembly: Gaining Access to the Motor
- The Deep Clean: Motor Fan and Housing
- Reassembly, Testing, and Complementary Maintenance
- Establishing a Proactive Maintenance Routine
- Troubleshooting: When Cleaning Isn’t Enough
Why Cleaning the Suction Motor is Non-Negotiable
Before we dive into the “how,” understanding the “why” is crucial for long-term care. The suction motor in your Shark Ion Robot is a high-speed, brushless electric motor that drives a fan to create the powerful airflow that lifts dirt from your floors. This fan, typically made of plastic, spins at thousands of RPMs. As air is pulled through the system, fine dust particles pass through the filters, but larger debris like pet hair, carpet fibers, and human hair have a nasty habit of wrapping around the motor shaft and fan blades.
The Domino Effect of a Dirty Motor
When hair and grime accumulate on the motor fan, it creates an imbalance. The fan becomes heavier and struggles to spin at its designed speed. This has a direct, negative impact on suction power. But the problems don’t stop there. The extra strain on the motor forces it to work harder, generating more heat. Prolonged operation under this strain can lead to premature bearing wear, reduced motor efficiency, and in severe cases, complete motor failure. A burnt-smelling motor is often a motor that has been choked by debris for too long. Regular motor cleaning breaks this cycle, ensuring efficient airflow, optimal battery usage (the motor is the biggest battery drain), and a significantly extended lifespan for your robot.
What Happens If You Ignore It?
Ignoring motor cleaning leads to a steady decline in performance. You’ll notice the robot leaving more debris behind, especially on carpets. It may run for shorter periods between charges as the motor labors. Eventually, the accumulated debris can cause a physical jam, stopping the fan entirely. This can trigger error codes or cause the robot to shut down to protect itself. At this point, the repair often involves a complete motor replacement, a cost that can approach or exceed the value of an older robot. Proactive cleaning is the cheapest and most effective form of repair.
Essential Tools and Safety Precautions
Approaching this task with the right tools and a safety-first mindset is essential. This is not a wet-cleaning job; water and electronics are a catastrophic mix. All cleaning must be done with dry methods.
Visual guide about How to Clean Suction Motor on Shark Ion Robot
Image source: i.ytimg.com
Your Cleaning Toolkit
Gather these items before you begin for a smooth, uninterrupted process:
- Precision Screwdriver Set: Shark Ion Robots use a mix of Phillips-head and Torx screws (often T8, T10). A set with various sizes is best.
- Soft-Bristled Brushes: A small, clean paintbrush or makeup brush is perfect for dislodging dust. An old, clean toothbrush is excellent for scrubbing in tight spaces.
- Compressed Air (Can or Compressor): The single most effective tool for blowing out entrenched dust and hair from the motor housing and fan blades. Use short bursts.
- Handheld Vacuum with Crevice Tool: To immediately suck up the dislodged debris instead of letting it resettle inside the robot.
- Tweezers or Needle-Nose Pliers: For meticulously pulling out long hairs and fibers that have wrapped around the motor shaft.
- Flashlight or Headlamp: The interior is dark. A good light source is non-negotible for seeing what you’re doing.
- Magnetic Mat or Small Container: To keep the tiny screws safe and organized. Losing one can mean you can’t reassemble the robot properly.
- Microfiber Cloth: For wiping down the exterior and any plastic housing parts.
Critical Safety First Steps
1. Power Down Completely: Place the robot on its side on a soft towel. Press and hold the power button until it shuts off. Do not rely on it just being on the charger. Then, physically remove it from the charging base. This ensures zero power flow.
2. Work in a Clean, Well-Lit Area: A cluttered workspace leads to lost screws and re-introduced dust.
3. Handle Components with Care: The motor itself is a sealed unit. You are cleaning around it and the fan attached to its shaft. Do not try to disassemble the motor casing itself.
4. Patience is a Virtue: Rushing can lead to stripped screws, broken plastic clips, or missed debris. Set aside 30-45 minutes for your first time doing this.
Step-by-Step Disassembly: Gaining Access to the Motor
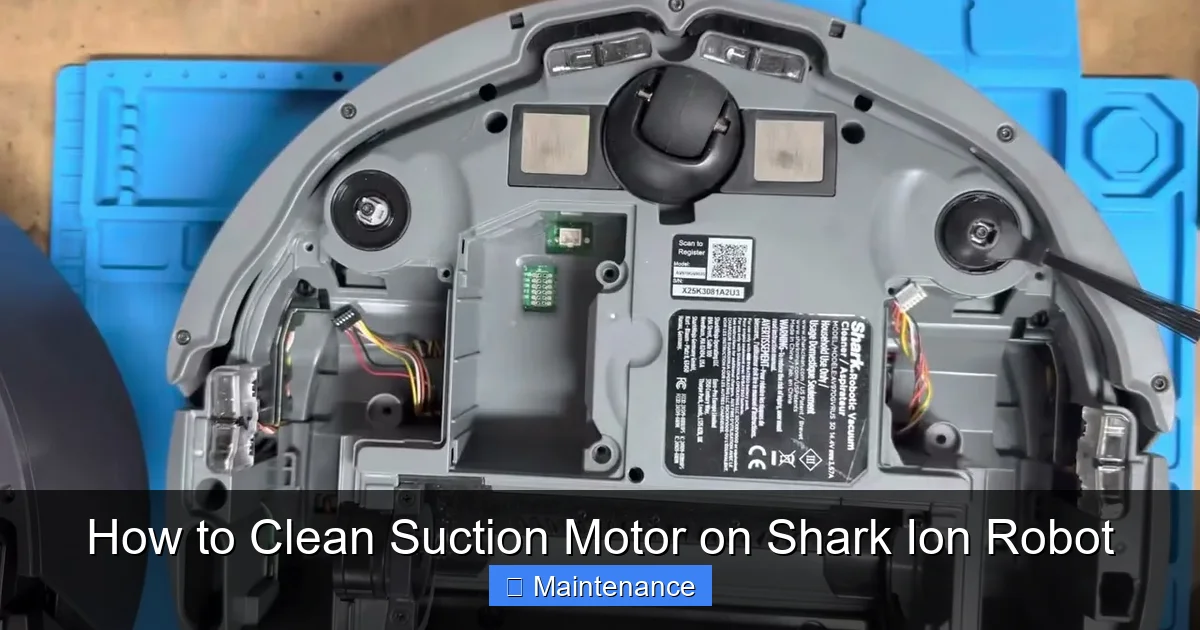
The exact screw locations can vary slightly between Shark Ion Robot models (e.g., RV750, RV850, etc.), but the general process is universal. The access point is almost always on the underside of the robot.

Visual guide about How to Clean Suction Motor on Shark Ion Robot
Image source: diysmarthomehub.com
1. Remove the Dustbin and Bottom Plate
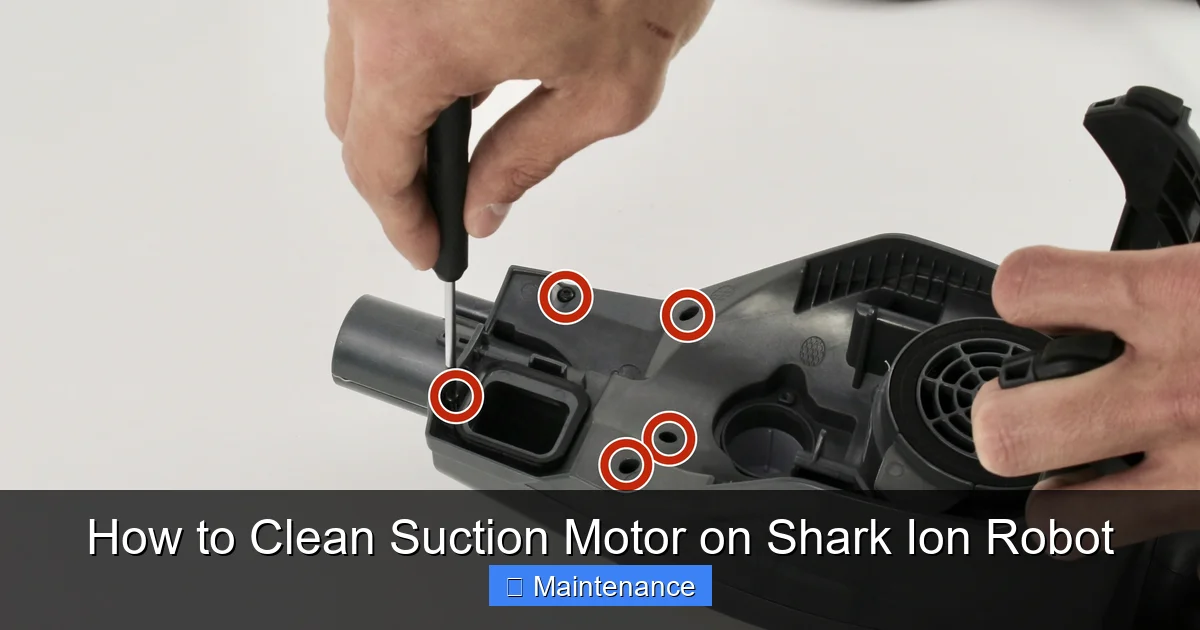
Start by pressing the release buttons on the dustbin and lifting it out. Set it aside. On the underside, you will see a large, rectangular bottom plate (often gray or black) that covers the brushes and main suction opening. This plate is secured by multiple screws, typically 4-6, around its perimeter and sometimes in the center. Using your correct-sized screwdriver, remove all of these screws. Keep them in your magnetic container. Gently pry the bottom plate off. It may be held by plastic clips, so a gentle wiggle with a plastic pry tool (or a fingernail) can help. Once loose, lift it away and set it aside.
2. Exposing the Brush Roll and Motor Chamber
With the bottom plate off, you’ll see the brush roll (the cylindrical brush with rubber bristles). This is not our target yet. Look toward the rear or center of the opening. You should see a smaller, secondary plastic cover, often black, that sits over the area where the main suction duct connects to the motor housing. This is the motor access cover. It is usually secured by 2-4 smaller screws. Remove these screws carefully. Some models may use Torx screws here. Once the screws are out, this cover should pop or slide off, revealing the fan and motor shaft.
3. Visual Inspection Before Cleaning
Now you have your first look at the heart of the matter. Use your flashlight. You will likely see a plastic fan (typically white or light gray) attached to a metal motor shaft. The space between the fan blades and the surrounding plastic housing is probably packed with a dense mat of hair, carpet fibers, and grayish dust bunnies. This is the primary blockage. You may also see dust caked on the inside walls of the motor housing. This visual confirmation underscores the need for this cleaning.
The Deep Clean: Motor Fan and Housing
This is the core task. Remember: dry methods only.
Visual guide about How to Clean Suction Motor on Shark Ion Robot
Image source: d3nevzfk7ii3be.cloudfront.net
Technique 1: The Hair & Fiber Extraction
Before using air, mechanically remove the large, tangled masses. Using your fingers, tweezers, or pliers, gently but firmly grab the ends of the hair/fiber mats and pull them out. Do not use metal tools to pry or scrape aggressively against the fan blades or housing. You risk scratching the plastic or bending the delicate fan blades, which will cause severe imbalance and noise. Work your way around the circumference of the fan, pulling out long strands. For hair wrapped tightly around the motor shaft itself (where the metal shaft meets the fan), use the tip of your needle-nose pliers to carefully tease it off. This is meticulous work but crucial.
Technique 2: Compressed Air Blow-Out
With the bulk of the material removed, it’s time for the air. Insert the straw nozzle of your compressed air can into the motor housing opening. Hold the can upright to avoid liquid propellant spray. Use short, controlled bursts of air. Aim the stream to hit the fan blades and the housing walls. You’ll see clouds of fine dust erupt. Rotate the fan by hand (if possible) to bring different blade surfaces into the airstream. The goal is to dislodge all the fine, caked-on dust that your fingers can’t reach. Always blow from the inside out if possible, to push debris away from the motor bearings. Have your handheld vacuum on standby with the crevice tool ready to immediately suck up the dust as it becomes airborne. This prevents it from settling deeper into the robot’s chassis.
Technique 3: Brush and Final Vacuum
Use your soft-bristled brush to sweep along the inside walls of the motor housing and around the base of the motor shaft. This will agitate any last clinging particles. Follow immediately with the vacuum’s crevice tool to remove them. Give the entire exposed area one final once-over with the vacuum nozzle to ensure it is pristine. The fan blades should spin freely by hand with no resistance or gritty feeling. The housing walls should be visibly clean.
Reassembly, Testing, and Complementary Maintenance
Do not reassemble until you are 100% sure the motor area is clean and dry (though it should be dry by default).
Secure Reassembly Steps
Reassembly is simply the reverse of disassembly, but attention to detail is key.
- Place the motor access cover back over the opening. Ensure it seats correctly in any plastic guides or clips.
- Insert all the screws you removed from the cover. Hand-tighten them first to avoid cross-threading, then use your screwdriver for a snug, secure fit. Do not overtighten and crack the plastic.
- Position the main bottom plate over the brush roll area. Align it carefully with the screw holes and any clips along the edge. Insert all perimeter screws and tighten.
- Reinstall the brush roll if you had to remove it (some models require its removal for bottom plate access). Ensure it spins freely.
- Reattach the dustbin.
The All-Important Test Run
Place the robot on a hard floor surface, away from its base. Press the power button. Let it run for 30-60 seconds. Listen carefully. You should hear a clean, high-pitched whirring sound from the suction motor. There should be no grinding, rattling, or unusual straining noises. Place your hand over the suction opening—you should feel a strong, steady pull. This confirms successful cleaning. If you hear grinding or the suction feels weak, power it off immediately and re-check the motor area for missed debris or a improperly seated fan.
Don’t Forget the Filters!
Cleaning the motor is half the battle. The main filter (usually a rectangular pleated filter behind the dustbin) and the pre-motor filter (a smaller, often circular mesh filter inside the dustbin chamber) are what trap the fine dust that would otherwise coat your motor. These must be maintained on a strict schedule. Tap them out after every few runs. Wash them with cool water (no soap!) monthly, let them dry completely for 24 hours before reinstalling. Replace them every 3-6 months. A clogged filter restricts airflow to the motor, causing the same strain as a dirty fan. Always clean the motor and filters together for maximum effect.
Establishing a Proactive Maintenance Routine
Waiting until suction plummets means you’re already dealing with a severe clog. A proactive routine is easier and better for your robot.
Creating Your Maintenance Calendar
Based on your home’s conditions, set reminders:
- After Every 3-5 Runs: Empty the dustbin and tap out the filters. Quick visual check of the brush roll for wrapped hair.
- Monthly: Wash the filters (if washable type). Remove the brush roll and clean the bearings and undercarriage. Visually inspect the motor access cover area; if it looks dusty, consider a quick air blow-out.
- Every 1-2 Months: Perform the full motor cleaning procedure outlined above. This frequency should be sufficient for most homes with hard floors and low-pile carpet. Increase to every month if you have multiple pets, long hair, or high-pile carpet.
- Every 6 Months: Check the rubber seals around the dustbin and motor housing for cracks or tears. Replace if necessary to maintain suction integrity.
Environmental Factors That Increase Cleaning Frequency
Your cleaning schedule isn’t one-size-fits-all. Ask yourself: Do you have dogs or cats that shed? Do you have a family member with long hair? Do you have wall-to-wall carpeting, especially high-pile or shag? Does your home have a lot of dust (near a road, construction, etc.)? If you answered “yes” to any of these, you must clean the motor more frequently. The extra hair and debris will accumulate at a much faster rate. Adjust your calendar accordingly.
Troubleshooting: When Cleaning Isn’t Enough
Sometimes, the problem runs deeper than simple debris.
Signs of a Potentially Damaged Motor
After a thorough cleaning, if you observe any of these, the motor itself may be faulty:
- A Distinct Burning Smell: Like overheating electronics or insulation. This is a major red flag. Stop using the robot immediately.
- Grinding or Scraping Noises: A sound of metal on metal, distinct from the normal brush roll sound. This could indicate failed bearings inside the motor.
- Intermittent Power Loss: The robot shuts down or loses suction power randomly, even with a full battery and clean filters.
- No Spin After Cleaning: You’ve removed all visible debris, but the fan blades will not turn by hand. The motor shaft may be seized.
Next Steps if Cleaning Fails
If you encounter these symptoms, the motor has likely sustained damage from prolonged operation while clogged. At this stage, DIY repair is not feasible. The motor is a sealed unit. Your options are:
- Contact Shark Customer Support: If your robot is still under the limited warranty (typically 1 year), you may be covered for a defective motor, though damage from neglect or abuse is often excluded. Have your model and serial number ready.
- Seek a Professional Repair Service: Some small appliance repair shops may service robot vacuums. Call ahead to confirm they work on Shark models.
- Motor Replacement: You can purchase an official Shark replacement motor (search for your exact model number). This is an intermediate-level repair that involves desoldering wires and removing the old motor from its housing. Only attempt this if you are comfortable with electronics soldering.
- Consider Replacement: For older models, the cost of a new motor plus professional installation may approach the cost of a new robot. Weigh the investment against the age and value of your current unit.
In most cases, however, a diligent, regular cleaning schedule will keep your Shark Ion Robot’s motor humming happily for years, preserving its powerful suction and saving you from costly repairs. It’s a small investment of time that pays massive dividends in performance and longevity.
Frequently Asked Questions
How often should I clean the suction motor on my Shark Ion Robot?
For most households, a thorough motor cleaning every 1-2 months is sufficient. Increase this to monthly if you have pets, long hair, or mostly carpeted floors. Always pair this with regular filter washing and dustbin emptying.
Can I use water or cleaning solutions on the motor fan?
Absolutely not. The motor and fan are electrical components. Water will cause short circuits and permanent damage. All cleaning must be done with dry methods like compressed air, brushes, and manual removal of debris.
What are the clear signs that my robot’s motor needs cleaning?
The primary sign is a noticeable, consistent drop in suction power. You may also hear the motor straining with a louder, lower-pitched sound, or find the robot leaving more debris behind, especially on carpets. Reduced runtime on a full charge is another indicator.
Is it normal for the motor to get hot during operation?
The motor will be warm after a cleaning cycle, but it should not be scorching hot to the touch. Excessive heat is a sign of strain, often caused by clogged filters, a dirty motor fan, or a failing motor itself. If it’s too hot to touch, clean the motor and filters immediately.
My motor fan is covered in a fuzzy, felt-like material. What is that?
That is a combination of compacted dust, hair, and carpet fibers that has matted together. It’s the most common type of clog. You must manually pull and pick this material out before using air to blow away the finer dust trapped within it.
After cleaning, my robot makes a loud rattling noise. What did I do wrong?
>A rattling noise usually means something is loose or improperly reassembled. First, power off the robot and check that all screws, especially those holding the bottom plate and motor cover, are tightened securely. Also, ensure the brush roll is properly seated and that no tools or debris are left inside the chassis. If the noise persists, a fan blade may have been inadvertently bent during cleaning.