Building your own kitchen cabinets with free plans is a rewarding project that can save you thousands of dollars while allowing complete customization. This guide provides a comprehensive, beginner-friendly roadmap, from sourcing reliable free plans to final installation. You’ll learn the essential tools, materials, and step-by-step processes to construct professional-looking cabinets. With patience and precision, you can achieve stunning results tailored perfectly to your kitchen’s unique space and style.
Key Takeaways
- Free plans are abundant but vary in quality: Focus on sources from reputable woodworking blogs, educational sites, or established tool manufacturers for clear, dimensioned diagrams and cut lists.
- Precision is non-negotiable: The success of your cabinets hinges on accurate measurements, square assemblies, and consistent joinery. Double-check everything before cutting.
- Your tool list defines the project: At minimum, you need a circular saw, drill/driver, pocket-hole jig, clamps, and a good square. A table saw and router significantly expand capabilities.
- Material choice affects cost and finish: Baltic birch plywood is the gold standard for carcases. Solid wood is for face frames and doors but requires more finishing. MDF is a budget option for painted finishes.
- The process is modular: Build one cabinet at a time, starting with a simple base cabinet. Master the carcass construction, then move to face frames, doors, and drawers.
- Finishing before assembly is critical: Sand and apply finish (paint, stain, varnish) to all individual components *before* final glue-up to avoid messy, uneven results.
- Installation is the final puzzle: Ensure walls and floors are plumb and level. Use shims liberally during installation to create a seamless, aligned cabinet wall.
📑 Table of Contents
- Why Build Your Own Kitchen Cabinets? The Real Talk
- Finding and Vetting Your Free Kitchen Cabinet Plans
- The Essential Toolkit: What You Actually Need to Start
- Material Selection: Plywood, Solid Wood, and Everything In Between
- The Step-by-Step Build: From Cut List to Complete Carcass
- Doors, Drawers, and Finishing: The Finale
- Installation Day: Level, Plumb, and Perfect
- Common Pitfalls & How to Avoid Them
Why Build Your Own Kitchen Cabinets? The Real Talk
Let’s be honest. The number one reason people consider a project like this is the price tag. A full kitchen’s worth of new cabinets from a big-box store or a custom cabinet shop can easily run $15,000, $25,000, or even more. That’s a house payment. When you decide to build kitchen cabinets free plans, you’re essentially trading a significant portion of that cost for your own time, sweat, and a profound sense of accomplishment. The materials for a standard 10’x10′ kitchen in good-quality plywood and solid wood might cost $3,000-$6,000, depending on your finish choices. That’s a potential savings of 60-80%.
But there’s another, equally powerful reason: control. Factory-made cabinets are made for the average kitchen. They come in standard sizes, with standard finishes. What if your kitchen has a weird angle? What if you want a specific cabinet height for your back? What if you dream of a unique door profile or an integrated spice rack that no one else sells? Building your own puts you in the designer’s chair. You are not limited by a catalog. You can build a 42″ tall pantry cabinet because you’re tall. You can create a deep, custom drawer for your stand mixer. You can make every cabinet fit your lifestyle, not a manufacturer’s production line.
This guide isn’t about turning you into a master cabinetmaker in a week. It’s about demystifying the process. We will focus on the most common and practical method: building a face-frame cabinet. This involves constructing a sturdy box (the carcass) from plywood, then attaching a solid wood frame (the face frame) to the front for rigidity and a traditional look. It’s forgiving, strong, and the standard for most homes. We’ll use pocket-hole joinery as our primary assembly method because it’s incredibly strong, requires minimal specialized tools, and is beginner-friendly.
The Myth of “Free” Plans: What You’re Really Paying With
Before we dive into *how* to find plans, let’s address the elephant in the room. “Free” doesn’t mean “no effort.” You are paying with your time, your attention to detail, and your willingness to learn. A good free plan will save you countless hours of head-scratching and wrong cuts, but it still requires you to read it thoroughly, understand the diagrams, and execute the steps. Think of the plan as your most important employee—you must communicate with it clearly and follow its instructions precisely. The best free kitchen cabinet plans will include: a detailed materials list (with exact dimensions for every piece), a cut diagram showing how to get all parts from a sheet of plywood with minimal waste, exploded views of the assembly, and hardware specifications (screws, hinges, drawer slides). If a plan is missing these, keep looking.
Finding and Vetting Your Free Kitchen Cabinet Plans
The internet is a double-edged sword. A quick search for “build kitchen cabinets free plans” will yield millions of results, from brilliant, architect-grade drawings to scribbled PDFs with missing dimensions. Your first task is to be a savvy detective. Start with sources known for quality woodworking education.
Visual guide about How to Build Kitchen Cabinets Free Plans
Image source: industrystandarddesign.com
- Woodworking Magazines’ Websites: Fine Woodworking, Woodsmith, and Popular Woodworking often have free project plans from their archives. These are meticulously drawn and tested.
- Tool Manufacturer Sites: Companies like Kreg (pocket-hole jig), Rockler, and Woodcraft offer free project plans that are designed to use their products. This is a great starting point as they are tailored to a specific, reliable joinery method.
- Educational Institutions: Some community college woodworking departments or extension programs post plans online as part of their outreach.
- Established DIY Blogs: Look for blogs with a long history (Ana White is a famous example) and a clear author bio. They often have entire kitchen series with plans that are dimensioned for standard cabinet sizes.
When you find a promising plan, put it through this vetting process:
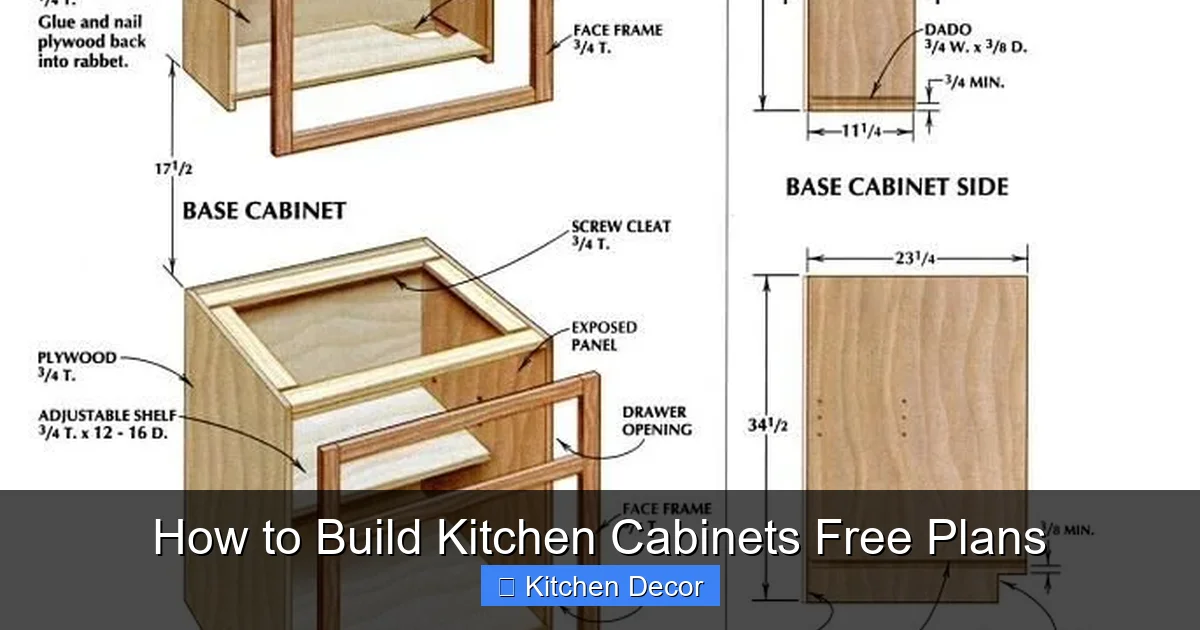
- Check the Dimensions: Are all interior and exterior dimensions clearly labeled? Standard base cabinet depth is 24″ (excluding the face frame), height is 34.5″ (plus a 1.5″ countertop overhang makes it 36″), and width varies. Wall cabinets are typically 12″ deep and come in various widths. The plan should state if it’s standard or custom.
- Scrutinize the Cut List: This is your shopping list and cutting guide. It should list every piece (side panels, top/bottom, back, face frame stiles/rails) with exact length, width, and thickness. Thickness matters—3/4″ plywood for carcases, 3/4″ solid for face frames, 1/4″ ply for backs.
- Analyze the Joinery Details: How does the face frame attach to the carcass? (Usually pocket holes or confirmat screws). How are the shelves supported? (Dado slots, adjustable shelf pins, or simply screwed in). The plan must explain this.
- Look for Hardware Specs: What type and size of hinges? (Full-overlay, half-overlay, inset). What brand/model of drawer slides? (e.g., 12″ or 14″ side-mount, 10″ undermount). Hardware dimensions dictate reveal sizes and construction details.
- Read the Comments: If it’s a blog post, read the comments. Have others built it? Did they find errors? Were they able to get the materials easily? This is your user review section.
A plan that passes this test is a keeper. Print it out. Get a red pen and start annotating. Note your specific measurements (e.g., “Our countertop is 1.25″ thick, not 1.5”). Circle critical steps. This plan becomes your bible.
The Essential Toolkit: What You Actually Need to Start
You don’t need a $20,000 professional shop. But you do need a core set of tools that are sharp, accurate, and in good working order. Here’s the tiered list, from bare minimum to highly recommended.
Visual guide about How to Build Kitchen Cabinets Free Plans
Image source: thepondsfarmhouse.com
Tier 1: The Absolute Minimum (Will get the job done, but with more effort)
- Circular Saw + Straight Edge: Your primary plywood cutter. A good circular saw with a fresh, fine-tooth plywood blade (like a 60-tooth Freud Diablo) is crucial. Use a long, straight factory edge or a dedicated track system for perfectly straight, splinter-free cuts.
- Drill/Driver: A cordless 18V or 20V drill/driver is your workhorse for pilot holes and driving screws. Have plenty of batteries.
- Pocket-Hole Jig (Kreg Jig): This is the single most important specialized tool for this method. The Kreg Jig (K4 or K5) allows you to drill perfectly angled, self-tapping pocket holes quickly and consistently. It’s a game-changer.
- Clamps: You cannot have too many. At least four 24″ bar clamps or pipe clamps for assembling carcasses. Several smaller F-clamps or quick-grip clamps for face frames. Clamps are your third hand.
- Combination Square & Speed Square: For marking, checking for square, and setting up your saw. Accuracy starts here.
- Drill Bits: A set of twist drill bits for pilot holes, and the special stepped bit that comes with your pocket-hole jig for the pocket itself.
- Sander: A random orbital sander (5″ or 6″) with a dust collection bag (or shop vac adapter) is worth its weight in gold. Hand-sanding a kitchen’s worth of cabinets is a soul-crushing task. Use 80-grit for initial sanding, 120-grit for final prep.
Tier 2: The Game Enhancers (Makes the work faster, easier, and more precise)
- Table Saw: The king of the woodshop. If you have access to one, you can rip long, straight, perfectly parallel edges on plywood with ease. It also allows for dado cuts (for shelf supports) and making your own face frame stock from dimensional lumber.
- Router & Bits: A plunge router with a straight bit and a rabbeting bit allows you to create incredibly strong, hidden joints. You can route dados for shelves, create recesses for cabinet bottoms, or add decorative edge profiles to face frames.
- Miter Saw: For cutting the face frame rails and stiles to precise lengths with perfect 45° angles if you have any mitered joints (like in a crown molding return).
- Hinge Jig: A dedicated jig for boring the cup holes for European-style hinges (like Blum or Salice) ensures perfect alignment every single time. This is a must if you’re using modern, full-overlay concealed hinges.
Before you buy a single board, round up your Tier 1 tools. You can build a beautiful, functional kitchen with just those. The Tier 2 tools are luxuries that professionalize the process and speed it up dramatically.
Material Selection: Plywood, Solid Wood, and Everything In Between
Your material choices will dictate the final look, weight, durability, and cost of your cabinets. Let’s break down the three main components: the carcass, the face frame, and the doors/drawers.
Visual guide about How to Build Kitchen Cabinets Free Plans
Image source: i.pinimg.com
The Carcass: The Foundation
This is the box. It must be strong, stable, and flat. Baltic Birch Plywood is the undisputed champion. It’s made from multiple thin layers of solid birch veneer, all glued with the grain alternating. This makes it incredibly stable—it won’t warp or twist like solid wood. It has a nice, light color that takes paint or stain well. The edges are a bit rough and require edge banding or a solid wood face frame to cover them. Buy it in 3/4″ thickness for sides, tops, and bottoms. Use 1/2″ or 1/4″ for cabinet backs (1/4″ is standard and saves weight and cost).
ApplePly or Maple Plywood are premium alternatives with a more uniform, lighter appearance and often a higher grade of veneer. They are more expensive but beautiful if you’re leaving the interior exposed.
Avoid:** Cabinet-grade particleboard or MDF for the carcass if you can. They are heavy, susceptible to moisture damage (swelling), and the screws don’t hold as well over time. They are okay for very dry environments and painted finishes, but plywood is superior.
The Face Frame: The Skeleton
The face frame is the grid of wood on the cabinet front that the doors and drawer fronts mount to. It adds tremendous rigidity and provides the traditional look. Solid Wood is the only real choice here. You’ll be joining it end-to-end and edge-to-face, so you need a material that machines well and holds screws. Common choices:
- Poplar: The workhorse. Inexpensive, relatively stable, easy to work with, and takes paint beautifully. It has a greenish tint that is completely covered by paint. The most popular choice for painted cabinets.
- Maple: Hard, light, and beautiful. Excellent for staining, as it has a very subtle, even grain. More expensive than poplar.
- Cherry or Oak: Premium hardwoods for staining. Cherry is a classic, reddish-brown wood that darkens with age. Oak has a prominent grain pattern. Both are more expensive and require more careful milling.
Buy your face frame material in 1×3 or 1×4 actual dimensions (which are 3/4″ thick). A 1×4 is actually 3/4″ x 3.5″. This is important for your plan’s dimensions.
Doors and Drawer Fronts: The Face of Your Kitchen
This is where you make a statement. You have two main paths:
- Raised Panel: The classic look. A center panel is raised (thicker in the middle) within a frame. Requires a router with a panel-raising bit and a separate bit for the frame’s “cove” or “ogee” profile. More complex but very traditional.
- Flat Panel (Slab): A simple, flat piece of wood (or MDF) with a routed edge profile (like a chamfer, roundover, or ogee). Much simpler to make, very modern or Shaker-style. Perfect for beginners.
For painted cabinets, many builders use MDF for the doors and drawer fronts. It’s perfectly stable, won’t warp, has a super smooth surface for paint, and is cheaper than solid wood. The only downside is it’s very heavy and the edges are porous, requiring careful sealing (with primer and paint) or edge banding. For stained finishes, you must use solid wood.
Hardware: Don’t skimp here. Good hinges (soft-close is worth the extra $2-$5 per hinge) and full-extension drawer slides (like Blum or Hettich) make a daily, noticeable difference in quality. Your plan will specify the exact size (e.g., 1/2″ overlay, 35mm cup hinge) and slide length (10″, 12″, 14″ based on drawer box depth).
The Step-by-Step Build: From Cut List to Complete Carcass
Now, the nitty-gritty. We’ll walk through building a standard base cabinet (34.5″ H x 24″ D x 24″ W). Your plan will have different numbers, but the *process* is identical.
Step 1: The Sacred Cut List & Cutting Your Plywood
This is where errors are made and money is wasted. Lay your full sheet of Baltic birch on a stable surface (sawhorses). Using your circular saw and a straight edge track (or a factory edge as a guide), cut the sheet into the manageable rectangles specified in your cut list. For example, you might cut a full 4’x8′ sheet into two 4’x4′ halves first, then make your final cuts. Always cut parts slightly oversized (1/8″ to 1/4″) and trim to final dimension later. This accounts for saw kerf (the width of the cut) and any minor wandering. Label every piece with a pencil—”Left Side,” “Top,” “Bottom”—immediately. A pile of identical-looking plywood rectangles is a recipe for disaster.
Step 2: Sanding & Edge Preparation
Before assembly, sand every piece. Start with 80-grit to remove saw marks and splinters, then move to 120-grit for a smooth finish. Pay special attention to the edges, which will be covered by the face frame but still need to be smooth to avoid a thick, uneven glue line. If you’re using plywood with a nice veneer you want to show on the interior, be gentle on the faces. If you’re painting everything, you can be more aggressive.
Step 3: Drilling Pocket Holes (The Kreg Jig Step)
This is the heart of the assembly. Set up your Kreg Jig according to the thickness of your material (3/4″ setting). The jig’s manual has a chart. Clamp your workpiece securely. Drill the pocket holes in the locations specified by your plan. Typically, for a carcass, you’ll drill pocket holes:
- On the ends of the top and bottom panels, to attach to the side panels.
- On the side panels, to attach the back.
- On the face frame pieces (this comes later).
Pro Tip: Drill all the pocket holes for a single type of joint at once. Drill all the holes in the ends of all your top/bottom panels, then move to the sides. It’s faster and ensures consistency. Wear safety glasses and ear protection.
Step 4: Dry Fitting & The First Glue-Up
Before you open the glue, do a dry run. Assemble the entire carcass without glue or screws, just to make sure all the pieces fit. Check for square by measuring diagonally from corner to corner. Both diagonals must be exactly equal. If they’re not, your box is a rhombus, not a rectangle. You may need to shim or adjust your pocket hole depth slightly. Once you’re confident, it’s time for the real thing.
Apply a thin, even bead of wood glue (Titebond III is a good, water-resistant choice) to the mating edges. Don’t glob it on; excess glue creates a mess and can interfere with a tight joint. Start with the two sides and the top/bottom. Clamp the sides to a flat surface (your workbench or a pair of sawhorses with a long, straight board on top). Clamp the top and bottom in place. Drive the pocket-hole screws. The glue will squeeze out—wipe it away with a damp cloth immediately. Check for square again with your diagonal measurement. Let the glue cure fully (check the bottle, usually 30-60 minutes) before moving on.
Step 5: Installing the Back
The back (1/4″ plywood) is what squares and stabilizes the entire cabinet. Your plan will show if it’s attached directly to the back edges of the sides, or if there’s a rabbet (a recessed ledge) cut into the sides and top/bottom. The rabbet method is stronger and hides the back edge. If your plan calls for a rabbet, you’ll need a router with a rabbeting bit, or you can simply attach the back with brad nails or small screws into the edges of the carcass, as long as it’s well-glued. The back should be centered and flush with the back of the carcass. Nail or screw it in place, checking that the cabinet remains square.
Step 6: Building and Attaching the Face Frame
Now your bare box gets its skeleton. Cut your solid stock (poplar, etc.) to the lengths specified in your plan’s face frame cut list. The stiles (vertical pieces) run the full height of the cabinet. The rails (horizontal pieces) fit between the stiles. This is where precision matters most. The inside dimensions of your face frame must match the outside dimensions of your carcass exactly. If your carcass is 24″ wide, your face frame stiles, when mounted, should also measure 24″ apart on the inside.
Assemble the face frame separately on a flat surface using pocket holes drilled into the backs of the rails into the stiles. Clamp and screw. Then, apply glue to the front edges of the carcass and clamp the completed face frame to it. Use plenty of clamps. Drive a few pocket screws through the back of the carcass into the face frame for extra security (these holes will be hidden by the back). Wipe excess glue. Let cure. You now have a solid, square cabinet box with a front frame. This is the point where you really feel like a cabinetmaker.
Doors, Drawers, and Finishing: The Finale
With your carcasses built, it’s time for the visible parts. This is where aesthetics take over.
Constructing Drawer Boxes
Drawer boxes are usually made from 1/2″ or 5/8″ plywood. The front is a separate drawer front that attaches to the box. The standard box is a simple rectangular box with a notched front. The sides (drawer sides) are cut to the interior width of the cabinet minus the slide thickness. The front and back are cut to the interior depth. The bottom is 1/4″ plywood, set in a rabbet or dado at the bottom of the sides. The slides mount to the cabinet sides (or a rail inside) and to the drawer box sides. Your slide instructions are critical here. Build the drawer box to the exact specifications of the slide manufacturer’s instructions. A 1/16″ error in box width will cause the drawer to bind. Use a router to create the rabbets for the bottom—it’s cleaner than a table saw for this small job.
Fabricating Doors
For a flat panel (slab) door, this is straightforward. Cut your MDF or solid wood panel to the exact size of the door opening, plus the desired reveal (usually 1/16″ to 1/8″ gap all around). Route the edge profile on all four sides. For a raised panel door, you need two frame pieces (stile and rail) and a center panel. The frame pieces are cut with a router using a “cutter” bit that creates a profile and a shoulder. The center panel is cut slightly smaller (by the width of the router’s cutter) to allow for wood movement. The frame pieces are joined with a “stile and rail” bit set that cuts a matching profile and a mortise-and-tenon-like joint. This is more advanced. Beginner Recommendation: Start with flat panel doors. They look fantastic and are much easier.
Finishing Before Assembly: The Golden Rule
Never, ever, finish your cabinets after they are assembled in the kitchen. You will get finish in the hinges, on the countertop, and in every nook. It will be a disaster. The correct order is:
- Sand: Sand every single component—carcass interior/exterior, face frame, doors, drawer fronts, drawer boxes—through the grits (80 -> 120 -> 180 -> 220). The final 220-grit pass is essential for a glass-smooth paint finish.
- Apply Finish: This could be stain + varnish, a tinted polyurethane, or multiple coats of paint. Use a spray gun for the absolute best, factory-like result on doors. A high-quality brush and roller (for carcasses) can work well too. Apply thin coats. Sand lightly between coats with 320-grit sandpaper. Do this in a clean, dust-free space (garage, workshop). Let each coat cure fully.
- Install Hardware: Only after the final finish coat is fully cured (check product specs, often 7+ days for paint), install the hinges and drawer slides. Use a hinge jig for perfect hole placement. This is the moment of truth—your doors should align perfectly.
Now, and only now, are your finished cabinet carcasses, with their finished doors and drawer fronts attached, ready for installation.
Installation Day: Level, Plumb, and Perfect
Installing cabinets is less about heavy lifting and more about being a meticulous puzzle-solver. The goal is a perfectly plumb, level, and seamless wall of cabinets.
Preparation is 80% of the Battle
Before your first cabinet touches the wall, you must prepare. Find the highest point of your floor along the cabinet wall. Mark a level line (using a laser level or a long spirit level) at the height of your base cabinet (usually 34.5″ to the top of the cabinet, or 36″ to the countertop surface). This is your primary reference line. All base cabinets will be shimmed to this line. For wall cabinets, you need to locate your wall studs. Mark their centers on the wall. You will screw into these studs through the back of the cabinets or into a ledger board temporarily attached to the wall.
The Installation Sequence
- Start with a Corner or End: If you have a corner cabinet, start there. If not, start at one end of the run. Place the first base cabinet in position. Shim under the front and back until the top is level and the side is plumb (use a long level on the side). Secure it to the wall studs with 3″ screws through the back (if the back is 1/2″ plywood, you may need to predrill and use washers to avoid crushing the plywood). Do not fully tighten yet.
- Strobe the Next Cabinet: Place the next cabinet tight against the first. Clamp them together at the face frames. Check the tops for level and the faces for alignment (use a straight edge across the doors). Shim as needed behind the second cabinet to bring it into perfect alignment with the first. Screw it to the wall. Repeat down the line. The key is aligning the face frames first; the wall follows.
- Clamp, Clamp, Clamp: Use long bar clamps across the face frames of adjacent cabinets to pull them tight and keep them aligned while you screw them together and to the wall. The clamps are your alignment tool.
- Wall Cabinets: This is a two-person job. Have a helper hold the cabinet while you screw it into the studs (or into a ledger board). Use a large level on the front. Wall cabinets are heavy and awkward. A cabinet jack or a temporary support rail under the cabinets makes this much safer.
- The Final Check: Once all cabinets are installed, check all the doors and drawers. They should open and close smoothly. If a door is rubbing, you can often adjust the hinge screws slightly. If a whole row is out of alignment, you may need to loosen the wall screws on the misaligned cabinet, adjust its shims, and retighten.
Take your time. Rushing installation ruins the look of an otherwise perfect build. Your final step is to install the countertop, followed by the final trim (crown molding, toe kicks, filler strips).
Common Pitfalls & How to Avoid Them
Even with the best free kitchen cabinet plans, mistakes happen. Here are the most common and how to sidestep them.
- Mistake: Not Accounting for Wood Movement. Solid wood expands and contracts with humidity. If you glue a solid wood panel into a solid wood frame with no room to move (a “panelled” door), the panel will eventually split the frame. Solution: In a raised panel door, the panel is never glued in—it floats in a groove. In a flat MDF door, there is no movement issue. For face frames, the joinery (pocket holes) allows for some movement, but it’s minimal. Avoid using wide, solid wood panels without a proper floating panel design.
- Mistake: Ignoring the “Reveal.” The reveal is the gap between a door/drawer front and the face frame or adjacent doors. Your plan and your hardware dictate this. A full-overlay hinge needs about a 1/16″ reveal all around to avoid rubbing. Solution: Build your cabinet boxes and face frames to the exact dimensions in your plan. When hanging doors, adjust the hinges to achieve an even, consistent reveal. Use a feeler gauge or a business card to check gaps.
- Mistake: Cutting First, Thinking Later. The excitement to start cutting is strong. Solution: Read the entire plan at least twice. Highlight all dimensions. Make a cut list spreadsheet. Triple-check your measurements against the plan before making a single cut. Remember: measure twice, cut once.
- Mistake: Poor Sanding. Rushing sanding leaves swirl marks and scratches that become glaringly obvious under paint or stain. Solution: Sand with the grain. Progress through the grits. Use a light to inspect your work at an angle. The final 220-grit pass should feel like silk. Clean all dust with a tack cloth before finishing.
- Mistake: Uneven Cabinet Heights. This is the most noticeable flaw in a DIY install. Solution: Your level line on the wall is your bible. Shim every base cabinet individually to that line. Do not assume the floor is level. Use long levels (48″ or longer) across multiple cabinet faces to check for high/low spots. The countertop will hide minor floor unevenness, but the cabinet tops must be level with each other.
Frequently Asked Questions
Is it realistic for a beginner to build an entire kitchen’s worth of cabinets?
Yes, absolutely. The key is to start small. Build a single base cabinet first, then a wall cabinet, then a simple drawer cabinet. Treat the first one as a practice unit. You will make mistakes on it, learn from them, and your subsequent cabinets will be perfect. The skills are cumulative.
How much money can I really save by building my own cabinets?
Realistically, you can save 50-70% compared to retail prices for semi-custom cabinets. A $20,000 cabinet package might cost you $6,000-$10,000 in materials. Remember to factor in the cost of your time, tools you may need to buy, and finishes. The savings are significant, but the project is a major time investment.
What’s the single most important tool to invest in?
The Kreg Jig. Without a doubt. Pocket-hole joinery is the backbone of this method. It’s fast, strong, and requires minimal skill compared to other joinery like dadoes or mortise-and-tenon. A good Kreg Jig (K4 or K5) will make every step of the carcass and face frame assembly dramatically easier and more reliable.
Are free plans really detailed enough, or will I need to guess a lot?
Quality free plans are very detailed. The problem is finding them. Stick to the vetted sources mentioned earlier (Fine Woodworking, Rockler, reputable blogs). If a plan has a complete cut list, exploded diagrams, and hardware specs, you should not have to guess. If dimensions are missing or vague, abandon that plan and find a better one.
How long does a full kitchen cabinet build actually take?
For a complete beginner working weekends and evenings, plan on 80-120 hours of shop time for a standard 10×10 kitchen. This includes cutting, sanding, assembly, finishing, and building doors/drawers. It’s a 3-6 month project for most people. An experienced woodworker could do it in 40-60 hours. Never underestimate the time for finishing—it involves long waits between coats.
Can I modify free plans to fit my weird kitchen dimensions?
Yes, and that’s a major benefit! Plans are typically for standard 3″ width increments (12″, 15″, 18″, 21″, 24″, etc.). If your space is 27″ wide, you can modify the plan. The key is to maintain the same construction methods. Change the width of the carcass and face frame, but keep the same joinery, shelf spacing, and back panel size. Just update the cut list accordingly. Start by modifying a standard plan before designing one from scratch.