Building an outdoor kitchen with metal studs offers a rot-proof, fire-resistant, and highly customizable alternative to traditional wood framing. This guide walks you through the entire process, from initial design and material selection to assembling the steel frame, installing weatherproof cladding, and integrating appliances and utilities. You’ll learn why metal studs are ideal for outdoor environments and get practical tips for a successful, long-lasting build that becomes the heart of your backyard.
Key Takeaways
- Metal studs are superior for outdoor use: They won’t rot, warp, or attract insects, offering unmatched durability and stability in all weather conditions.
- Proper planning is non-negotiable: Finalize your appliance, sink, and storage layout before you cut a single stud, as changes later are costly and difficult.
- Use only corrosion-resistant materials: Every fastener, anchor, and bracket must be stainless steel or galvanized to prevent rust and ensure structural integrity.
- Create a continuous weather barrier: A proper housewrap or rigid foam barrier behind your cladding is critical to protect the steel frame from moisture.
- Account for thermal bridging: Metal conducts heat/cold; use thermal breaks (like plastic spacers) and insulation within the wall cavity to improve energy efficiency for any enclosed cabinets.
- Check local building codes and permits: Outdoor kitchens with gas lines, electrical, or permanent structures often require permits; verify requirements before you start.
- Secure the structure to a solid foundation: The framed wall must be anchored to a concrete slab, pavers, or footings to withstand wind and the weight of countertops and appliances.
📑 Table of Contents
- Why Choose Metal Studs for Your Outdoor Kitchen?
- Phase 1: Planning, Design, and Materials Sourcing
- Phase 2: Layout and Framing the Walls
- Phase 3: Weatherproofing, Insulation, and Utilities
- Phase 4: Cladding and Finishing the Exterior
- Phase 5: Countertops, Appliances, and Final Touches
- Conclusion: Your Forever Backyard Hub
Why Choose Metal Studs for Your Outdoor Kitchen?
So, you’re dreaming of that perfect backyard setup—a sizzling grill, a handy sink, ample counter space for prep, and maybe even a pizza oven. Fantastic! But the frame holding it all together is the unsung hero. For decades, pressure-treated lumber was the go-to. But wood, even when treated, has a fatal flaw in an outdoor setting: it wants to rot. It swells, it shrinks, it attracts insects, and over time, it compromises the entire structure. This is where metal studs, specifically light-gauge steel framing, completely change the game.
Building an outdoor kitchen with metal studs isn’t just a modern trend; it’s a smart, long-term investment. Think of metal studs as the skeleton of a commercial-grade building, now adapted for your patio. They are dimensionally stable—meaning they won’t twist, warp, or bend with humidity and temperature swings. They are incombustible, offering peace of mind if you’re grilling nearby. And crucially, they are impervious to rot and pests. A properly built metal stud frame can easily last 50+ years with minimal maintenance, outlasting the appliances it supports. While the initial material cost can be slightly higher than basic lumber, the elimination of future rot repairs and the longevity make it a cost-effective choice over the life of your kitchen.
We’re going to walk through this together. This isn’t a vague overview; it’s a practical, step-by-step guide to taking your outdoor kitchen from a sketch on paper to a sturdy, beautiful reality. We’ll cover the unique considerations for steel framing, how to adapt standard framing techniques, and the vital details that separate a weekend project from a professional, enduring build.
The Unbeatable Advantages
Let’s list why metal studs are your best friend for this project. First, strength-to-weight ratio. Steel studs are surprisingly light but incredibly strong. You can span longer distances with fewer supports, allowing for more open, cantilevered designs for that sleek, overhanging bar top. Second, precision and consistency. Every stud is manufactured to exact lengths and dimensions. No more picking through a pile of lumber at the home center to find a straight 2×4. This makes layout faster and the final result cleaner. Third, design flexibility. Steel is easy to cut and drill on-site with the right tools (aviation snips, drill bits). Want a curved bar front or a unique angled shape? It’s much simpler to bend or notch steel than to try and steam-bend wood.
The biggest advantage, however, is immunity to environmental decay. No more worrying if the bottom plate of your island is sitting in a puddle after a rainstorm. It’s just metal. It will get wet and dry out without damage, provided we do our job right with the weather barrier and cladding. This makes metal studs the only logical choice for a structure that is, by definition, exposed to the elements 24/7/365.
Phase 1: Planning, Design, and Materials Sourcing
Rushing to the build phase is the single biggest mistake. With metal studs, precision planning is even more critical because, while easy to cut, modifying a assembled steel frame is more involved than adjusting a wood one. This phase is about making all your decisions on paper first.
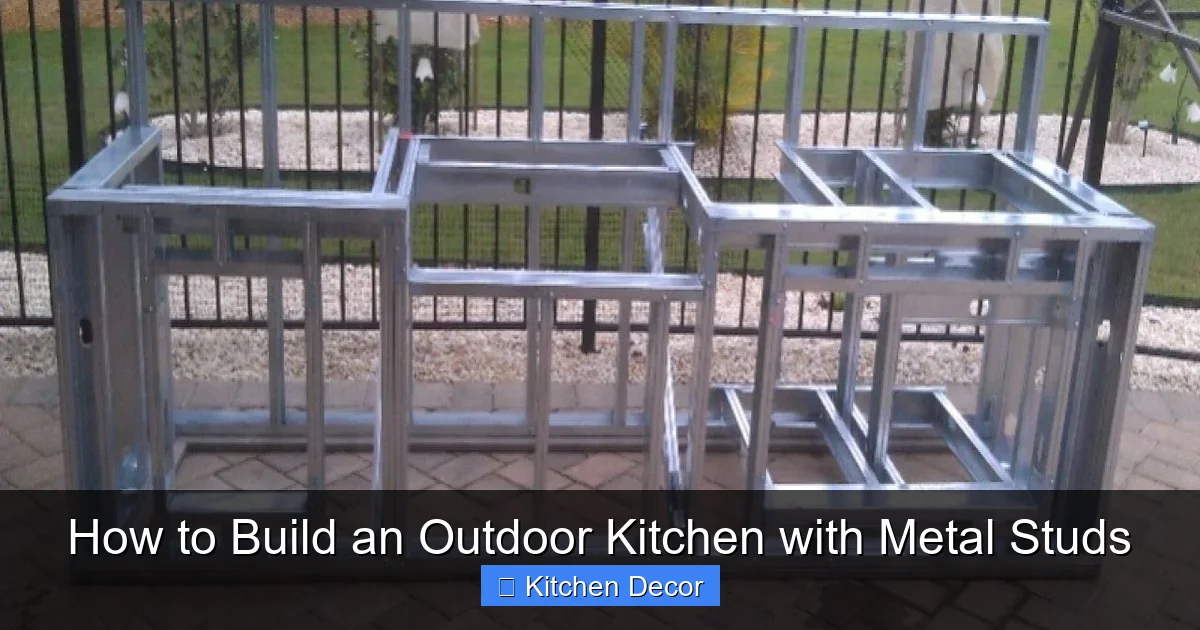
Visual guide about How to Build an Outdoor Kitchen with Metal Studs
Image source: i.pinimg.com
Design & Layout: The Golden Rule
Sit down with your space. Measure it accurately. Then, draw your outdoor kitchen to scale. Where will the grill go? The sink? The refrigerator? The seating? Consider the “work triangle” (grill, sink, prep area) for efficiency. Will this be a simple L-shaped bar, or a full U-shaped kitchen with an island? This layout dictates your framing. Mark the exact locations of all appliance openings. You must know the precise width, height, and depth of every appliance you plan to install. Why? Because the framed openings for your grill, fridge, and under-counter drawers must be built to the exact manufacturer specifications. There is no “we’ll make it fit later.” If your framed opening is even ½ inch too small, that appliance isn’t going in. Order your appliances early and have the installation manuals handy.
Also, think vertically. How high will your countertop be? Standard outdoor counter height is often 36-42 inches. This determines your stud height. Will you have a bar with overhang for seating? That overhang must be cantilevered or supported by brackets from the steel frame below. Sketch this all out.
Your Metal Stud Shopping List
You’ll be working with two primary components: studs (the vertical members) and track (the horizontal channels that the studs slide into). For an outdoor kitchen, you typically use 3 5/8″ or 6″ deep studs and track, which provides ample cavity space for insulation and utilities. The gauge (thickness) of the metal is important. For non-load-bearing interior walls, 25-gauge is common. For an outdoor structure that will support countertops, overhangs, and appliance weight, you should specify 20-gauge or 18-gauge studs and track. It’s heavier and more expensive, but the added rigidity and screw-holding power are worth it. Don’t skimp here.
You will also need:
- Fasteners: This is not the place for cheap drywall screws. You need self-tapping (sheet metal) screws for connecting studs to track and studs to each other. For attaching sheathing or cladding to the frame, use stainless steel or hot-dipped galvanized exterior screws. Get a mix of #8 and #10 screws in 1″ and 1 ½” lengths.
- Anchors: To secure the bottom track to your concrete slab or pavers, you need stainless steel wedge anchors or Tapcon screws.
- Tools: Aviation snips (for cutting studs), a drill with metal-cutting bits, a level (a 4-foot and a torpedo level), a chalk line, a tape measure, a framing square, safety glasses, and gloves. A metal stud punch (for knocking out knockouts in the web for wiring) is very helpful.
- Sheathing/Barrier: You need a continuous weather-resistant barrier. Options include ½” rigid foam insulation board (which also provides an R-value and a thermal break), or a housewrap like Tyvek applied over a flat sheathing like OSB or cement board. We’ll discuss the pros and cons later.
- Cladding: Your final exterior finish. Popular choices are cement board (like HardieBacker), metal panels, stone veneer, or stucco. Ensure whatever you choose is rated for exterior use.
Foundation & Anchoring: The Bedrock of Your Build
Your beautiful steel frame is only as strong as what it’s attached to. You must build on a stable, level, and permanent foundation. This is not a project for a gravel bed or loose pavers unless you install a proper, compacted sub-base and a perimeter footing. The gold standard is a poured concrete slab that is at least 4 inches thick, with a vapor barrier underneath, and reinforcement with rebar or wire mesh. The slab should be at least 6 inches larger than your kitchen footprint on all sides. It must be fully cured and perfectly level. If you’re installing over an existing patio, it must be structurally sound and level. You will be anchoring the bottom track of your frame to this surface with concrete anchors every 16-24 inches around the entire perimeter and at every stud location. This prevents the entire wall system from shifting or being uplifted by wind.
Phase 2: Layout and Framing the Walls
With your slab ready and your materials stacked, it’s time for the satisfying work of turning metal into a shape. The process is similar to wood framing but with its own rhythm. The key is to work from a perfect, level baseline.
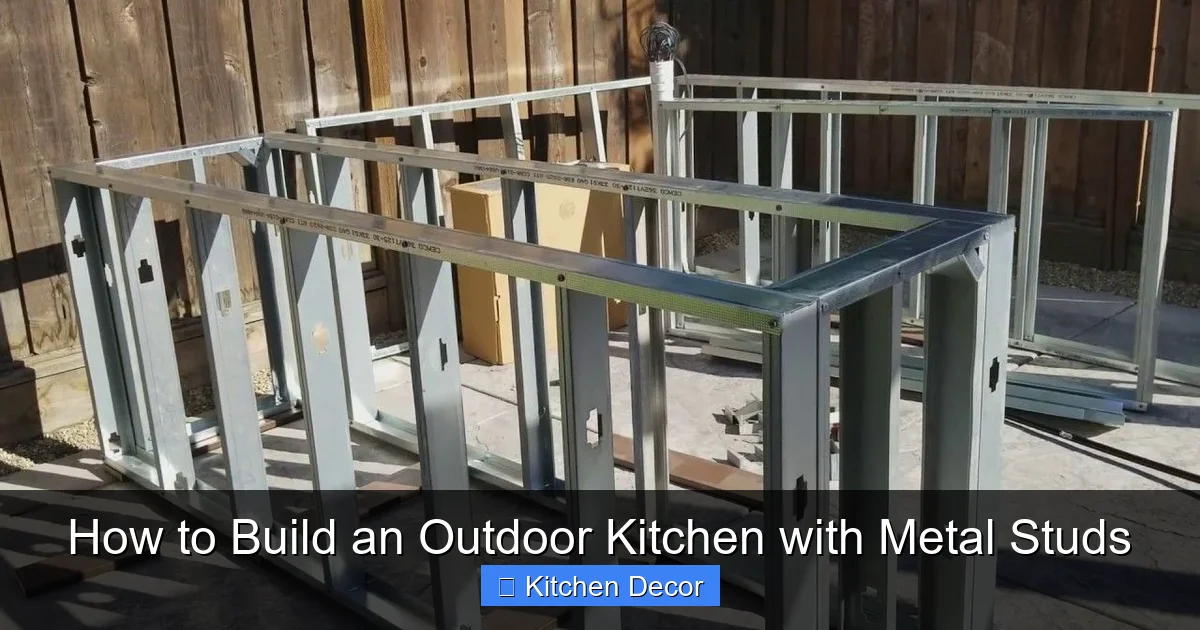
Visual guide about How to Build an Outdoor Kitchen with Metal Studs
Image source: i.pinimg.com
Snap the Chalk Lines
Using your layout plan, snap a precise chalk line on your slab for the exact outside edge of your bottom track. This is your reference for everything. Double-check all measurements against your appliance specs. From this line, snap parallel lines for interior walls or partitions. Use your framing square to ensure 90-degree corners. Accuracy here is paramount; errors compound as you build up.
Cutting and Assembling the Bottom Track
Measure and cut your bottom track pieces to length using aviation snips. Wear gloves; metal edges are sharp. Lay the cut pieces on your chalk lines. At corners and intersections, the track must overlap. For a simple outside corner, the horizontal track of one wall simply butts into the vertical leg of the adjacent wall’s track. For inside corners or T-intersections, you’ll need to notch the track or use special corner connectors for a tighter fit. Drill pilot holes through the track and into the concrete at every stud location (16″ or 24″ on center, per your design) and at intervals between. Install the wedge anchors or Tapcons, leaving the track slightly proud of the anchor head for now. You’ll tighten everything after the wall is stood up.
Building the Wall Panels Flat on the Ground
This is the most efficient method. Don’t try to build walls standing up. Lay your bottom track on the slab. Cut your studs to the final wall height (slab to top plate height). For a standard 8-foot wall with a 4 ½” thick countertop, you might cut studs to 92 ½” to allow for top and bottom track and a double top plate. Important: Metal studs have a “C” shape. The web (the flat middle part) has pre-punched knockouts for wiring. You want these knockouts aligned vertically when the wall is assembled. This makes running electrical later much easier. So, when you layout studs along the bottom track, ensure the knockouts are on the same side of every stud.
Now, lay the top track on the ground parallel to the bottom track. Insert your cut studs into the bottom track, then lift the top track into place and screw it down through the track flanges into the studs. Use two screws per connection, one through each flange of the track. Work systematically. For any openings (like for a grill), you’ll build a “rough opening” header and jack studs (trimmers) just like with wood. The header is two studs laid back-to-back with a piece of track between them at the top and bottom, forming a deep, strong box. The jack studs support the header.
Standing and Securing the Walls
With your wall panels complete on the ground (have a helper for this!), it’s time to stand them. Carefully lift each panel into position over the anchor holes in the bottom track. Use temporary diagonal bracing to hold it plumb (perfectly vertical). A 4-foot level is your best friend here. Check for plumb on both sides and along the length. Once plumb, go back and tighten all the bottom anchors securely. Then, secure the wall panels to each other at corners and intersections. Use #10 self-tapping screws, driving through the flanges of the track on one wall into the studs or track of the adjacent wall. For a super-strong corner, you can also use metal corner braces or stitch screws (driving screws alternating from each side).
After all walls are stood and connected, install a double top plate. This ties the entire wall system together, provides a solid nailing surface for countertop supports, and helps distribute loads. Cut pieces of track for the top plate, lay them over the wall tops, and screw down through the top plate into the studs below, staggering the screws.
Phase 3: Weatherproofing, Insulation, and Utilities
Your steel skeleton is now a rigid, upright structure. Before you close up the walls, you must address the three critical layers that live between the frame and your final cladding: the weather barrier, insulation, and the rough-in for plumbing and electrical. Skipping or botching any of these steps leads to a short-lived, problematic kitchen.
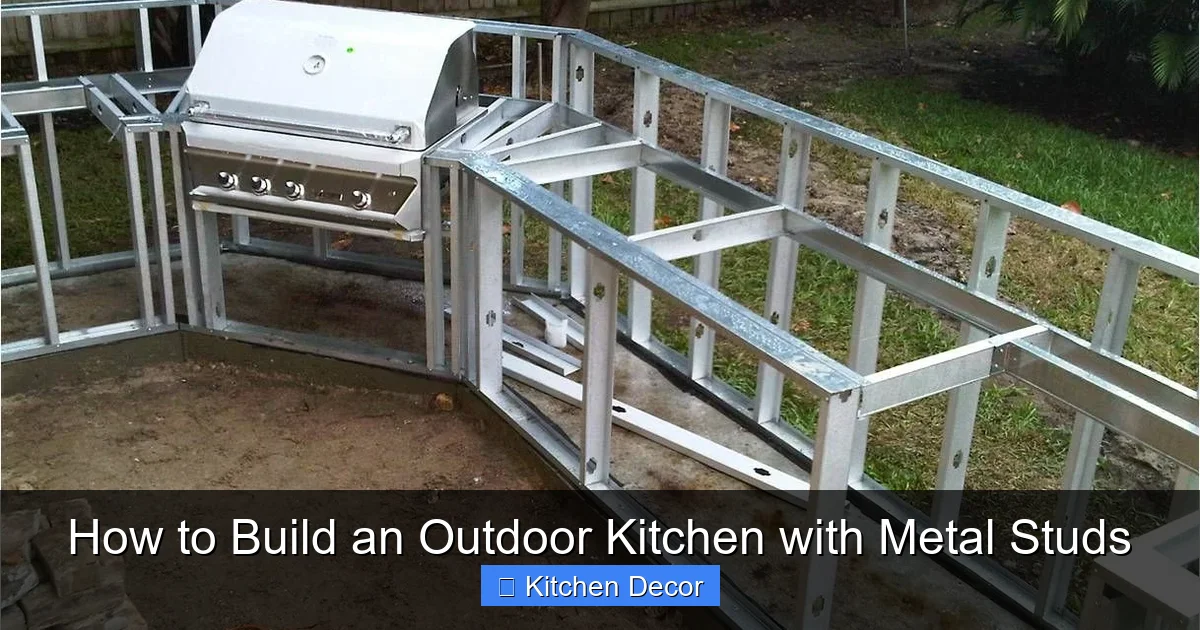
Visual guide about How to Build an Outdoor Kitchen with Metal Studs
Image source: i.pinimg.com
The Weather Barrier: Your First Line of Defense
Steel does not rot, but everything inside your wall cavity does if it gets wet. The weather barrier’s job is to stop liquid water from penetrating the wall while allowing any vapor that does get in to escape. You have two excellent paths here.
Path A: Rigid Foam Board. This is my top recommendation for a DIYer. Install ½” or 1″ thick rigid foam insulation board (XPS or polyiso) directly over the entire steel frame, secured with cap nails or foam-board screws with large washers. Seal all seams with foil tape. This creates a continuous, flat, insulating barrier. It provides a small R-value, a crucial thermal break to stop the metal studs from conducting cold/heat into your cabinets, and a perfect nailing base for your cladding. It’s simple and effective.
Path B: Housewrap over Sheathing. For a more traditional approach, cover the steel frame with a layer of exterior-grade OSB or cement board. Then, wrap the entire surface in a high-quality housewrap like Tyvek, taping all seams. This method is slightly more complex but offers a very robust drainage plane. The cement board option is great if you plan to apply a stucco or thin-set stone veneer directly to it.
Never skip this layer. Do not assume your cladding (like metal panels) is weatherproof. Wind-driven rain will find its way behind almost any siding. The barrier is what protects your investment.
Insulation: Comfort and Efficiency
If your outdoor kitchen has any enclosed, cabinet-like structures (for storage, a fridge housing, etc.), you should insulate the walls. Uninsulated metal boxes become ovens in summer and freezers in winter, stressing appliances and making adjacent spaces uncomfortable. Use unfaced fiberglass batts or spray foam cut to fit snugly between the studs. For a DIYer, unfaced batts are easiest. Wear proper PPE (gloves, mask, long sleeves). For areas that will never be enclosed (like the back of a simple bar top), insulation isn’t necessary. The thermal break from the rigid foam barrier on the exterior is often sufficient for the frame itself.
Roughing in Plumbing and Electrical
This is where those pre-punched knockouts in the metal studs pay off. With the frame and barrier in place, you can now run your utilities. This is the time to hire licensed professionals for the final connections. Your job here is the rough-in.
- Electrical: Run NM-B (Romex) cable or individual THWN wires in conduit from your main panel to the locations for outlets, lighting, and appliance circuits. Use the vertical knockout lines in the studs to run cables cleanly. Install metal or PVC conduit for any exposed runs. Remember to plan for dedicated circuits for the grill (if electric), refrigerator, and any other major appliances. All outdoor outlets must be GFCI-protected and housed in weatherproof covers.
- Plumbing: For a sink, you’ll need to run hot and cold supply lines (PEX is excellent for this) and a drain line (PVC) to your sewer or septic connection. The drain must have a proper slope (¼” per foot). Plan the location of your P-trap access panel—it needs to be accessible! Consider a frost-proof hose bib for water supply if you live in a freezing climate.
- Gas: This is absolutely a job for a licensed professional. Your role is to plan the route from your main gas line to the grill location, ensuring it’s a straight, accessible run. The pro will install the black iron or CSST line, pressure test it, and make the final connection to the appliance.
After all wiring and pipes are in place, install any necessary blocking between studs for future support of shelves, heavy countertops, or wall-mounted items.
Phase 4: Cladding and Finishing the Exterior
Now the transformation happens. The raw steel frame gets its skin. Your choice of cladding defines the kitchen’s aesthetic—modern industrial, rustic farmhouse, or sleek contemporary. The installation principles are similar for most materials.
Preparing the Surface
If you used rigid foam, you now have a flat, stable surface. You can often attach many claddings directly to it with the proper fasteners. If you used housewrap over sheathing, you’re ready to go. The key is to start with a truly flat, true surface. Check your wall with a long straightedge. Any high or low spots in the framing will telegraph through your final finish. Shim or plane (if using wood furring strips over foam) as needed to achieve flatness.
Popular Cladding Options and Tips
- Cement Board Panels (Hardie Panel, etc.): A top choice. It’s durable, fireproof, and can be painted or installed with a variety of reveals (gaps between panels). Fasten with cement-board screws, following manufacturer spacing. Leave recommended expansion gaps at edges and corners, which you’ll cover with trim.
- Metal Panels (Steel, Aluminum, Copper): For a modern look. Use panels specifically rated for exterior use. Fasten with concealed clip systems or exposed screw finishes (use stainless steel screws with neoprene washers). Pay close attention to thermal expansion; panels need room to move.
- Stone or Brick Veneer: Provides a classic, sturdy look. You must install a metal lath (or use a cement board with a manufactured stone veneer system) over your weather barrier. Apply a scratch coat of mortar, then press the veneer pieces into it. This is a more advanced skill but doable for a careful DIYer.
- Stucco: A traditional, seamless finish. Requires a multi-layer system over a weather barrier and lath. Best left to professionals for a flawless result, but the prep (installing lath and base coat) can be a DIY project with research.
Universal Tip: Always start cladding from the bottom up. This allows each subsequent course to overlap the one below, shedding water downward. Follow the manufacturer’s instructions to the letter regarding fastener type, spacing, and sealants.
Cap Flashing and Trim
The #1 spot for water intrusion? The top edge of your cladding where it meets the countertop or roof overhang. You must install a continuous cap flashing (a metal “L” or “J” channel) that tucks under the countertop overhang and laps down over the top course of cladding. This creates a physical barrier that directs any water that gets behind the cladding outward, not down into the wall cavity. Similarly, use proper outside corner trim and seal all joints with a high-quality exterior caulk rated for your cladding material.
Phase 5: Countertops, Appliances, and Final Touches
The hard part is done. Now for the fun part—bringing your kitchen to life with surfaces and equipment.
Building the Countertop Base
Your countertop will sit on the top plates of your framed walls and any supporting legs or brackets. For a sturdy base, you can install a layer of ¾” exterior-grade plywood or OSB over the top plates, screwed down securely. This provides a solid, flat substrate for your countertop material. If you have a large overhang (more than 6-8 inches), you must support it. Options include:
- Corbels: Heavy-duty steel brackets anchored into the studs below.
- Legs: Installing vertical posts at the end of an overhang.
- Steel support channels: A hidden steel channel that runs back into the wall framing.
Never rely solely on the fasteners holding the countertop to the edge of the frame for a large overhang. The force from people leaning on it will create a lever effect and eventually pull the screws out.
Choosing and Installing Countertops
Popular outdoor choices include:
- Granite or Quartz: Extremely durable, heat-resistant, and low-maintenance. Must be installed by pros due to weight. Ensure the slab is properly sealed for exterior use.
- Concrete: Customizable, modern, and tough. Can be poured in place or installed as pre-cast slabs. Requires sealing.
- Stainless Steel: Professional, seamless, and indestructible. Often welded on-site. Expensive but iconic.
- Tile: A cost-effective DIY option. Use a proper exterior-grade thin-set and grout. Ensure the substrate is perfectly flat to prevent cracking.
Secure countertops according to the manufacturer’s specs, using appropriate anchors that go through the countertop and into the solid blocking or plywood base below.
Appliance Installation and Final Details
Now, slide your grill, fridge, and sink into their precisely framed openings. They should fit snugly but not require force. Shim as necessary to level them. Connect the utilities—this is where your licensed pros come back to make the final, permanent connections and pressure/leak tests. Install cabinet doors and drawers if you built them. Add your personal touches: LED strip lighting under the counter, a backsplash of tile or metal, a hanging pot rack, or a bar stool rail. Finally, apply a coat of high-quality exterior paint or sealant to any exposed steel (like the bottom track) if you want a finished look, though galvanized steel is often left as-is.
Conclusion: Your Forever Backyard Hub
Building an outdoor kitchen with metal studs is a project that combines the satisfaction of hands-on construction with the wisdom of choosing materials built to last. You’ve moved beyond the limitations of wood and created a foundation—literally and figuratively—for years of incredible meals and gatherings. The initial effort in planning, the precision of the steel frame, and the meticulous attention to weatherproofing all pay dividends in a structure that won’t groan, sag, or rot as the seasons change. It becomes a permanent, valuable extension of your home. So, grab your layout grid, your snips, and your level. Start with that first, perfectly anchored chalk line. Your dream outdoor kitchen, sturdy as a commercial space and personal as your favorite recipe, is waiting to be built.
Frequently Asked Questions
Is building with metal studs more difficult than with wood?
It’s different, not necessarily harder. Cutting and assembling is fast and precise with the right tools (aviation snips, self-tapping screws). The main differences are the need for all stainless/galvanized hardware and the absolute requirement for a solid, level foundation and proper anchoring. The planning phase is more critical.
Will my metal stud kitchen get hot in the sun?
The steel frame itself will absorb and conduct heat. However, by installing a continuous rigid foam barrier on the exterior (as recommended), you create a thermal break that drastically reduces heat transfer into the interior cabinet spaces. Without this break, enclosed cabinets can become very hot.
Do I need to insulate the walls if I use metal studs?
Insulation is highly recommended for any enclosed cabinet space (like a fridge housing or storage cabinets) to protect appliances from extreme temperatures and improve energy efficiency. For open bar walls with no enclosed cavities, insulation is less critical, though the exterior rigid foam barrier is still essential for weatherproofing and a minor thermal break.
Can I attach heavy stone veneer directly to metal studs?
No. You must never apply a heavy, brittle material like stone or brick veneer directly to the thin metal studs. You need a solid, flat substrate. Install a layer of exterior-grade OSB or cement board over the studs, then a metal lath and mortar base (scratch coat) before applying the veneer. The substrate carries the weight, not the studs.
What about rust? Won’t the metal studs rust eventually?
Not if you use the right materials and details. The studs themselves are typically zinc-galvanized. The critical factor is using stainless steel or hot-dipped galvanized for every single fastener, anchor, and connector that penetrates the weather barrier. Also, the continuous weather barrier (rigid foam or housewrap) must be installed correctly to keep bulk water away from the frame. If water gets behind the cladding and is allowed to sit against the steel, galvanizing can eventually fail. Proper installation prevents this.
Do I really need a building permit for an outdoor kitchen?
Very likely, yes. Most jurisdictions consider a permanent outdoor kitchen with a roof or one that includes electrical, plumbing, or gas to be a structure requiring a permit. It’s also tied to your home’s insurance. Permits ensure the work meets safety codes, especially for gas and electrical. Always check with your local building department before purchasing major materials or starting. The process is usually straightforward for a DIY project where you pull the permit and schedule inspections at the rough-in (frame, utilities) and final stages.