Wiring a 3-prong stove outlet is a manageable DIY project for those with basic electrical knowledge, but it demands strict adherence to safety codes. This guide walks you through the entire process, from turning off power and gathering tools to making the correct wire connections and performing a final safety test. Always prioritize safety, verify your stove’s compatibility, and know when to call a licensed electrician for complex situations.
Key Takeaways
- Safety First: Always turn off the dedicated circuit breaker at the main panel and verify power is off with a tester before touching any wires. Failure to do so can cause severe injury or death.
- Compatibility Check: Confirm your electric range is designed for a 3-prong (NEMA 10-30R) outlet. Newer ranges typically require a 4-prong (NEMA 14-30R) outlet for the separate neutral and ground.
- Correct Wire Gauge: Use 10-gauge (10/2 with ground) copper wire for a 30-amp, 240-volt circuit. Using a smaller gauge can cause overheating and fire.
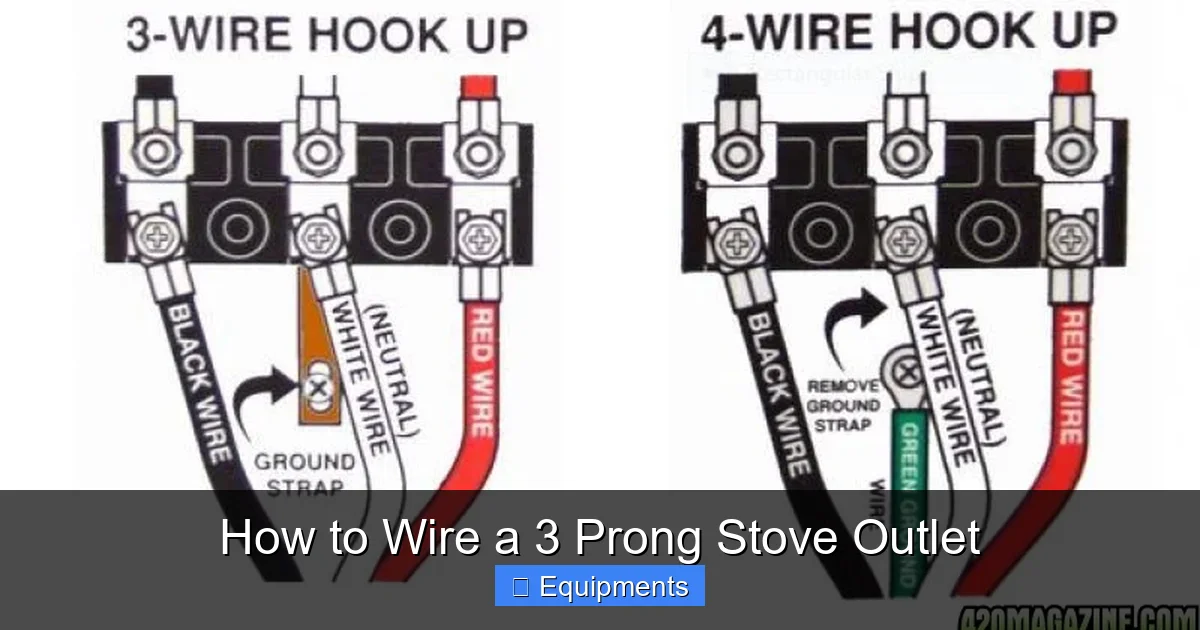
- Proper Connections: The two hot wires (typically red and black) connect to the two brass-colored screws. The bare copper ground wire connects to the green grounding screw. There is no neutral connection in a 3-prong system.
- Secure and Neat: Ensure all wire connections are tight under the outlet’s terminal screws. Leave no stray copper strands exposed. The outlet must be mounted securely to the wall box.
- Mandatory Testing: After wiring but before connecting the stove, test the outlet with a multimeter or plug-in circuit tester to confirm correct voltage (240V between hots) and proper grounding.
- Know Your Limits: If you are uncomfortable working with 240V electricity, lack the proper tools, encounter aluminum wiring, or your local code requires a permit and inspection, hire a qualified electrician.
📑 Table of Contents
- Introduction: Powering Your Kitchen Workhorse
- Section 1: The Non-Negotiable Foundation of Electrical Safety
- Section 2: Gathering Your Tools and Materials
- Section 3: Understanding the Wiring Scheme and Your Stove’s Needs
- Section 4: Step-by-Step Wiring Installation
- Section 5: Final Verification and Power-Up
- Section 6: Common Mistakes and Troubleshooting
- Conclusion: Safety Over Speed
Introduction: Powering Your Kitchen Workhorse
Your electric stove is the heart of the kitchen, a powerful appliance that demands a dedicated, high-voltage electrical connection to operate safely and efficiently. Unlike standard 120V outlets for lamps and small appliances, a stove requires a 240-volt circuit, delivered through a specialized 3-prong outlet. Understanding how to wire this outlet correctly is not just a matter of getting the stove to turn on; it’s a critical safety skill that protects your home and family from electrical hazards like fires and electrocution.
This comprehensive guide will demystify the process of wiring a 3-prong stove outlet. We’ll start with the absolute essentials of safety and preparation, move through understanding the unique wiring scheme, and then provide a detailed, step-by-step walkthrough of the installation. We’ll also cover how to test your work and highlight common pitfalls to avoid. While this is a project an experienced DIYer can tackle, it carries significant risk. If at any point you feel unsure, the only correct decision is to stop and consult a licensed professional.
Section 1: The Non-Negotiable Foundation of Electrical Safety
Before you even look at a tool, you must internalize the safety protocols for working with 240-volt electricity. This is not a project where you can “be careful.” It requires systematic, verifiable procedures.
Visual guide about How to Wire a 3 Prong Stove Outlet
Image source: wiringall.com
The Single Golden Rule: De-Energize the Circuit
The cardinal rule of any electrical work is to ensure the circuit you are working on is completely de-energized. For a stove outlet, this means going to your home’s main electrical service panel (breaker box) and locating the dedicated 30-amp, double-pole breaker that feeds the stove circuit. Flip this breaker to the OFF position. Do not rely on a light switch or any other control; the breaker is the only sure source of disconnect.
Once the breaker is off, you must prove the absence of power. Use a non-contact voltage tester on the wires inside the outlet box after you remove the old outlet (or on the new outlet’s terminals before you connect wires). For absolute certainty, use a multimeter set to AC volts. Carefully probe between the two hot terminals (and between each hot and ground). The reading must be zero. Test your tester on a known live circuit first to ensure it works.
Understanding the 3-Prong Configuration: A Legacy System
The 3-prong stove outlet, officially a NEMA 10-30R, is an older design. Its key characteristic is that it combines the neutral and grounding functions into a single path. The two vertical blades are the “hot” legs, each carrying 120 volts of opposite polarity, which together provide the 240 volts needed by the stove’s heating elements. The round, L-shaped prong is the ground. In this system, the neutral wire from the panel is bonded to the ground at the main service panel and serves as both the return path for 120V components (like lights and timers) and the safety ground. This is why you will only see two hot wires and one ground wire connected to the outlet—there is no separate neutral terminal.
⚠️ Critical Warning: This bonding of neutral and ground is only safe and code-compliant at the main service panel. If your home has a subpanel (a separate breaker box downstream from the main), the neutral and ground MUST be isolated from each other in that subpanel. A 3-prong outlet on a circuit originating from a subpanel with a bonded neutral/ground is a serious code violation and safety hazard. If you are unsure about your panel configuration, consult an electrician.
Section 2: Gathering Your Tools and Materials
Having everything you need before you start prevents frustration and dangerous mid-project trips to the hardware store. Here is your checklist:
Visual guide about How to Wire a 3 Prong Stove Outlet
Image source: thekitchenix.com
Essential Tools
- Non-Contact Voltage Tester: For the initial safety check.
- Multimeter: For definitive voltage verification and final testing.
- Insulated Screwdrivers: Both flathead and Phillips, with comfortable, non-conductive handles.
- Wire Strippers/Cutters: A quality tool that can cleanly strip 10-gauge wire without nicking the copper.
- Pliers: Needle-nose pliers are helpful for bending and positioning wires.
- Electrician’s Fish Tape or Wire Puller: If you need to run new cable through walls, this is essential.
- Drill and Spade Bit: To create a hole in the wall plate for the cable connector.
- Flashlight or Headlamp: Your work area will likely be dark.
Required Materials
- NEMA 10-30R Receptacle: The 3-prong, 30-amp, 250-volt outlet. Buy a reputable brand.
- 10/2 with Ground (UF-B or NM-B) Cable: This is 10-gauge wire with two insulated conductors (red and black) and a bare copper ground. The length depends on your run. For surface runs, use UF (Underground Feeder) cable. For inside walls, use NM (Romex) cable.
- Cable Connector (Gland): A strain-relief connector that clamps the cable to the back of the outlet box, protecting the wire from fraying.
- Old-Work (Retrofit) Electrical Box: If you are replacing an outlet, you likely need an “old-work” box that clamps to the drywall. If you are installing a new outlet from scratch, you’ll need a new-work box nailed to a stud.
- Wire Nuts: For any splices you might need to make in the junction box.
- Electrical Tape: For insulating terminal screws and minor tasks.
Pro Tip: Before buying cable, measure the exact distance from your breaker panel to the outlet location, adding several extra feet for maneuvering and future adjustments. It’s better to have a little too much than to come up short.
Section 3: Understanding the Wiring Scheme and Your Stove’s Needs
This is the intellectual core of the project. You must understand what each wire does and where it goes. A mistake here is not just a non-functioning stove; it’s a latent fire hazard.

Visual guide about How to Wire a 3 Prong Stove Outlet
Image source: thekitchenix.com
The Three Wires: Hot, Hot, and Ground
In a 3-prong system, you have three wires coming from your breaker panel:
- Hot Leg 1 (Black): Carries 120 volts. Connects to one brass terminal on the outlet.
- Hot Leg 2 (Red): Carries 120 volts, 180 degrees out of phase with Hot 1. When combined, they provide 240 volts. Connects to the other brass terminal.
- Ground (Bare Copper): A safety path. In a fault (like a live wire touching the stove’s metal case), it directs massive current safely into the earth, tripping the breaker. Connects to the green grounding screw.
Notice there is no white neutral wire connected to the 10-30R outlet. That’s by design. Any 120V needs inside the stove (clock, lights) will use one hot leg and the shared neutral/ground path back to the main panel.
Is Your Range Actually Compatible?
This is the most common point of failure for DIYers. You must check your range’s installation manual or the nameplate on the back. Look for the listed electrical requirements.
- If it says “3-wire” or “NEMA 10-30P” (the plug that goes on your stove’s cord), you are good to proceed with this 3-prong outlet.
- If it says “4-wire,” “NEMA 14-30P,” or lists separate neutral and ground connections, you cannot use a 3-prong outlet. You must install a 4-prong (NEMA 14-30R) outlet and run a 4-wire cable (10/3 with ground). Attempting to adapt a 4-wire stove to a 3-prong outlet is unsafe and often impossible without modifying the stove’s internal wiring, which voids warranties and violates code.
Example: A vintage 1970s ranges often require 3-wire. A range purchased in the last 15-20 years almost certainly requires 4-wire. When in doubt, default to the 4-wire method or call an electrician.
Section 4: Step-by-Step Wiring Installation
With power off, tools ready, and compatibility confirmed, let’s get to work. We’ll assume you are replacing an existing outlet or installing a new one in a new location.
Step 1: Prepare the Outlet Box and Cable
If you are replacing an outlet, remove the cover plate and unscrew the old outlet from the box. Gently pull it out and disconnect the wires, noting which terminal each was on (take a photo!). For a new installation, secure the new-work electrical box to a stud at the correct height (typically 12-18 inches above the floor).
Take your 10/2 with ground cable. Strip about 1 inch of insulation from the end of each of the three wires (red, black, bare) using your wire strippers. Be careful not to nick the copper strands. Twist the strands of each wire tightly with your pliers.
Step 2: Connect the Wires to the Outlet
Look at the back of your new NEMA 10-30R receptacle. You will see:
- Two brass-colored terminal screws (for Hot 1 and Hot 2).
- One silver-colored terminal screw (this is NOT used in a 3-prong install—it’s for a neutral, which we don’t have).
- One green hexagonal grounding screw.
Take your red and black wires. Loosen the two brass screws. Curl the exposed end of each wire into a clockwise hook shape with your needle-nose pliers. Hook the red wire under one brass screw and the black wire under the other. Tighten the screws firmly. The orientation (which hot goes to which screw) does not matter for the stove’s operation, but be consistent for clarity.
Now, take your bare copper ground wire. Hook it under the green grounding screw and tighten it securely. Do not connect any wire to the silver screw. It should remain empty.
Step 3: Secure the Cable and Mount the Outlet
Insert the cable into the knockout hole on the back or bottom of the outlet box. Secure it with the cable connector (gland). Tighten the gland’s screws to clamp the cable firmly, creating a strain relief. This prevents the cable from being pulled out of the terminals if someone trips on the cord.
Carefully bend the wires back into the box, ensuring no bare copper is exposed and the connections are solid. Push the outlet gently into the box, aligning the mounting holes. Secure the outlet to the box with the two long mounting screws provided. Finally, attach the cover plate.
Section 5: Final Verification and Power-Up
Do not reconnect the breaker yet. We must test our handiwork before applying full power to the circuit.
Initial Visual and Tug Test
Look inside the outlet box one last time. Are all terminal screws tight? Is there any stray wire touching another terminal or the metal box? Give each wire connection a gentle tug. Nothing should budge. Ensure the bare ground wire is not touching either brass terminal.
Testing the Outlet with a Multimeter
Now, with the breaker still OFF, set your multimeter to measure AC volts (typically V~ or 600V AC). You will perform three tests:
- Hot to Hot (Red to Black): Insert one probe into the left vertical slot and the other into the right vertical slot. You should read 0 volts. This confirms no voltage is present.
- Hot 1 to Ground (Red to Round): Probe the left vertical slot and the round ground slot. Still 0 volts.
- Hot 2 to Ground (Black to Round): Probe the right vertical slot and the round ground slot. Again, 0 volts.
If all three tests read zero, you have successfully de-energized the circuit and your outlet is wired safely without any shorts to ground. You may now carefully restore power by flipping the double-pole breaker back ON.
Testing Under Load
With power on, perform the tests again, this time expecting voltage:
- Hot to Hot: Should read 220-240 volts.
- Hot to Ground: Each test should read 120-125 volts.
These readings confirm you have a correct 240V circuit with a proper ground. The voltage between the two hots should be roughly double the voltage between a hot and ground.
Final Step: Plug your stove into the newly wired outlet. Turn the stove’s breaker on at the panel, then turn on the stove. It should power up normally. Listen for any unusual arcing sounds or check for tripped breakers immediately. If the breaker trips or the stove doesn’t work, turn off power and re-check your connections.
Section 6: Common Mistakes and Troubleshooting
Even with careful work, issues can arise. Here’s how to diagnose them.
Breaker Trips Immediately Upon Startup
This is usually a short circuit. Turn off the power and check:
- Is the bare ground wire touching either of the hot terminal screws? This is the most common error.
- Is there a wire strand poking out and touching the metal outlet box?
- Did you accidentally connect a wire to the neutral (silver) screw?
- Is there damage to the stove’s power cord or internal wiring?
No Power, Breaker Doesn’t Trip
This indicates an open connection or a disconnected wire.
- Are both hot wires securely under their brass screws?
- Is the breaker itself faulty? Try turning it fully OFF and then back ON.
- Is there a loose connection at the breaker terminal in the panel? (This requires an electrician to check).
Stove Works but Gets Hot/Voltage Drops
This suggests an undersized wire or a loose connection causing high resistance.
- Are you using a true 10-gauge cable? Using 12-gauge wire on a 30-amp circuit is a major code violation and fire risk.
- Check all terminal screws in the outlet and at the breaker. Are they tight?
- Is the cable run excessively long (over 100 feet), causing voltage drop? You may need to upsized to 8-gauge wire.
The Aluminum Wiring Red Flag
If your home was built between the late 1960s and mid-1970s, you might have aluminum wiring. Do not connect aluminum wire directly to a standard copper-rated outlet terminal. The dissimilar metals can cause oxidation, overheating, and fire. Special antioxidant paste and CO/ALR-rated connectors are required. This is a job for a professional electrician familiar with aluminum wiring remediation.
Conclusion: Safety Over Speed
Wiring a 3-prong stove outlet is a project that sits at the intersection of home improvement and serious electrical work. By following this guide—prioritizing safety, confirming compatibility, using the correct materials, making secure connections, and rigorously testing—you can successfully complete the installation. Remember, the goal is not just a working outlet, but a permanently safe and code-compliant one. The smell of an electrical fire or the sound of a tripped breaker are signals that something is wrong. Never ignore them. Your stove will be a reliable kitchen centerpiece for years to come, powered by an outlet you installed with confidence and care. However, if any step feels beyond your comfort zone or knowledge, investing in a licensed electrician is the wisest and safest investment you can make in your home and your family’s well-being.
Frequently Asked Questions
Can I use a 3-prong outlet for a new stove?
Generally, no. Modern stoves manufactured after 1996 are required to have a 4-prong cord and plug, which provides a separate neutral and ground for enhanced safety. Using a 3-prong adapter or modifying the cord is unsafe and violates electrical code. You must check your stove’s manual; if it calls for a 4-wire connection, you need to install a 4-prong (NEMA 14-30R) outlet.
Do I need a permit to wire a stove outlet?
In most jurisdictions, yes. Installing a new 240V circuit typically requires an electrical permit and a final inspection by your local building department. This ensures the work meets the National Electrical Code (NEC) and local amendments. Check with your city or county building office. Even if a permit isn’t legally required for a simple replacement, having the work inspected provides peace of mind and is important for future home sales.
What is the difference between a 3-prong and 4-prong stove outlet?
The key difference is the separation of the neutral and ground wires. A 3-prong (NEMA 10-30R) has two hot blades and a ground/neutral combined L-shaped prong. The neutral and ground are bonded together at the outlet. A 4-prong (NEMA 14-30R) has two hot blades, a separate neutral blade, and a separate ground round. This provides a dedicated, safer path for fault current and is the standard for all new installations.
My outlet box is metal. Do I need to ground the box itself?
Yes, absolutely. If you are using a metal electrical box, it must be grounded. The grounding wire from your cable (bare copper) should be connected to both the green screw on the outlet and to a grounding screw that attaches to the metal box itself. This ensures the entire metal assembly is at ground potential, preventing shock if a live wire touches the box.
Can I extend an existing stove circuit with a junction box?
Yes, but it must be done correctly. You can splice the existing 10/2 cable to a new length of 10/2 cable inside an accessible junction box (not buried behind drywall). All splices must be made with appropriately sized wire nuts, the box must be the right size for the wires inside, and the box must remain accessible (have a cover plate). The junction box must also be in a location suitable for electrical connections.
What size breaker and wire do I need for a stove outlet?
For a standard household electric range, you need a dedicated 30-amp, 240-volt circuit. This requires a double-pole 30-amp breaker in your panel and 10-gauge copper wire (10/2 with ground for a 3-prong, 10/3 with ground for a 4-prong). Always verify the specific amperage draw listed on your stove’s nameplate, as some high-end models may require a 40-amp or 50-amp circuit. Never install a breaker or wire smaller than the appliance’s requirement.
