Using the steam clean function on your Whirlpool oven is a simple, chemical-free way to tackle everyday messes. Just fill the reservoir with water, select the cycle, and let the built-in steam loosen grime. This guide walks you through every step, from prep to wipe-down, ensuring a sparkling oven without harsh fumes or scrubbing. It’s the safe, smart method for routine maintenance.
Key Takeaways
- Steam Clean Uses Only Water: The cycle heats a small reservoir of water to generate steam that softens baked-on food, eliminating the need for chemical cleaners.
- Always Remove Racks & Accessories: Metal racks and other items must be taken out before starting the cycle to prevent damage from prolonged steam exposure.
- It’s for Light to Moderate Messes: The steam clean feature is designed for recent spills and grease, not for decades-old, carbonized buildup.
- Cool Before Wiping: After the cycle, let the oven cool completely (about 30-60 minutes) before wiping the interior with a damp cloth.
- Never Use Commercial Cleaners: Using store-bought oven cleaners inside during or after a steam cycle can create hazardous fumes and damage the oven interior.
- Distilled Water is Recommended: Using distilled water prevents mineral deposits from hard water from accumulating inside the steam system.
- Ventilation is Key: Always ensure your kitchen is well-ventilated by opening a window or running your hood fan during and after the cycle.
📑 Table of Contents
- Understanding the Magic of Steam: What is the Steam Clean Feature?
- Essential Pre-Cycle Preparation: Setting the Stage for Success
- The Step-by-Step Steam Clean Process: From Button to Wipe
- Steam Clean vs. Traditional Self-Clean: A Clear Comparison
- Troubleshooting: When Steam Clean Doesn’t Seem to Work
- Long-Term Care: Keeping Your Oven Steam-Ready
- Conclusion: Embrace Effortless Oven Maintenance
Understanding the Magic of Steam: What is the Steam Clean Feature?
So, you’ve got a Whirlpool oven with that mysterious “Steam Clean” button. Maybe you’ve been eyeing it for months, wondering if it’s really as good as it sounds. Let’s clear the air—literally and figuratively. This isn’t a gimmick; it’s a clever piece of engineering designed to make one of the worst kitchen chores vastly easier. At its core, the steam clean cycle is a low-temperature, water-based cleaning system. Unlike the traditional self-clean cycle that cranks your oven up to nearly 900°F to incinerate grime (and often creates a terrible smell), steam clean operates at a much gentler temperature, typically around 250°F to 300°F.
Here’s how it works: You pour a specified amount of water—usually about 1 to 1.5 cups—into a dedicated reservoir, often located on the oven’s interior wall or bottom. When you start the cycle, the oven’s heating element boils this water, creating a cloud of hot, moist steam that fills the entire cavity. This steam does the heavy lifting. It penetrates and saturates dried-on food particles, grease splatters, and sugary spills, rehydrating and loosening them without harsh chemicals. After the cycle (which is surprisingly quiet and quick, often 30-45 minutes), the grime is left soft and wipe-away ready. You simply wait for the oven to cool, grab a damp cloth or sponge, and wipe the interior clean. It’s a process that transforms oven cleaning from a dreaded, all-day event into a 15-minute wipe-down.
The Science Behind the Steam
Think about how you loosen a stubborn jar lid—you run it under hot water. The heat and moisture expand the metal slightly and soften any gunk. Your oven’s steam clean cycle does the exact same thing on a larger scale. The high humidity environment prevents any remaining food particles from re-baking onto the surface. It’s a controlled, efficient softening process. This method is particularly effective on the types of messes we commonly make: melted cheese that bubbled over, dough that puffed up and stuck, or sugary marinades that caramelized into a sticky mess. These substances are hygroscopic, meaning they attract and hold water molecules. Steam attacks them directly.
Essential Pre-Cycle Preparation: Setting the Stage for Success
This is the most critical phase. Skipping or rushing preparation is the #1 reason people think the steam clean “didn’t work.” Proper prep ensures the steam can contact every surface and that nothing gets damaged. Let’s get your oven ready.
Visual guide about How to Use the Steam Clean on a Whirlpool Oven
Image source: restoregoshop.ca
Step 1: The Great Emptying
First and foremost, the oven cavity must be completely empty. This means:
- Remove Both Oven Racks: Take out the upper and lower racks. The prolonged exposure to steam and heat can warp the metal over time, and any residue on the racks will just bake back on.
- Clear the Bottom: Take out any pizza stones, baking steels, or silicone mats.
- Check the Drawer: If you have a storage drawer underneath, empty it. Heat and steam can rise.
- Oven Thermometer: If you use one, remove it. Most are not designed for this environment.
Place the racks aside in a safe spot. You’ll clean them separately later, often just in the sink with dish soap and a non-abrasive pad.
Step 2: The Gentle Scrape
Don’t just pour water in and walk away. Take a few minutes to do a preliminary clean. Use a plastic or silicone spatula to gently scrape off any large, loose chunks of food debris—burnt edges of a casserole, piles of cheese, etc. You don’t need to scrub; just remove the bulk material. This prevents loose food from simply turning to sludge and spreading around during the steam cycle. For any thick, wet spills (like a lasagna overflow), blot them up with paper towels first.
Step 3: The Reservoir Ritual
Locate your oven’s steam clean water reservoir. In most Whirlpool models, it’s a small, marked cup or trough built into the oven’s bottom wall, often near the door. Consult your specific owner’s manual for the exact location and capacity. The manual is your best friend here. Typically, you’ll need between 1 and 1.5 cups (250-375ml) of water. Use distilled water if possible. Tap water contains minerals (hardness) that can leave white, chalky deposits inside the reservoir and steam vents over time. Distilled water is pure and prevents this. If you only have tap water, that’s fine, but consider running an extra rinse cycle (just water, no food) more frequently.
Carefully pour the measured water into the reservoir. Do not overfill. There is usually a “MAX” line. Wipe up any spills immediately with a dry cloth. You do not want water pooling on the oven floor outside the reservoir.
The Step-by-Step Steam Clean Process: From Button to Wipe
With the oven bare and the reservoir filled, you’re ready for the main event. The process is designed to be foolproof, but following these steps in order guarantees the best results.
Visual guide about How to Use the Steam Clean on a Whirlpool Oven
Image source: restoregoshop.ca
Step 4: Selecting and Starting the Cycle
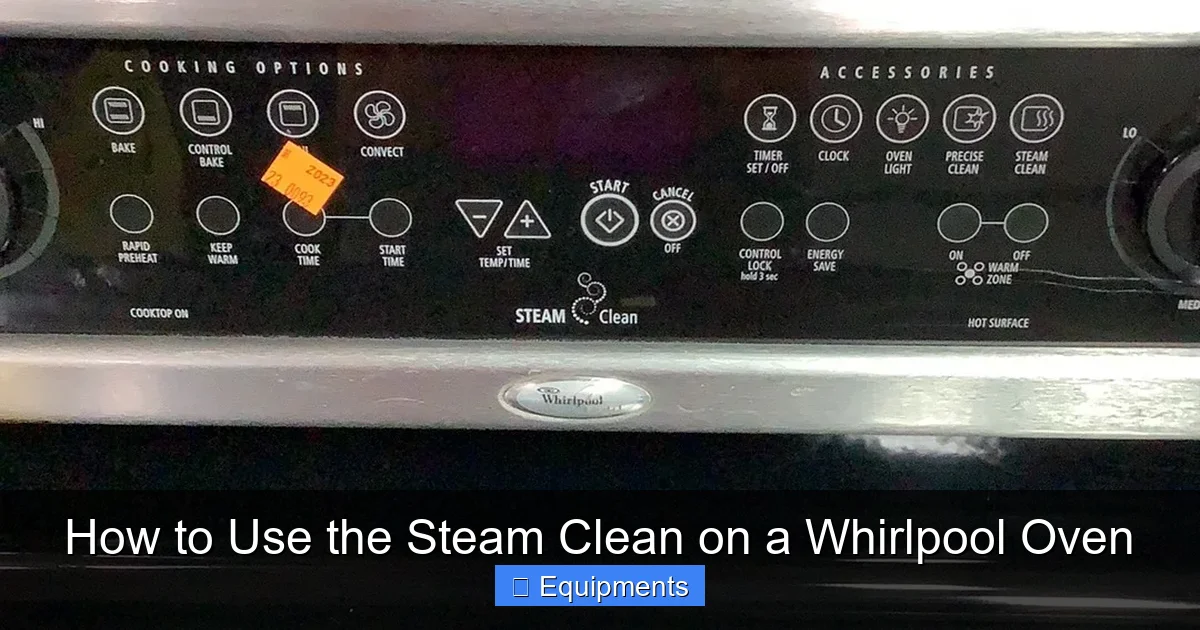
Close the oven door firmly. On your control panel, look for the button labeled “Steam Clean” or an icon that looks like a cloud with water droplets. The exact labeling can vary by model year and series. Press this button. The display should indicate the cycle is active, often showing a countdown timer (e.g., 35:00). Some models may require you to turn a dial to the “Steam Clean” setting. The cycle will now begin. You’ll hear a humming or bubbling sound as the water heats and steams. Do not attempt to open the door during the cycle. The oven will be hot and full of steam. Most models will lock the door electronically for safety. The cycle will run its predetermined course and then end with a beep.
Step 5: The All-Important Cool-Down Period
This is non-negotiable. When the cycle ends, the oven interior is hot and saturated with steam. If you try to wipe it now, you risk serious steam burns. The water and loosened grime will also be scalding hot. The manual will specify a cool-down time, but a safe rule of thumb is to wait at least 45 to 60 minutes after the cycle completes. Use this time to clean the racks in the sink. You’ll be grateful you waited when you can comfortably reach in with a cloth.
Step 6: The Final Wipe-Down
After the cool-down, open the door. You’ll see a damp, warm interior. The grime should be visibly loosened, often appearing as a grayish, muddy film. Now for the satisfying part. Grab a few things:
- A stack of microfiber cloths or paper towels.
- A bowl of warm, soapy water (a few drops of dish soap).
- A non-abrasive plastic scraper or nylon pad for stubborn spots.
Start wiping from the top (ceiling) of the oven down to the bottom. The soapy water will help lift the loosened debris. For the floor, which will have the most concentrated residue and possibly leftover water from the reservoir, you may need to rinse your cloth frequently. Use the plastic scraper gently on any spots that are still a bit stuck—the steam should have done 90% of the work. Never use metal scrapers, steel wool, or abrasive cleaners like Comet. These will scratch the porcelain enamel finish. Wipe until the cloth comes away clean. You may need to go over the interior 2-3 times with a clean, damp cloth to remove all soap residue. Finally, dry everything with a dry microfiber towel to prevent water spots.
Steam Clean vs. Traditional Self-Clean: A Clear Comparison
Many Whirlpool ovens also have a traditional “Self-Clean” or “Pyrolytic Clean” cycle. It’s crucial to understand the difference so you use the right tool for the job. Choosing wrong can lead to frustration or even damage.
Visual guide about How to Use the Steam Clean on a Whirlpool Oven
Image source: aqsappliances.com
- Steam Clean: Temperature: ~250-300°F. Method: Water-based steam. Duration: 30-45 minutes + cool-down. Best For: Weekly or bi-weekly maintenance of light to moderate spills (grease, cheese, dough, sauces). Pros: No fumes, quick, energy-efficient, safe for most interior components, no locking up the oven for hours. Cons: Not for heavy, carbonized buildup.
- Traditional Self-Clean: Temperature: ~850-900°F. Method: Incineration (burns food to ash). Duration: 2-4 hours + several hours cool-down. Best For: Deep, annual cleaning of severe, baked-on grime. Pros: Extremely effective on old, burnt-on messes. Cons: Creates intense smoke and fumes (requires excellent ventilation), high energy use, locks the oven, can shorten the life of some electronic components over time, smells like a campfire in your kitchen.
The Smart Strategy: Use the Steam Clean cycle regularly—once a month or after a messy cooking session—to prevent grime from ever reaching the point where you’d need the harsh, high-heat self-clean cycle. This proactive approach keeps your oven looking great and extends the time between major cleanings by years.
Troubleshooting: When Steam Clean Doesn’t Seem to Work
You followed all the steps, but after wiping, some stubborn spots remain. Don’t panic. Here’s how to diagnose and fix it.
Issue: Large, Charred, or Old Burnt-On Spots
Diagnosis: The steam clean cycle is simply not designed for this. If the food has been carbonized—turned to a hard, black, rock-like substance—steam won’t penetrate it. You’ve exceeded the feature’s capability.
Solution: For these isolated, ancient spots, you will need to use a dedicated, non-abrasive oven cleaner paste or a poultice of baking soda and water. Apply it only to the affected spot, let it sit for several hours or overnight, then gently scrub with a non-scratch pad. This is a targeted manual intervention, not a full-cavity chemical clean. After removing the spot, run a final steam clean cycle to rinse any cleaner residue and refresh the entire cavity.
Issue: The Reservoir Didn’t Seem to Boil or Produce Much Steam
Diagnosis: This is rare but possible. It could mean the heating element responsible for boiling the water is faulty, or the water level was too low.
Solution: Double-check you added enough water. If the problem persists, your oven may need a service call. Do not attempt to force it by adding more water than recommended.
Issue: White, Chalky Residue After Cleaning
Diagnosis: This is almost always mineral deposits from hard water. The steam evaporated, leaving the minerals behind on the surfaces.
Solution: Wipe the affected areas with a cloth dampened with a 50/50 solution of white vinegar and water. The mild acid dissolves the mineral scale. Rinse thoroughly with a clean, damp cloth. To prevent this, switch to distilled water for all future steam clean cycles.
Issue: Error Code Appears During Cycle
Diagnosis: An error code (like F or E codes) indicates a specific problem detected by the oven’s computer. It could relate to the steam sensor, temperature sensor, or a door lock issue.
Solution: Stop the cycle immediately. Consult your owner’s manual’s error code section. Often, the fix is to turn off the circuit breaker to the oven for 5 minutes, then restart it. If the error returns, you will need to contact Whirlpool customer service or a certified appliance technician. Do not continue trying to run the cycle with an active error.
Long-Term Care: Keeping Your Oven Steam-Ready
Making the steam clean feature a regular part of your kitchen routine is the ultimate pro-tip. A little prevention goes a very long way.
Adopt a “Clean As You Go” Mentality
After any cooking that produces splatters or spills (roasting vegetables, baking pizza, a casserole that bubbled over), don’t let it sit. Once the oven has cooled enough to be safe (warm, not hot), wipe up the spill with a damp cloth. This takes 30 seconds and prevents the mess from baking on permanently. This habit means your monthly steam clean will always be a quick, easy wipe.
Use Oven Liners Strategically (With Caution)
A removable oven liner or catch tray placed on the bottom rack can catch drips and crumbs. Important: Never place a liner directly on the oven floor, as it can melt, smoke, or block vents. Use it only on a rack. This makes post-cooking cleanup a simple lift-and-shake.
Regular Light Maintenance
Once a week, give the oven door glass a quick wipe with a glass cleaner or vinegar solution. A clean door makes you more likely to notice a spill inside before it hardens. Also, periodically wipe the door gasket with a damp cloth to keep it free of food debris, which can affect the seal.
Deep Clean the Steam System Itself
Every 3-6 months, run an empty steam clean cycle using only distilled water and no food residue. This helps flush any mineral buildup from the reservoir and steam vents, ensuring optimal performance. After this “flush” cycle, wipe the interior as usual.
Protect the Finish
Always use soft cloths and non-abrasive cleaners on the porcelain enamel interior. Avoid any scouring powders or metal pads. The steam cycle is gentle, but your wiping tools must be too. This preserves the easy-to-clean surface for years.
Conclusion: Embrace Effortless Oven Maintenance
Mastering the steam clean feature on your Whirlpool oven is one of the simplest yet most impactful things you can do for your kitchen sanity. It transforms oven cleaning from a punishing, chemical-filled chore into a quick, water-based, and safe routine. By understanding its purpose—gentle steam for light-to-moderate messes—and committing to the essential preparation steps of emptying, scraping, and using the right water, you unlock its full potential. Remember, this feature is your ally for maintenance, not a miracle cure for years of neglect. Used regularly, it keeps your oven performing beautifully, looking great, and ready for your next culinary adventure without the dread of a scrubbing session. So, fill that reservoir, press that button, and enjoy the sparkling results with minimal effort. Your future self will thank you every time you open a clean oven door.
Frequently Asked Questions
How long does the Steam Clean cycle take on a Whirlpool oven?
The cycle itself typically runs for 30 to 45 minutes, depending on your specific model. However, you must also factor in the mandatory cool-down period of 45 to 60 minutes before you can safely wipe the interior. Plan for about 1.5 to 2 hours total from start to a clean, cool oven.
Is it safe to leave the oven racks in during the Steam Clean cycle?
No, you should always remove both oven racks and all accessories before starting a steam clean cycle. The prolonged exposure to heat and moisture can cause the metal racks to warp over time. Additionally, any residue on the racks will bake on, making them harder to clean. Remove them and wash them separately in the sink.
Can I use vinegar, baking soda, or other cleaners with the Steam Clean cycle?
Never add any substances other than clean water to the steam clean reservoir. Adding vinegar, baking soda, or commercial oven cleaners can create dangerous chemical reactions, produce toxic fumes, and damage the steam generation system and oven interior. The cycle is designed to work with water alone. For extra cleaning power, you can wipe the cooled oven with a vinegar-water solution after the cycle.
How often should I use the Steam Clean feature?
For best results, use the steam clean feature every 1 to 2 months, or immediately after any cooking that causes significant spills or splatters. Regular use prevents grime from building up and hardening, making each subsequent cleaning even easier. This proactive maintenance reduces the need for the harsher, high-temperature self-clean cycle.
What should I do if some baked-on food remains after wiping down?
If a small, stubborn spot remains after a steam clean and wipe-down, it likely exceeds the steam’s softening power. Create a paste of baking soda and water, apply it only to that spot, and let it sit for several hours or overnight. Then, gently rub with a non-abrasive nylon pad. After removing the spot, run another quick steam cycle to rinse the area. For widespread, ancient carbonized buildup, you may need to resort to a targeted application of a commercial oven cleaner on that specific area.
Can I use the Steam Clean cycle on a cold oven, or does it need to be preheated?
You should always start the steam clean cycle with a completely cold oven. The cycle is designed to heat the water from room temperature. Starting with a hot oven can be dangerous (risk of steam burns when opening) and may affect the cycle’s timing and effectiveness. Always ensure the oven is cool to the touch before filling the reservoir and starting the cycle.