Using the Steam Clean function on your Whirlpool oven is a simple, effective way to tackle everyday messes without harsh chemicals. Just add water to the oven bottom, select the cycle, and let the built-in steam loosen food residue. After the cycle, a quick wipe-down leaves your oven sparkling. This guide walks you through every step, from preparation to best practices, ensuring a safe and thorough clean every time.
Key Takeaways
- The Steam Clean cycle uses only water: No detergents or chemicals are needed or recommended, making it an eco-friendly and safe cleaning method for your oven interior.
- Preparation is crucial: Remove all racks, accessories, and loose food debris before starting the cycle for the best results and to prevent damage.
- It’s designed for light to moderate messes: The Steam Clean function excels at softening recent spills and baked-on grease but may not tackle heavily carbonized, old grime.
- The cycle is long but hands-off: Expect the process to take 30 minutes to over an hour, including heating, steaming, and cooling phases—no supervision required.
- Post-cycle wiping is mandatory: The steam loosens debris, but you must manually wipe the interior with a damp cloth or sponge after the oven cools completely.
- Never use commercial cleaners: Using oven spray or other chemicals during or after a Steam Clean cycle can cause dangerous fumes and damage the oven’s interior coating.
- Regular use prevents major buildup: Running the Steam Clean cycle monthly on a lightly used oven keeps it in pristine condition and avoids the need for harsher cleaning methods.
📑 Table of Contents
- Introduction: The Magic of Steam Cleaning Your Oven
- Understanding How the Steam Clean Feature Actually Works
- Step-by-Step: How to Use the Steam Clean Cycle on Your Whirlpool Oven
- Pro Tips for Maximizing Your Steam Clean Results
- Critical “Do Nots” and Safety Precautions
- Maintaining Your Oven Between Steam Clean Cycles
- Conclusion: Embrace Effortless Oven Maintenance
Introduction: The Magic of Steam Cleaning Your Oven
Let’s be honest: cleaning the oven is often at the bottom of our chore list. The thought of scraping at charred, baked-on food residue with harsh chemicals is enough to make anyone procrastinate. But what if you could press a button and let your oven essentially clean itself? That’s the promise of the Steam Clean feature, and Whirlpool has perfected it. This isn’t just a gimmick; it’s a smart, built-in system that leverages the power of steam to dissolve grease and food particles, making one of the kitchen’s toughest jobs remarkably simple.
If you own a Whirlpool oven with this feature, you have a powerful tool at your disposal. However, knowing *how* to use it correctly is the key to unlocking its full potential. Using it improperly can lead to disappointing results or, in rare cases, minor issues. This comprehensive guide will walk you through everything you need to know—from the exact steps to take before, during, and after the cycle, to insider tips on maximizing its effectiveness and avoiding common pitfalls. By the end, you’ll be a Steam Clean pro, ready to keep your oven sparkling with minimal effort.
Understanding How the Steam Clean Feature Actually Works
The Science Behind the Steam
Before diving into the “how-to,” it helps to understand the “why.” The Steam Clean function is brilliantly simple. The oven heats a small amount of water—usually about 1 to 1.5 cups—placed in the bottom of the oven cavity. This water is heated to boiling, creating a high-humidity, saturated steam environment inside the sealed oven. This hot steam does the heavy lifting: it penetrates and softens dried-on food splatters, grease, and baked-on residues. The moisture helps to rehydrate and loosen these materials, breaking their bond to the oven’s porcelain enamel interior coating.
Visual guide about How to Use the Steam Clean on a Whirlpool Oven
Image source: restoregoshop.ca
What It Cleans (And What It Doesn’t)
It’s important to have realistic expectations. The Steam Clean cycle is engineered for routine maintenance and light to moderate messes. Think recent spills from a bubbling lasagna, splatters from roasting vegetables, or general grease buildup. It is not designed for the deep, heavy-duty cleaning required for decades of accumulated, carbonized grime. For that, a traditional self-cleaning cycle (which uses much higher temperatures, around 900°F, to incinerate debris) or manual scraping might still be necessary. Think of Steam Clean as your weekly or monthly helper, not your occasional rescue mission for a neglected oven.
Step-by-Step: How to Use the Steam Clean Cycle on Your Whirlpool Oven
While exact button labels and cycle times can vary slightly between Whirlpool models (like those in the Range or Wall Oven series), the fundamental process is universal. Always consult your specific model’s manual, but this guide covers the standard procedure.
Visual guide about How to Use the Steam Clean on a Whirlpool Oven
Image source: restoregoshop.ca
Step 1: Preparation – The Most Important Phase
This step makes or breaks the entire cleaning process. Rushing here leads to poor results.
- Remove Everything: Take out all oven racks, baking stones, thermometer probes, and any accessories. The intense steam and heat can warp racks or damage other items. Set them aside for separate cleaning.
- Cool and Scrape: Ensure the oven is completely cool. Use a plastic or silicone spatula to gently scrape off any large, loose food chunks or burnt bits. Do not use metal scrapers, as they can scratch the enamel coating. Dispose of the debris.
- Wipe Away Loose Debris: With a damp paper towel or soft cloth, wipe the interior walls, floor, and ceiling to remove as much loose residue as possible. This allows the steam to focus on the stuck-on bits.
- Locate the Water Reservoir: On most Whirlpool ovens, you’ll pour water directly into the bottom of the oven cavity. There is no separate tank. Identify the area—it’s usually the deepest part of the floor.
Step 2: Adding Water
This is the core of the process.
- Measure the Water: Use approximately 1 cup (8 ounces) of clean, distilled, or filtered water. Tap water is fine, but distilled water prevents mineral deposits if you have very hard water. Never exceed the recommended amount, typically indicated by a fill line or in your manual. Too much water can cause overflow and mess.
- Pour Carefully: Slowly pour the water directly into the bottom of the cool oven. Avoid spilling it onto the heating elements (usually visible at the top or bottom) or the oven walls. If your model has a specific “water cup” or reservoir insert, use that as directed.
Step 3: Selecting and Starting the Cycle
Now, let the technology take over.
- Close the Door: Securely close the oven door. The oven must be sealed to build and maintain the steam pressure and temperature.
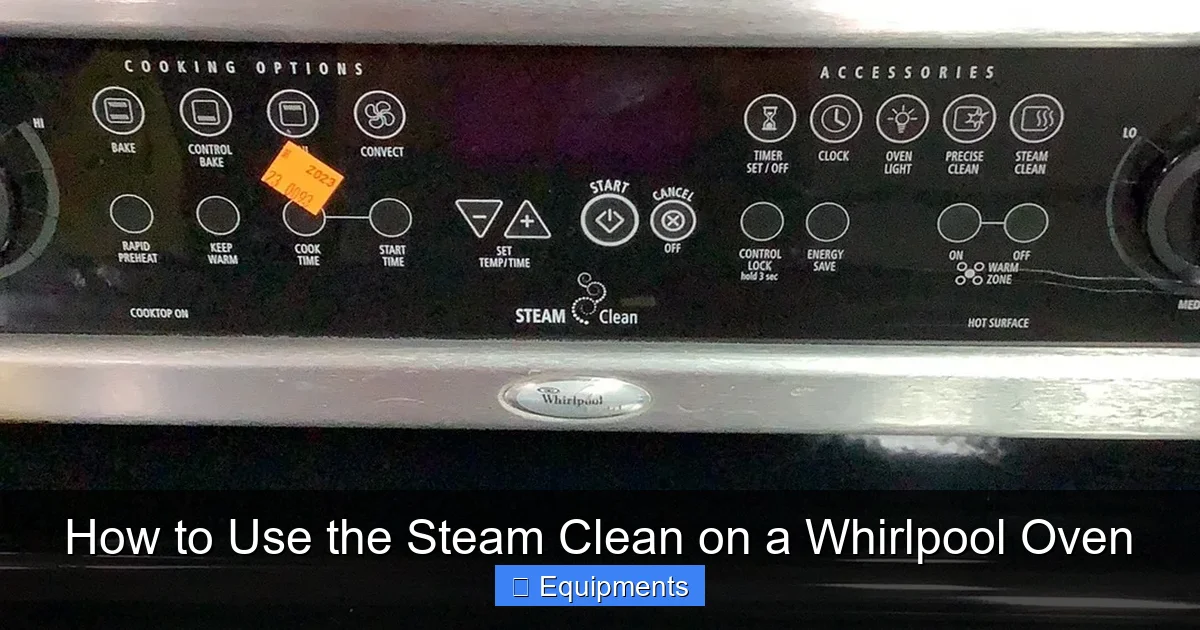
- Navigate the Controls: Press the Clean or Steam Clean button on your oven’s control panel. You may need to use the arrow or toggle keys to select the “Steam” option if your oven has both Steam and Pyrolytic (traditional self-clean) cycles.
- Start the Cycle: Press Start. The oven will lock (a safety feature), begin heating the water, and generate steam. The display will show the remaining time. Typical cycle times range from 30 minutes to 1 hour and 15 minutes, depending on the model and soil level setting (if available). Do not attempt to open the door during this time. The oven will be very hot and pressurized.
Step 4: The Waiting Game – What Happens During the Cycle
Once started, the process is automatic. You’ll hear the sound of boiling water and see steam visibly fogging the oven window. The cycle typically has two phases:
- Steam Phase: The water boils vigorously, filling the cavity with steam. This is the active cleaning period, lasting most of the cycle time.
- Cooling Phase: The heating element turns off, and the oven begins to cool. The door will remain locked until the internal temperature drops to a safe level (usually below 200°F). This can take 30-45 minutes after the active cleaning time ends. Do not force the door open.
Step 5: Post-Cleaning – The Final Wipe-Down
This is the non-negotiable final step for a truly clean oven.
- Ensure the Oven is Cool: Wait until the lock icon on the display disappears and the oven is comfortably cool to the touch. This is a critical safety step.
- Remove the Residual Water: You’ll find a small amount of dirty water and loosened debris pooled in the bottom of the oven. Use a sponge or absorbent cloth to soak it up and wring it into a sink.
- Wipe the Interior: Dampen a soft cloth, sponge, or non-scratch scrubber with warm, soapy water (a drop of dish soap is fine now). Wipe down all interior surfaces—walls, ceiling, door, and floor. The steam should have loosened almost everything, so this should require minimal effort. For any stubborn spots, let a warm, soapy cloth sit on the spot for a minute to further soften it.
- Rinse and Dry: Go over the surfaces with a clean, damp cloth rinsed in clear water to remove any soap residue. Finally, dry everything with a soft, dry towel or let it air dry.
- Clean the Door Gasket: Don’t forget the rubber door seal. Wipe it with a damp cloth to remove any steam residue or grease.
Step 6: Replacing Racks and Ventilation
Once the interior is completely dry, slide your clean oven racks back in. Leave the oven door slightly ajar for a few hours to ensure any residual moisture evaporates completely, preventing musty smells.
Pro Tips for Maximizing Your Steam Clean Results
Following the basic steps will get you a clean oven, but these professional tips will get you a *spotless* oven with even less frustration.
Visual guide about How to Use the Steam Clean on a Whirlpool Oven
Image source: aqsappliances.com
Tip 1: Timing is Everything – Clean While Warm (But Not Hot)
The best time to run your Steam Clean cycle is after you’ve just used the oven for cooking, but once it has cooled down to a warm touch (around 150-200°F). The residual heat helps the water reach the boiling point faster, shortening the cycle time slightly. More importantly, recent spills are still relatively fresh and will be easiest for the steam to tackle. Cleaning a cold oven with old, caked-on messes will yield less impressive results.
Tip 2: Pre-Treat Extremely Stubborn Spots
For a particularly tough, baked-on patch (like melted cheese or dried sugar), don’t expect the steam to do it all. Before starting the cycle, place a warm, damp cloth directly on the spot and let it sit for 10-15 minutes. This pre-soaking in moisture will give the steam cycle a huge head start. Alternatively, you can make a paste of baking soda and water, apply it thinly to the spot, and let it sit overnight before running the Steam Clean cycle. The baking soda is a mild abrasive and degreaser that works synergistically with the steam.
Tip 3: Use the Right Tools for Wiping
After the cycle, your best friends are a non-scratch scrubber sponge (like the blue-and-yellow kind) and a microfiber cloth. For any remaining tiny bits of residue, use the scrubber side with gentle circular motions. The microfiber is perfect for the final wipe and dry, as it traps moisture and particles without scratching. Avoid steel wool, abrasive powders, or metal scrapers at all costs.
Tip 4: Clean the Oven Window Separately
The Steam Clean cycle is great for the main cavity, but it may not fully tackle a greasy, foggy oven door window. For that, create a paste of baking soda and water, spread it on the cooled window (avoiding the gasket), let it sit for 20-30 minutes, then wipe clean with a damp cloth. For extra shine, finish with a 50/50 solution of vinegar and water. The steam from the main cycle can sometimes help, but dedicated attention ensures crystal clarity.
Tip 5: Maintain a Cleaning Schedule
The easiest way to keep your oven clean is to use the Steam Clean feature preventatively. If you use your oven heavily (multiple times a week for roasting, etc.), run the Steam Clean cycle once a month. For lighter use, every 2-3 months is sufficient. This regular, light maintenance prevents the need for the more intense (and smelly) traditional self-clean cycle and keeps your oven performing and looking its best.
Critical “Do Nots” and Safety Precautions
Using the Steam Clean feature is very safe, but there are absolute rules to follow to avoid damaging your appliance or creating a hazardous situation.
Never Use Commercial Oven Cleaners or Chemicals
This is the single most important rule. The Steam Clean cycle is designed to work with water only. Spraying on a commercial oven cleaner (like Easy-Off) before or after the cycle is dangerous. The chemicals can react violently with the high heat and steam, creating toxic fumes that are harmful to inhale. They can also corrode or discolor the porcelain enamel interior. If you have accidentally used a chemical cleaner, you must thoroughly rinse and wipe the oven multiple times with water before ever running a Steam Clean cycle.
Do Not Add Anything Other Than Water
Resist the urge to “boost” the cleaning power by adding vinegar, lemon juice, dish soap, or baking soda directly to the water reservoir. These substances can foam, overflow, or leave residues that are difficult to rinse away and may burn onto the surface during the heating process. Stick to plain water in the reservoir.
Never Open the Door During the Cycle
The oven door locks automatically for a reason. Opening it during the Steam Clean cycle releases a blast of scalding, pressurized steam that can cause severe burns. It also disrupts the cleaning process, as the oven needs to maintain a sealed, high-humidity environment. Wait for the cycle to complete and the lock to disengage.
Be Mindful of Overflow
Using more than the recommended amount of water (usually 1-1.5 cups) is the primary cause of overflow. Excess water will boil over onto the oven floor, creating a bigger mess to clean up and potentially seeping into the door gasket or vent areas. Measure carefully.
Do Not Clean the Heating Elements
The exposed heating elements (the coils at the top or bottom) are not designed to be cleaned. Do not attempt to scrub or wipe them. If food drips onto them, simply let it burn off during normal cooking or during the Steam Clean cycle—the high heat will incinerize it. Scraping or cleaning them can damage the element’s coating.
Maintaining Your Oven Between Steam Clean Cycles
To make your monthly Steam Clean a breeze, adopt these simple daily and weekly habits.
The Post-Cooking Wipe
The best defense is a good offense. After every time you use the oven—especially for messy foods like casseroles, pizzas, or roasted meats—take 30 seconds to wipe up any visible spills or splatters while the oven is still warm (but not hot). A warm, damp cloth or a quick spray of a daily kitchen cleaner will do. This prevents spills from baking on permanently and becoming a future chore.
Use Oven Liners and Baking Sheets Strategically
Place a baking sheet on the rack below whatever you’re cooking to catch drips and drips. For pizzas and pies, using a pizza pan or baking sheet with a lip can contain bubbling cheese and sauce. Silicone oven liners that fit on the oven floor can be a great barrier, but ensure they are rated for your oven’s maximum temperature and are placed correctly so they don’t obstruct vents or touch heating elements.
Check and Clean the Door Gasket Regularly
The rubber seal around the oven door is prone to collecting grease and food particles. Wipe it down with a damp cloth weekly. A clean gasket ensures a proper seal, which is vital for the efficiency of both the Steam Clean and cooking cycles. If the gasket becomes damaged, torn, or hardened, it should be replaced to maintain oven performance and safety.
Ventilation is Key
Your oven has a venting system, usually a slot at the top or bottom of the door or on the control panel. Ensure these vents are never blocked by pots, pans, or towels. A blocked vent traps heat and moisture inside, which can affect cooking performance and potentially cause excess condensation during the Steam Clean cycle.
Conclusion: Embrace Effortless Oven Maintenance
The Steam Clean feature on your Whirlpool oven isn’t just a convenience; it’s a game-changer for kitchen hygiene and your peace of mind. By understanding its mechanism—using only water to generate powerful, penetrating steam—and following the precise steps for preparation, execution, and post-cycle care, you transform oven cleaning from a dreaded weekend project into a simple, monthly ritual. Remember, consistency is key. Regular, light cleaning with Steam Clean prevents the daunting buildup that requires harsh chemicals or the intense, long-duration traditional self-clean cycle. Adopt the pro tips, strictly avoid the critical “don’ts,” and integrate quick wipes into your cooking routine. In doing so, you’ll keep your Whirlpool oven performing optimally, looking its best, and providing a safe, clean environment for all your culinary creations for years to come. Now, go enjoy your sparkling clean oven and the delicious meal you’re about to cook in it!
Frequently Asked Questions
How long does the Steam Clean cycle take on a Whirlpool oven?
The total cycle time, including heating, steaming, and cooling, typically ranges from 45 minutes to over 90 minutes. The active steaming phase is usually 30-60 minutes, followed by a mandatory cooling period where the door remains locked until the oven is safe to open. Always refer to your specific model’s manual for exact timings.
Is it safe to leave the oven unattended during the Steam Clean cycle?
Yes, it is designed to be a fully automatic, hands-off process. Once you start the cycle and close the door, it is safe to leave the kitchen. The oven door will lock automatically as a safety feature, preventing it from being opened until the internal temperature has cooled to a safe level. However, always ensure your kitchen is well-ventilated.
Can I use dish soap or vinegar in the water for a deeper clean?
No. The Steam Clean cycle is engineered to work with plain water only. Adding soap, vinegar, or other cleaners can cause excessive foaming, overflow, and leave behind residues that may burn or create unpleasant odors during the heating process. For extra cleaning power, pre-treat spots with a baking soda paste before starting the cycle.
How often should I run the Steam Clean cycle?
For optimal maintenance, run the Steam Clean cycle monthly if you use your oven regularly (several times a week). For lighter use (once or twice a week), every 2-3 months is sufficient. The goal is to treat light spills before they become hardened, baked-on messes that the steam cannot handle.
Will Steam Clean remove old, heavily baked-on grease and carbon buildup?
It may soften and remove some of it, but it is primarily designed for routine, light-to-moderate messes. For decades of accumulated, carbonized grime, the Steam Clean cycle might not be powerful enough. In such cases, you may need to use the traditional high-temperature Self-Clean cycle (if your model has one) or resort to manual scraping with a gentle, non-abrasive tool after using a dedicated oven cleaner (used separately and rinsed thoroughly).
Why is there still dirty water or residue in the bottom after the cycle?
This is normal. The steam loosens debris, which then mixes with the condensed steam water, creating a dirty slurry in the bottom of the oven. This is precisely why the post-cycle wiping step is essential. You must manually remove this dirty water and wipe all surfaces. If significant solid residue remains after wiping, it indicates the pre-cleaning scraping step was insufficient for that particular mess.