Organizing your pull-out pantry drawers is a game-changer for kitchen efficiency. This guide walks you through a proven system: start by emptying and decluttering everything, then sort items into logical zones. Invest in uniform, shallow containers and label everything clearly. The result is a visually calm, highly functional space where you can instantly find what you need, reducing food waste and daily stress. Consistent, simple maintenance keeps it that way for the long haul.
Let’s be honest: pull-out pantry drawers are a brilliant kitchen innovation. They take that deep, dark, hard-to-reach cabinet space and turn it into a smooth, accessible storage solution. But that very depth is also their greatest weakness. Without a system, they quickly become a black hole for forgotten snacks, mismatched containers, and mystery items shoved to the back. You pull it out, a cascade of cereal boxes and bags tumbles out, and you’re left feeling frustrated and overwhelmed. Sound familiar?
Organizing these drawers isn’t about achieving a sterile, magazine-worthy look (though that’s a nice bonus). It’s about creating a functional, intuitive system that saves you time, reduces food waste, and brings a little more peace to your daily routine. It’s about turning that potential headache into your kitchen’s secret weapon. This comprehensive guide will walk you through every single step, from the initial purge to the final label, ensuring your pull-out pantry drawers work for you, not against you.
Key Takeaways
- Empty and Assess First: Always begin by completely emptying the drawer. This is the only way to truly see its potential, identify problem areas, and clean the space thoroughly before reorganizing.
- Sort into Logical Zones: Group like items together (baking supplies, snacks, spices, etc.) before placing them back. This zoning system is the core of functional organization and makes items intuitive to locate.
- Use Uniform, Shallow Containers: Opt for shallow, rectangular bins and dividers that fit the drawer’s depth perfectly. Uniform containers create a clean, integrated look and prevent the “junk drawer” effect.
- Label Relentlessly: Clear labels on container fronts or edges are non-negotiable for long-term success. They ensure every family member can maintain the system and items are returned to their proper home.
- Prioritize Accessibility: Store everyday items at the front and top of zones, with lesser-used items toward the back. Consider weight—keep heavy items lower for safety and ease.
- Maintain with a “One In, One Out” Rule: To prevent regression, adopt a simple rule: when adding a new item, remove an old one. Schedule a quick 5-minute weekly reset to straighten and reassess.
- Think About Aesthetics: In a visible kitchen space, cohesive container materials (like bamboo or white plastic) and neat alignment contribute significantly to a sense of calm and order.
📑 Table of Contents
- Why Pull-Out Pantry Drawers Need Special Attention
- Phase One: The Great Purge and Assessment
- Phase Two: Zoning and Planning Your Layout
- Phase Three: Selecting the Right Storage Solutions
- Phase Four: The Implementation – Loading Your New System
- Phase Five: The Finishing Touches – Labeling and Aesthetics
- Long-Term Maintenance: The 5-Minute Weekly Reset
- Special Considerations and Pro Tips
- Conclusion: Your Calm, Functional Pantry Awaits
Why Pull-Out Pantry Drawers Need Special Attention
Before we dive into the “how,” let’s understand the “why.” Standard shelves have their own challenges, but pull-out drawers present a unique set of circumstances that demand a tailored approach. They are essentially a long, narrow room on wheels. You have excellent front-to-back access, but limited side-to-side visibility unless you pull the entire drawer out. This creates a natural tendency to pile items in layers, with the newest additions plopped on top, burying older items.
The Depth Dilemma
The primary issue is depth. A standard 24-inch deep cabinet becomes a 24-inch deep drawer. That’s a long way to reach! Without internal organization, you’re forced to either keep the drawer frustratingly under-utilized at the front or engage in deep excavation every time you need the baking powder at the back. This leads to items being forgotten, expiring, and ultimately thrown away. Proper organization converts that single deep space into a series of shallow, manageable “layers” or zones, each with its own purpose.
The Accessibility Advantage
The beauty of the pull-out is its full extension. Unlike a fixed shelf where you can only see the front row, a good drawer slides out completely, revealing its entire contents. Our goal is to leverage this advantage. By using containers that match the drawer’s depth, you can pull the drawer out and see everything at a glance, without having to unload it. It transforms the experience from a treasure hunt to a simple scan.
Phase One: The Great Purge and Assessment
You cannot organize clutter. It’s the first and most important rule. This phase is non-negotiable and sets the foundation for everything that follows. Think of it as triage for your pantry. Schedule 30-60 minutes of uninterrupted time, put on some music, and let’s get to work.
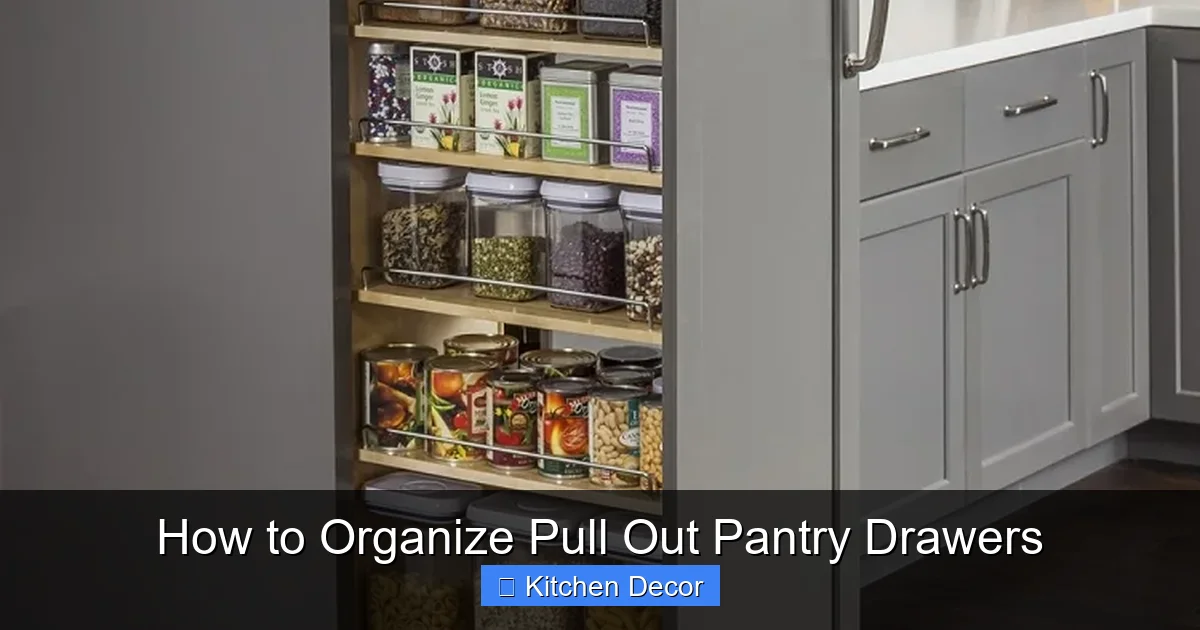
Visual guide about How to Organize Pull Out Pantry Drawers
Image source: slideoutshelvesllc.com
Step 1: Completely Empty the Drawer
Yes, everything. Pull the drawer out fully and place a large towel or sheet on your counter or kitchen table. Dump every single item onto it. This is your chance to see the true volume of what you own and confront the “what is this?” moments. As you empty, wipe down the interior of the drawer with a damp cloth. This small act of cleaning is psychologically powerful and gives you a fresh, clean slate to work with.
Step 2: Sort into Four Categories
Now, take each item and sort it into one of four piles on your towel:
- Keep: Items you use regularly, are unexpired, and belong in the pantry.
- Relocate: Items that don’t belong in this specific drawer (e.g., a can of cat food in the snack drawer) or belong in another kitchen zone (e.g., cooking oils that would be better near the stove).
- Discard/Donate: Expired food, items you know you’ll never use, or unopened non-perishables you can donate to a local food bank.
- Undecided: A small, limited pile for things you truly need to think about. Set a timer—if you haven’t decided in 10 minutes, it probably goes in the discard/donate pile.
Be brutally honest. That half-used bag of specialty flour from a failed baking experiment three years ago? It’s time to let it go.
Step 3: Analyze Your “Keep” Pile
This is your inventory. Group these kept items by type. You’ll likely see natural clusters emerge: all the pastas and grains, the assorted snacks, the baking supplies, the spice packets, the canned goods. Count how many distinct categories you have. This count will directly inform how many containers or dividers you’ll need. Also, note the shapes and sizes. Do you have mostly tall boxes (cereal), flat bags (chips), or small jars (spices)? This variety is what we’ll accommodate with our storage solutions.
Phase Two: Zoning and Planning Your Layout
Now that you know what you have and how much, it’s time for the blueprint. The secret to a drawer that stays organized is a designated “home” for every single item type. We call these “zones.” A zone is a dedicated space within the drawer for a specific category of items.
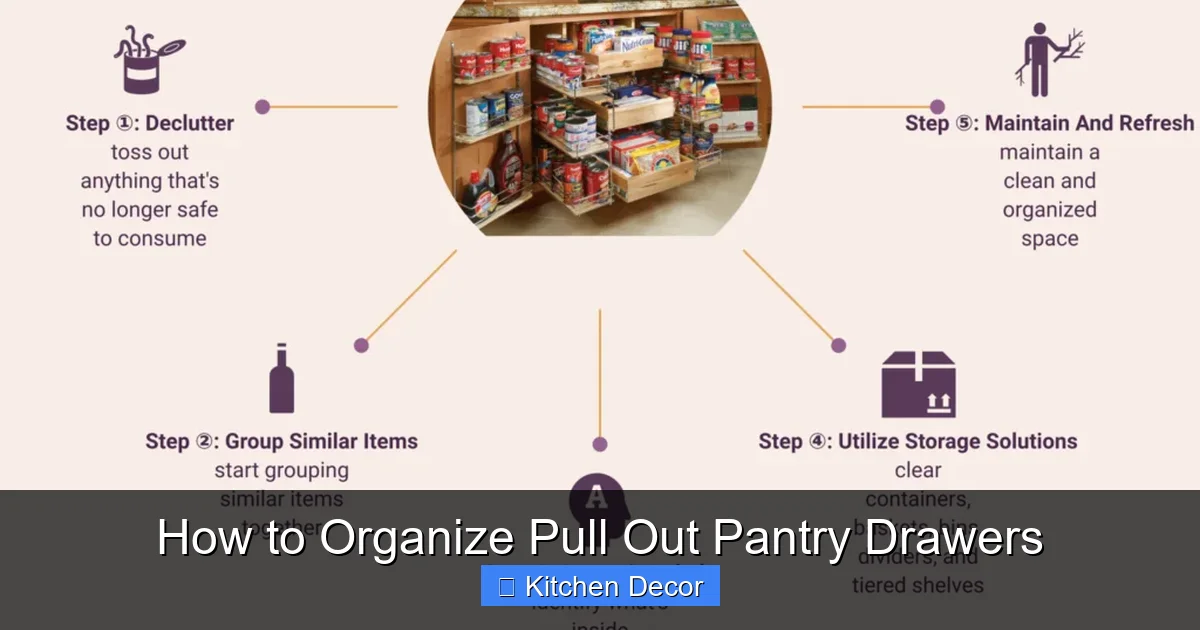
Visual guide about How to Organize Pull Out Pantry Drawers
Image source: diyguidance.com
How to Determine Your Zones
Look at your sorted “Keep” piles. Your zones should reflect your cooking and eating habits. Ask yourself:
- What do I reach for most during the week? (Everyday snacks, breakfast items)
- What do I use for weekly meal prep? (Pasta, canned tomatoes, rice)
- What is specialty or occasional? (Holiday baking supplies, entertaining items)
Place your high-frequency zones toward the front of the drawer for easiest access. Medium-frequency zones go in the middle, and low-frequency or bulk items go toward the back. This is your “usage-based” layout.
Sketching It Out
Grab a piece of paper and draw a simple rectangle representing your drawer’s interior. Now, block out sections for each zone. Consider the height of items. For example, a zone for baking sheets or large cutting boards might need the full height of the drawer. A zone for spice jars can be shallow. Leave a small “miscellaneous” or “landing zone” at the very front for items that are in transition (a newly purchased item not yet shelved, a half-used container of something). This landing zone prevents clutter from accumulating on the counter.
Accounting for Drawer Hardware
Don’t forget the drawer slides! When your drawer is fully extended, the slides themselves occupy a tiny bit of space on the inside, usually at the very back. Ensure your planned layout doesn’t place a critical, frequently accessed item in a spot that gets obstructed by the slide mechanism when the drawer is closed. Typically, the back 1-2 inches are less accessible, perfect for your low-frequency zone.
Phase Three: Selecting the Right Storage Solutions
This is where the magic happens. The right containers turn your zoned plan into a physical reality. The goal is to create “sub-drawers” within your drawer—shallow, defined compartments that hold a specific category. Forget about repurposing random plastic tubs. We’re aiming for a cohesive, intentional look that maximizes every inch.
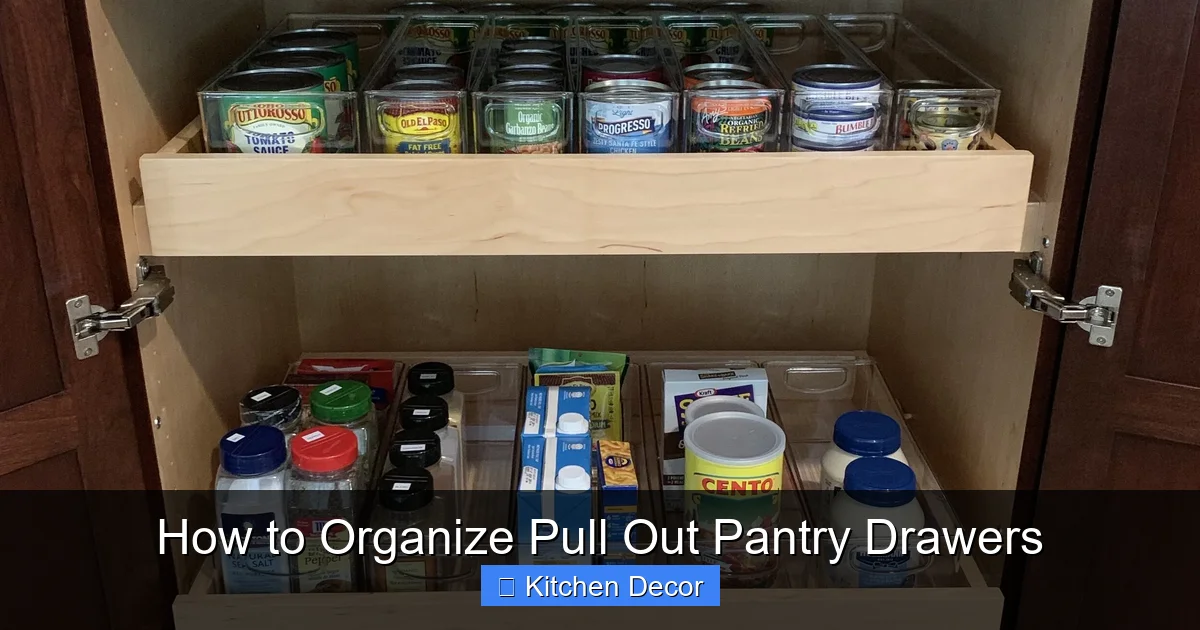
Visual guide about How to Organize Pull Out Pantry Drawers
Image source: images.squarespace-cdn.com
The Golden Rule: Shallow and Rectangular
For pull-out pantry drawers, shallow is superior. You want containers that are no deeper than 4-6 inches, depending on your drawer depth. This ensures you can see and reach the back of the container without having to pull it out entirely. Rectangular shapes are also key—they tessellate perfectly, minimizing wasted space between them, unlike round containers that leave awkward gaps.
Container Types and Their Perfect Uses
- Adjustable Divider Trays: These are the workhorses. They are shallow trays with movable plastic or bamboo dividers. You can configure them to create custom-sized compartments for everything from spice jars to snack bags to packets. Ideal for drawers with a mix of small items.
- Fixed-Compartment Organizers: These are pre-made trays with a set number of equal-sized squares or rectangles (e.g., 9-compartment for spices, 4-compartment for baking supplies). Perfect for when you have a very consistent set of items (like a standard spice jar collection).
- Open Front Bins and Baskets: For larger, bulkier items like bags of chips, boxes of cereal, or clusters of canned goods. Look for bins with a high front-to-back ratio and a cut-out or open front. This allows you to see the labels of items inside and pull the bin out as a single unit if needed. Woven baskets add warmth but can be harder to clean; plastic or metal are more practical for pantries.
- Lazy Susan Turntables: Don’t forget the power of the turntable! A small, shallow lazy susan (10-12 inch diameter) placed in the back of a deep drawer is a revelation. Simply spin it to bring items from the back to the front. It’s the ultimate solution for that “back of the drawer” black hole.
- Drawer Organizers for Utensils: These can be repurposed! The shallow, compartmentalized trays designed for flatware are fantastic for organizing small packets (tea, coffee, hot chocolate, drink mixes), seasoning packets, or small baking extracts.
Material Matters
Stick to durable, easy-to-clean materials. Food-safe plastic (PP or acrylic) is lightweight and affordable. Bamboo is beautiful, sturdy, and sustainable. Powder-coated metal is sleek and very durable. Avoid wicker or untreated fabric in a pantry, as they can harbor spills and pests.
Phase Four: The Implementation – Loading Your New System
You have your zones planned and your containers selected. Now, let’s put it all together. This step requires precision and a commitment to the system you’ve designed.
Place Containers First
Before you put a single food item back, place all your empty containers and organizers into the drawer according to your sketch. Arrange them to see if your layout works. Can you pull the drawer out smoothly? Is there any shifting? Adjust as needed. This is your dry run.
Fill Containers by Category
Now, take your sorted piles from Phase One. Fill each container with its designated category. For example, all pasta and grains go into one bin. All chip and snack bags go into another. Be strict here. A single stray granola bar in the baking zone will be the seed of future clutter.
The Art of “Facing” and “Nesting”
Within each container, practice “facing.” Align all labels to face the same direction (usually towards the front of the drawer). This creates instant visual order and makes scanning for items effortless. For bags (chips, flour), roll them neatly or use bag clips to seal and flatten them, allowing them to stand upright like books on a shelf. This “nesting” technique saves massive amounts of space.
Placement According to Your Zone Plan
Now, place the filled containers into their designated zones in the drawer. Remember: heaviest items (cans, large bottles) should go in the front-lower part of their zone for easier lifting and to prevent them from crushing items behind. Lightest items (packets, small boxes) can go in the back or on top. Ensure the drawer can still be pulled out fully without containers catching on the cabinet frame.
Phase Five: The Finishing Touches – Labeling and Aesthetics
A system without labels is a system destined to fail. Labels are the instruction manual that allows anyone in your household to maintain the organization. They are not optional; they are essential.
Labeling Best Practices
Use a label maker for clean, consistent, smudge-proof text. Alternatively, use a permanent marker on masking tape or chic chalkboard labels. The label should go on the front edge of the container, not the side, so it’s visible when the drawer is closed or when you pull it out. Be specific but concise. “Pasta & Grains” is better than just “Food.” “Snacks – Kids” clarifies ownership. For bins with multiple items, you can list them (e.g., “Chips, Pretzels, Nuts”).
Creating Visual Calm
Since pantry drawers are often in a visible kitchen area, their appearance matters. Choose containers in a cohesive color palette—white, clear, bamboo, or black create a streamlined look. Avoid a mishmash of colors and styles. Take a moment to ensure all container fronts are flush and aligned. This simple act of alignment makes the drawer look professionally organized, even if it’s full.
The “Landing Zone” Protocol
Designate that small front space as the official “Landing Zone.” Its only job is to hold the one item currently in transit—the new box of tea you just bought, the half-used can of beans that needs to go back in. Make a household rule: nothing stays in the landing zone overnight. Before bed or during the nightly kitchen tidy, that item must be moved to its proper container. This prevents the landing zone from becoming a dumping ground.
Long-Term Maintenance: The 5-Minute Weekly Reset
Organization is not a one-time event; it’s a habit. The key to preventing your beautifully organized drawers from devolving back into chaos is a tiny, consistent maintenance ritual.
The Weekly 5-Minute Audit
Pick a low-stress time, like Sunday evening while dinner is cooking. Pull out each pantry drawer one by one. Do a quick scan:
- Are all items in their correct, labeled container?
- Is anything out of place, spilled, or opened and not sealed?
- Is the “Landing Zone” clear?
- Check for expiring items. Rotate any newer items to the back of their container, older items to the front.
Spend just 60-90 seconds per drawer. This tiny investment prevents massive future overhauls.
The “One In, One Out” Rule
To manage volume, especially in smaller pantries, institute a strict “one in, one out” policy. When you bring a new jar of pasta sauce home, identify an older one (or a different item you no longer need) and immediately place it in your donation box. This keeps your inventory from silently ballooning and overcrowding your carefully planned zones.
Adapting to Changing Needs
Your pantry needs will change. A new hobby (home brewing), a dietary shift (gluten-free), a new baby—all these impact what you store. Every 3-6 months, revisit your zone map. Does it still make sense? Is a zone too full or underused? Be flexible and willing to swap container placements or even zone definitions. Your system should serve you, not the other way around.
Special Considerations and Pro Tips
Let’s tackle some common scenarios and advanced tricks to squeeze every bit of functionality from your drawers.
Organizing Very Deep Drawers
For drawers deeper than 24 inches, a single layer of shallow containers might not be enough. Consider a two-tier system using a shallow drawer insert on top for small, frequent items (spices, packets) and leaving the lower, deeper space for larger, less-frequent items accessed via a lazy susan or large bin. Alternatively, use a very deep bin for bulk items and place a shallow divider tray on top of it within the same drawer for your everyday items.
Managing Weight and Safety
Never overload a drawer. Pull-out slides have weight limits, usually between 50-100 lbs. Distribute heavy items (cans, large bottles) across multiple drawers if possible. If one drawer must hold all the canned goods, keep them in a sturdy, deep bin that contains them and prevents shifting. Ensure the drawer is fully supported when pulled out to avoid tipping.
Kid-Friendly Accessibility
If kids get their own snacks, create a dedicated “Kids Snack” zone in the easiest-to-reach drawer, at their height. Use open bins they can easily open and close. Label with pictures for pre-readers. Store healthy options at the front of the bin and treats in a separate, higher or back bin if you want to control access.
Dealing with Awkward Items
What about the rolling pin, the extra loaf pan, or the giant bag of flour? These are “oddballs.” Assign them a specific, spacious home—perhaps a single deep bin in the back of a drawer, or a dedicated drawer just for bulky bakeware. The rule is: everything has a home. If it doesn’t, it doesn’t belong in the pantry and should be relocated to a garage, basement, or donated.
Conclusion: Your Calm, Functional Pantry Awaits
Organizing your pull-out pantry drawers is more than a weekend chore; it’s an investment in the daily smooth operation of your home. It’s the difference between starting your day with a frustrating search and starting it with effortless confidence. By following this structured process—the purge, the zoning, the strategic container selection, and the commitment to labeling and maintenance—you transform wasted space into a highly efficient, visually pleasing asset.
Start with one drawer. Don’t try to tackle the entire kitchen at once. Experience the satisfaction of that first perfectly organized compartment, the joy of seeing every label face forward, the relief of finding the cumin on the first try. That positive reinforcement will fuel you to tackle the next drawer. Your kitchen should be a place of creativity and nourishment, not stress and searching. Take control of your pantry drawers today, and feel the difference every single time you pull one open.
Frequently Asked Questions
What are the best containers for deep pull-out pantry drawers?
The best containers are shallow (3-6 inches deep), rectangular bins or divider trays made of durable plastic, bamboo, or metal. Shallow containers ensure you can see and reach the back easily. Look for open-front bins for boxed goods and adjustable dividers for mixed small items like packets and spice jars.
How do I organize a very narrow pull-out drawer?
For narrow drawers (less than 12 inches wide), use slim, vertical organizers designed for utensils or cutting boards. Create vertical zones by stacking flat items like baking sheets or pans using a file-style organizer. Use tall, thin containers for spices or oils, and prioritize items with small footprints. A single, long, shallow bin running the full width can hold items like rolled-out pastry or long utensils.
What’s the best way to keep my organized pantry drawers from getting messy again?
The key is consistent, minimal maintenance. Implement a 5-minute weekly reset where you check for misplaced items and straighten zones. Enforce a strict “one in, one out” rule for new purchases. Most importantly, label every container clearly so every household member knows where things belong, making it easy for everyone to maintain the system.
Should I use baskets or bins in my pantry drawers?
Both can work, but bins are generally superior for pull-out drawers. Look for plastic or metal bins with high fronts and open fronts (or cut-out fronts) so you can see labels inside. Woven baskets can be beautiful but are harder to clean if spills occur and can snag on drawer slides. If using baskets, ensure they are specifically designed for drawer use with smooth, finished edges.
How do I organize snacks so kids can help themselves?
Create a dedicated, low-to-the-ground drawer for kids’ snacks. Use open, easy-to-grip bins. Organize by type (chips, fruit snacks, granola bars) and label with words and pictures. Store healthier choices at the front of the bin and treats in a separate bin or toward the back to encourage better choices. This system empowers kids and keeps the main pantry zones intact.
What if my drawer is too shallow for standard containers?
For very shallow drawers (under 3 inches), standard containers won’t work. Use ultra-shallow drawer organizers meant for jewelry or desk supplies. These have very low compartments perfect for spice jars, small packets, or tea bags. You can also use the drawer itself as the “container” by using adhesive-backed, non-slip liner to create defined zones directly on the drawer bottom, then placing items in those zones without additional bins.