Lining a loaf pan with parchment paper is a simple yet transformative baking technique. It creates a non-stick barrier that guarantees your delicate loaves, cakes, or meatloaf release cleanly without sticking or tearing. This process promotes even baking, prevents over-browning on the bottom, and makes cleanup an absolute breeze. By following a few precise steps—measuring, cutting, and fitting—you can achieve professional results and eliminate the most common pan-related baking frustrations.
Key Takeaways
- Perfect Release: Parchment paper acts as a reliable non-stick surface, ensuring your baked goods slide out of the pan intact every single time.
- Even Baking: It insulates the bottom of the loaf, preventing excessive heat exposure that can lead to over-browning or a hard crust before the center is done.
- Effortless Cleanup: The paper catches all drips and crumbs, allowing you to simply lift the loaf out and discard the liner, making the pan ready for its next use instantly.
- Measure Twice, Cut Once: Accurate pan measurements are crucial; the paper must be long enough to cover the bottom and tall enough to create overhanging “handles” on the long sides.
- The “No-Knot” Method is Key: The most reliable technique involves creating long overhangs on the two long sides of the pan and leaving the short sides open, avoiding the tricky and often ineffective knot method.
- Greasing is Optional but Helpful: A light coating of butter or oil on the pan *before* adding the parchment helps it adhere and prevents any potential slipping during batter pouring.
- Common Pitfalls: Avoid using wax paper (it melts), cutting the paper too short, or forcing the paper into corners, which causes tearing and wrinkles that can affect your bake.
📑 Table of Contents
- Why Lining Your Loaf Pan is Non-Negotiable for Perfect Bakes
- Understanding Your Tools: Parchment Paper vs. Alternatives
- Gathering Your Materials: More Than Just Paper
- The Step-by-Step Method: The “No-Knot” Technique
- Common Mistakes and How to Avoid Them
- Beyond the Basics: Pro Tips and Special Considerations
- Troubleshooting: When Things Go Wrong
- Conclusion: The Simple Secret to Stress-Free Baking
Why Lining Your Loaf Pan is Non-Negotiable for Perfect Bakes
Let’s be honest: few things are more disheartening in baking than meticulously preparing a batter, pouring it into a loaf pan, baking it to golden perfection, and then having it stubbornly stick, tear, or crumble when you try to remove it. You’ve poured your heart—and your ingredients—into this creation. The final step, getting it out of the pan intact, should be a victory, not a victory-over-a-sticky, crumbly mess. This is where the humble sheet of parchment paper becomes your baking best friend. It’s not just a convenience; for many recipes, especially delicate ones like pound cake, banana bread, or glazed meatloaf, it’s an essential tool for success. Understanding how to line a loaf pan with parchment paper correctly elevates your baking from a hopeful gamble to a reliable, repeatable science. It’s the small detail that separates the good bakers from the great ones. In this comprehensive guide, we will walk through every single step, from measuring your pan to mastering the no-knot technique, ensuring you never face a stuck loaf again.
The Multifaceted Benefits of a Parchment Liner
Beyond the obvious benefit of easy release, a properly lined loaf pan offers several other critical advantages that directly impact the quality of your final product. First, it acts as an insulator. The dense metal of a loaf pan conducts heat very efficiently. Without a barrier, the bottom crust can brown and harden much faster than the center of the loaf cooks, leading to a disproportionally thick, tough bottom crust. The parchment paper creates a slight air gap, moderating the heat transfer to the bottom and allowing the entire loaf to bake more evenly from crust to core. Second, it protects the pan itself. Sugary batters, caramel sauces, or cheesy meatloaf mixtures can caramelize or burn onto the pan’s surface, creating a nightmare scrub. The parchment catches all of this, preserving your bakeware and saving you significant time and elbow grease. Third, for presentation, a clean, smooth liner allows you to lift the entire loaf out by the overhanging tabs, leaving a perfectly shaped, pristine loaf ready for slicing or decorating. No more awkward in-pan cooling or risky flipping maneuvers.
Understanding Your Tools: Parchment Paper vs. Alternatives
Before we dive into the “how,” it’s vital to understand the “what.” Not all baking papers are created equal, and using the wrong material can be a recipe for disaster. The term “parchment paper” is often used generically, but there are key distinctions.
Visual guide about How to Line Loaf Pan with Parchment Paper
Image source: m.media-amazon.com
Parchment Paper: The Gold Standard
True parchment paper is cellulose-based and treated with a non-stick coating, typically silicone. It is heat-resistant, usually safe up to 420-450°F (215-230°C). It is non-reactive, meaning it won’t interact with acidic ingredients like tomatoes or citrus. It is flexible, easy to work with, and has a slightly translucent, grayish appearance. This is the only paper you should use for lining loaf pans. Brands like Reynolds Wrap™ Parchment Paper or If You Care® FSC Certified Parchment are reliable choices.
What NOT to Use: Wax Paper and Grocery Bags
Wax Paper is NOT a substitute for parchment paper. It is coated with wax, which melts at baking temperatures. Using it in a hot oven will cause the wax to smoke, potentially transfer a waxy taste to your food, and create a fire hazard. It is solely for cold applications like lining sandwich wraps or separating layers of cookies for storage. Similarly, never use brown paper bags, newspaper, or regular printer paper. They are flammable, can impart unwanted flavors, and will not provide a non-stick surface.
Silicone Baking Mats: A Reusable Alternative?
Silicone mats, like Silpat®, are fantastic for cookie sheets and sheet pans. However, for standard loaf pans, they are often not the best solution. Most loaf pans have slightly tapered sides, making it difficult for a rigid silicone mat to conform snugly to all corners and edges. They can also be tricky to remove from a deep pan without tearing the baked good. While you *can* find mats specifically shaped for loaf pans, parchment paper remains the more versatile, accessible, and reliable option for this specific task.
Gathering Your Materials: More Than Just Paper
Success starts with having the right tools at your counter. This process requires minimal equipment, but each piece plays a specific role.
Visual guide about How to Line Loaf Pan with Parchment Paper
Image source: m.media-amazon.com
The Loaf Pan Itself: Know Your Dimensions
Loaf pans come in standard sizes, but there is variation. The most common are:
- Standard (or 1lb): Approximately 8.5 x 4.5 x 2.5 inches. This is the quintessential size for quick breads and pound cakes.
- Large (or 1.5lb): Approximately 9 x 5 x 3 inches. Used for larger recipes or those with a lot of volume.
- Mini Loaf: Various sizes, often around 5.75 x 3 x 2 inches.
Action Step: Before you even open the parchment roll, take your loaf pan and measure the inside dimensions. Measure the length of the bottom (the longer side), the width of the bottom (the shorter side), and the height of the sides. Write these down. This is your blueprint.
The Parchment Paper Roll
A full-width roll (typically 15 or 18 inches wide) is ideal. The pre-cut sheets are often too short for the length of a standard loaf pan, forcing you to piece two together, which creates a weak seam. Using a continuous sheet from the roll is stronger and cleaner.
Scissors and a Ruler
A good, sharp pair of kitchen scissors is essential for cleanly cutting the paper. A ruler or tape measure ensures your cuts are precise. Eyeballing it leads to paper that’s too short or too long, causing frustration.
Optional but Recommended: Butter or Neutral Oil
A very light brushing of softened butter, shortening, or a neutral oil like canola or vegetable oil on the interior of the pan before inserting the parchment liner. This is a “belt and suspenders” approach. It helps the parchment stick to the pan, preventing it from billowing or shifting when you pour in a thin or watery batter. It also provides an extra non-stick guarantee for any exposed pan edges.
The Step-by-Step Method: The “No-Knot” Technique
This is the method we champion. It’s simpler, more reliable, and eliminates the fiddly and often frustrating step of tying a knot in the middle of your paper. The goal is to create two long, sturdy “handles” on the long sides of the pan. You will use these handles to lift the entire baked loaf out of the pan after cooling.
Visual guide about How to Line Loaf Pan with Parchment Paper
Image source: i.ytimg.com
Step 1: Cut the Paper to Length
Take your roll of parchment paper. Unroll it and cut a piece that is the length of your pan + (2 x the height of the pan) + 4 inches. Let’s use a standard 8.5” long, 2.5” high pan as our example.
- Pan Length: 8.5 inches
- 2 x Pan Height: 2 x 2.5″ = 5 inches
- Extra for handles: ~4 inches
- Total Cut Length = 8.5 + 5 + 4 = 17.5 inches
This extra length accounts for the paper running along the bottom, up both long sides, and providing sufficient overhang to create strong handles. For a 9” long pan, you’d cut a piece about 19-20 inches long. The width of your paper (from the roll) should be at least the width of your pan plus an inch or two for ease. A 15” wide roll is perfect for almost all loaf pans.
Step 2: Create the Long Handles
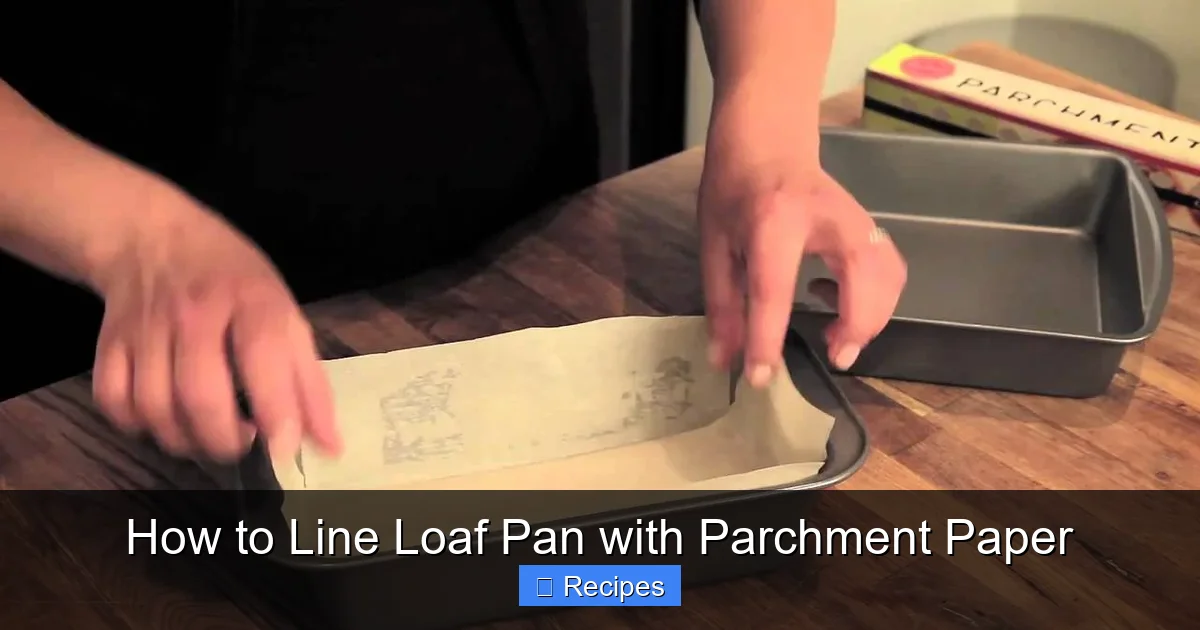
Take your long strip of parchment. You are going to place it into the pan such that the paper runs parallel to the long sides. This is the most critical orientation. The long dimension of your paper will span the length of the pan.
- Gently press the paper into the pan, starting at one end. Let the paper fall into the corners naturally. Do not try to force it into sharp creases; gentle pressure is enough.
- The paper should now cover the entire bottom and rise up both of the long sides. The two short sides of the pan will be left uncovered. This is intentional and correct. The paper will look like a “U” shape when viewed from above, with the open side of the U facing one of the short ends.
- You should now have a good 3-4 inches of paper overhanging from each long side. These are your handles.
Visual Tip: Imagine you are tucking a bed sheet onto a mattress. You smooth it over the center (the bottom of the pan) and let the excess fall evenly over the two long edges. You are not trying to make a tight, fitted sheet; you need loose, long tabs.
Step 3: Secure with Optional Grease and Trim
If you chose to grease the pan first, the parchment will now naturally adhere to the greased surface. If not, the weight of the batter will hold it in place. However, for very thin batters (like a delicate sponge cake for a Swiss roll variation), the grease step is highly recommended.
At this point, check the height. The overhanging paper should be at least 2-3 inches taller than the pan’s rim. If it’s shorter, you started with a piece that wasn’t long enough. If it’s much longer, you can trim the excess with scissors, but it’s better to have too much than too little. The extra paper will help you grip and lift.
Step 4: The “Butterfly” Fold for the Short Ends (Advanced)
While the short ends are left open in the classic method, some bakers like to create small “wings” on the short sides for extra security, especially for very wet or loose batters.
- Take the corner of the parchment where the long side meets the short side (one end of the “U”).
- Fold that corner inward, diagonally, so it lies flat against the bottom of the pan. The fold will run from the corner of the pan up the short side about an inch.
- Repeat for the other three corners (two on the open end, one on each side of the closed “U” end).
This creates small triangular flaps that help contain batter from seeping out the ends. It’s not always necessary but is a nice pro tip for extra-messy recipes like zucchini bread or meatloaf with a lot of moisture.
Common Mistakes and How to Avoid Them
Even with the best instructions, a few pitfalls can trip people up. Knowing these in advance will save you from a baking disaster.
Mistake 1: Cutting the Paper Too Short
This is the #1 error. If your paper doesn’t have enough overhang, you have no handles. You’ll be forced to try and dig the loaf out with a knife, almost certainly causing damage. Solution: Always use the formula: Pan Length + (2 x Pan Height) + 4 inches. When in doubt, cut an inch longer.
Mistake 2: Forcing the Paper into Sharp Creases
Parchment paper is flexible, not rigid. If you try to make it form perfect 90-degree corners in the pan, you will create stress points that are likely to tear, either immediately or when the batter’s weight pulls on them. Solution: Let the paper settle gently. Smooth it with your hand, but let it rest in soft folds at the corners. The batter’s weight will press it into the pan shape.
Mistake 3: Using the Wrong Orientation
Placing the long side of your paper across the short side of the pan (so the overhangs are on the short ends) results in very short, useless handles. You won’t be able to get a grip to lift the loaf. Solution: Always align the long dimension of your cut paper with the long sides of your loaf pan.
Mistake 4: Skipping the Grease for Wet Batters
A very fluid batter (like a thin cake batter) can get underneath a non-adhered parchment liner, lifting it and creating an uneven bake or a stuck edge. Solution: For anything thinner than a typical quick bread batter, lightly grease the pan first. A spritz of baking spray with flour works great too.
Mistake 5: Trying to Re-use the Same Liner
Parchment paper is designed for single use. After baking, it is often brittle, has absorbed oils and flavors, and has lost its structural integrity. Reusing it can lead to tearing and potential contamination. Solution: Use a fresh sheet for every bake. It’s a small cost for guaranteed performance and food safety.
Beyond the Basics: Pro Tips and Special Considerations
Once you’ve mastered the standard method, these advanced tips will help you tackle any recipe with confidence.
For Very Tall or Specialty Loaf Pans
If you have an extra-tall artisan loaf pan or a pan with a unique shape (like a heart or oval), the standard strip may not cover enough of the side. In this case, you may need to cut a separate piece to line the sides. Cut a rectangle that is the height of the pan by the perimeter of the pan’s opening. Press this strip against the greased pan walls first, then fit your bottom piece with long overhangs over it, tucking the edges slightly.
The “Envelope” or “Cross” Method for Maximum Containment
For the messiest, most liquid batters (think: a very juicy fruit bread or a loose meatloaf mixture), you can create a full envelope.
- Cut two pieces: one long strip (as in the standard method) and one shorter strip the length of the pan’s width plus 2-3 inches on each end.
- Place the long strip in first (handles on long sides).
- Place the shorter strip perpendicular to it, lying on top of the long strip’s bottom, with its ends overhanging the short sides.
- This creates a cross-shaped bottom. The batter is contained on all four sides by paper. You’ll have to lift by the long handles, but the short overhangs provide an extra barrier.
What About Non-Stick Spray?
Can you skip parchment and just use a non-stick cooking spray? Sometimes, for very sturdy, high-fat recipes like a standard butter-rich pound cake, a good spray *might* work. However, it is never as reliable as parchment. Spray can pool, create uneven surfaces, and eventually the non-stick coating on your pan will degrade. Parchment is a more consistent, foolproof barrier. The rule of thumb: if the recipe is important to you, or if you’ve had sticking issues before, use parchment.
Troubleshooting: When Things Go Wrong
Even with perfect lining, occasionally an issue arises. Here’s how to diagnose and solve it.
“My loaf stuck to the parchment paper!”
This is confusing but happens. The loaf bonded to the paper itself. Causes: 1) The parchment was not truly non-stick (wax paper was used by mistake). 2) The recipe has an extremely high sugar content that caramelizes and acts as glue. 3) The loaf was under-baked and is too fragile. Solution: Ensure you are using real parchment. For very sugary recipes (like some glazes or honey-sweetened breads), you can dust the parchment very lightly with flour or a dry ingredient from the recipe before adding the batter. Always use the full recommended bake time; a toothpick or instant-read thermometer should come out clean.
“The parchment slid around when I poured the batter.”
The liner wasn’t secured. Solution: Next time, grease the pan first. You can also use a tiny dab of butter or oil on the *outside* of the parchment where it contacts the pan to “glue” it in place temporarily.
“The bottom of my loaf is still too dark.”
Your parchment may be of lower quality or the oven’s bottom heat is too intense. Solution: Try placing a second sheet of parchment on top of the first liner, creating a double layer of insulation. Alternatively, bake the loaf on a preheated baking sheet (which acts as a heat shield) or move the rack up one position from the very bottom of the oven.
Conclusion: The Simple Secret to Stress-Free Baking
Lining a loaf pan with parchment paper is one of the most impactful, low-effort skills a home baker can learn. It transforms the final, most anxiety-inducing moment of a bake—the release—into a simple, satisfying lift. It protects your pans, improves your bake’s appearance and texture, and makes cleanup disappear. By remembering the core principles—measure accurately, cut a long strip, orient it along the long sides to create handles, and use grease for extra security—you arm yourself against failure. It’s a small investment of time and a few cents for a sheet of paper that pays dividends in perfect loaves, beautiful presentation, and pure baking joy. So next time a recipe calls for a loaf pan, don’t think twice. Grab that roll of parchment, measure, cut, and line with confidence. Your future self, holding a pristine, intact slice of homemade banana bread, will thank you.
Frequently Asked Questions
Can I reuse parchment paper after baking?
No, parchment paper is designed for single use. After baking, it becomes brittle, absorbs oils and flavors, and may have small pieces of baked good stuck to it. Reusing it risks tearing and can affect food safety and taste. For consistent results and hygiene, always use a fresh sheet.
What’s the difference between parchment paper and wax paper?
Parchment paper is coated with silicone, making it heat-resistant (up to 420-450°F), non-stick, and safe for ovens. Wax paper is coated with wax, which melts at baking temperatures, can smoke, and may transfer a waxy flavor to food. Wax paper is only for cold uses like wrapping sandwiches or storing cookies.
My loaf pan is non-stick. Do I still need parchment paper?
While a good non-stick pan helps, parchment paper is still recommended for best results. It provides a guaranteed release, especially for sticky, sugary, or delicate batters. It also protects the pan’s finish from scratches and baked-on residue, extending the life of your non-stick coating and making cleanup effortless.
How do I cut parchment paper for a round cake pan?
The principle is the same, but the shape changes. Trace the bottom of the round pan on the parchment and cut a circle to fit the bottom. Then, cut a long strip that is the circumference of the pan plus a few inches for overlap, and the height of the pan plus 2-3 inches. This strip lines the sides. For a loaf pan, we use one long strip for both the bottom and the long sides.
Why is my parchment paper smoking in the oven?
This is usually because the paper is touching the oven walls or heating elements, or the oven temperature is set too high (above the paper’s rated temperature, typically 420-450°F). Ensure the paper is fully contained within the pan and not protruding over the edges where it could contact the oven. Also, verify your oven’s actual temperature with an oven thermometer, as some run hot.
Can I use aluminum foil instead of parchment paper?
You can, but it’s not ideal. Foil does not have a non-stick surface, so your loaf will likely stick unless you grease it heavily. It also conducts heat very efficiently, which can lead to over-browning on the bottom. Foil is best for creating a covered tent for poultry or for lining a pan for roasting vegetables where sticking isn’t a concern. For loaf pans, parchment is superior for release and even baking.
Pingback: Can You Use Parchment Paper - kitchenandhouseware.com