Plumbing a kitchen sink with a disposal and dishwasher requires careful planning of drain lines, proper connections, and thorough leak testing. Success hinges on understanding the P-trap configuration, using the right fittings for both the disposal’s dishwasher inlet and the air gap, and following local plumbing codes. With the correct tools and a methodical approach, this is a manageable DIY project that ensures efficient wastewater drainage for years.
Key Takeaways
- Plan Your Drain Layout First: Map out the entire drain path from the sink, through the disposal, to the P-trap and wall drain, ensuring proper slope and alignment before making any cuts or connections.
- The Disposal is the Hub: The garbage disposal unit serves as the central connection point. Its dishwasher inlet (often a 1/2″ or 3/4″ threaded port) must be used for the dishwasher drain hose, not the sink drain directly.
- Air Gap is Non-Negotiable: An air gap fitting installed on the countertop is the only code-approved method to prevent contaminated water from siphoning back into the dishwasher. Never create a “high loop” as a permanent substitute.
- Use the Correct Fittings and Sealants: Utilize plumber’s putty for sink flange seals and Teflon tape or pipe dope for threaded connections. Compression fittings are preferred for drain traps to allow for future disassembly.
- Test Relentlessly Before Finalizing: Run water through the sink and dishwasher simultaneously to check every connection for drips. A small leak under the cabinet can cause major damage over time.
- Mind the Electrical: A garbage disposal requires a dedicated GFCI-protected circuit. Ensure power is off at the breaker before any electrical work and consider professional installation if you’re uncomfortable.
- Maintenance Prevents Clogs: Regular disposal use with cold water and avoiding fibrous foods, combined with cleaning the dishwasher air gap, will keep your system flowing freely and prevent foul odors.
📑 Table of Contents
- Introduction: Tackling a Core Kitchen Plumbing Project
- Essential Tools and Materials: Your Prep Checklist
- Understanding the Flow: How Your Drain System Works
- Step-by-Step: Installing the Garbage Disposal
- Step-by-Step: Hooking Up the Dishwasher and Air Gap
- Finalizing the Drain System and Testing for Leaks
- Long-Term Care and Troubleshooting Common Issues
- Conclusion: Enjoy Your Efficient, Leak-Free Kitchen
Introduction: Tackling a Core Kitchen Plumbing Project
So, you’re staring at that empty cabinet space under your new kitchen sink, a shiny garbage disposal in one hand and a dishwasher drain hose in the other. It can feel like a puzzle where all the pieces are pipes, and the picture on the box is a leak-free, smoothly functioning kitchen. Plumbing a kitchen sink with a disposal and dishwasher is one of the most common—and most critical—projects for a home DIYer or a new homeowner. Get it right, and you’ll have a silent, efficient cleanup station for years. Get it wrong, and you could be dealing with slow drains, gross sink smells, or even contaminated dishwasher water.
The key to success is understanding the system. You’re not just connecting a sink to a pipe; you’re integrating two major appliances into your home’s drain-waste-vent (DWV) system. The disposal handles food waste, the dishwasher needs a dedicated, sanitary drain path, and both must tie into the main drain line without impeding flow or creating cross-connections. This guide will walk you through every step, from gathering tools to the final satisfying test run, using clear language and practical tips. We’ll assume you’re replacing an existing setup, but the principles apply to new installations too.
Essential Tools and Materials: Your Prep Checklist
Before you make a single cut or loosen a nut, a proper inventory of tools and parts will save you countless trips to the hardware store. Rushing to the store mid-project often means buying the wrong part or overpaying for a rushed purchase. Lay everything out in your kitchen workspace.
Visual guide about How to Plumb a Kitchen Sink with Disposal and Dishwasher
Image source: fskitchensink.com
The Core Tool Kit
You’ll need a mix of basic hand tools and a few specific plumbing tools:
- Adjustable Wrench & Pipe Wrench: A 10″ or 12″ adjustable wrench is your workhorse for nuts and bolts. A smaller pipe wrench (8″) is excellent for stubborn older pipes.
- Plumber’s Putty & Silicone Caulk: Plumber’s putty is for creating waterproof seals under sink flanges and strainer baskets. Silicone is for final sealing where the sink meets the countertop.
- Teflon Tape (PTFE Tape): The unsung hero of threaded connections. Wrap it clockwise on all male threads (disposal inlets, tailpieces) to prevent leaks.
- Pipe Cutter or Hacksaw: For cutting copper, PVC, or steel drain pipes cleanly. A tubing cutter is best for copper.
- Channel-Type Pliers (GrooveLock): Incredibly useful for gripping and turning large plastic nuts on trap components.
- Bucket and Sponges: For catching inevitable drips and residual water in pipes when you disconnect them.
- Flashlight or Headlamp: It’s always dark under the sink. A headlamp is a game-changer.
- Screwdrivers (Flathead & Phillips): For removing old strainers, disposal mounting rings, and dishwasher clip brackets.
- Hole Saw Kit: If your sink doesn’t have a pre-drilled disposal hole, you’ll need a 3-1/2″ hole saw to cut it.
- Utility Knife: For cleaning old putty, trimming hose, and general cleanup.
Parts and Fittings: Don’t Guess, Measure
This is where projects stall. You need the correct pipes and adapters for your specific sink and cabinet layout:
- Garbage Disposal Unit: Ensure it matches your sink’s hole pattern. Most use a “M-O” (Moen-Oatey) universal mounting system.
- Disposal Tailpiece & Continuous Waste: This is the pipe that comes out of the disposal’s drain outlet. It often includes a connection for the dishwasher (a 7/8″ or 1″ slip nut inlet). You may need an extra tailpiece or a “disposal connector” if your sink’s drain doesn’t align.
- P-Trap & Wall Tube: The classic “P” shaped pipe that holds water to block sewer gases. A plastic (PVC or ABS) trap is highly recommended over metal—it’s easier to work with, doesn’t corrode, and is code-compliant for drains. You’ll need a “trap adapter” to connect the plastic trap to your older metal wall drain if present.
- Dishwasher Drain Hose: Usually 5/8″ or 7/8″ ID. Check your dishwasher’s manual. It must be a specific type rated for high temperatures.
- Air Gap Fitting: A small, cylindrical chrome or plastic fixture that mounts on the countertop. It has two inlets (from sink/disposal and from dishwasher) and one outlet to the disposal or drain. This is a code requirement.
- Hose Clamps: Stainless steel clamps for securing the dishwasher drain hose to the air gap and disposal inlet.
- Slip-Joint Washers: The rubber or fiber washers that seal the connections in your trap assembly. Always replace these when disassembling old traps.
Pro Tip: Take a photo of your old setup before disconnecting anything. This is your reference diagram. Also, when buying parts, bring an old piece of pipe to the store for a perfect match on diameter. For a project this involved, consider purchasing a kit from a plumbing supply store that includes compatible tailpieces, traps, and connectors. It simplifies the process immensely. And remember, if your project involves significant changes or you’re unsure about local codes, reviewing our terms and conditions regarding professional installation recommendations is always a wise step.
Understanding the Flow: How Your Drain System Works
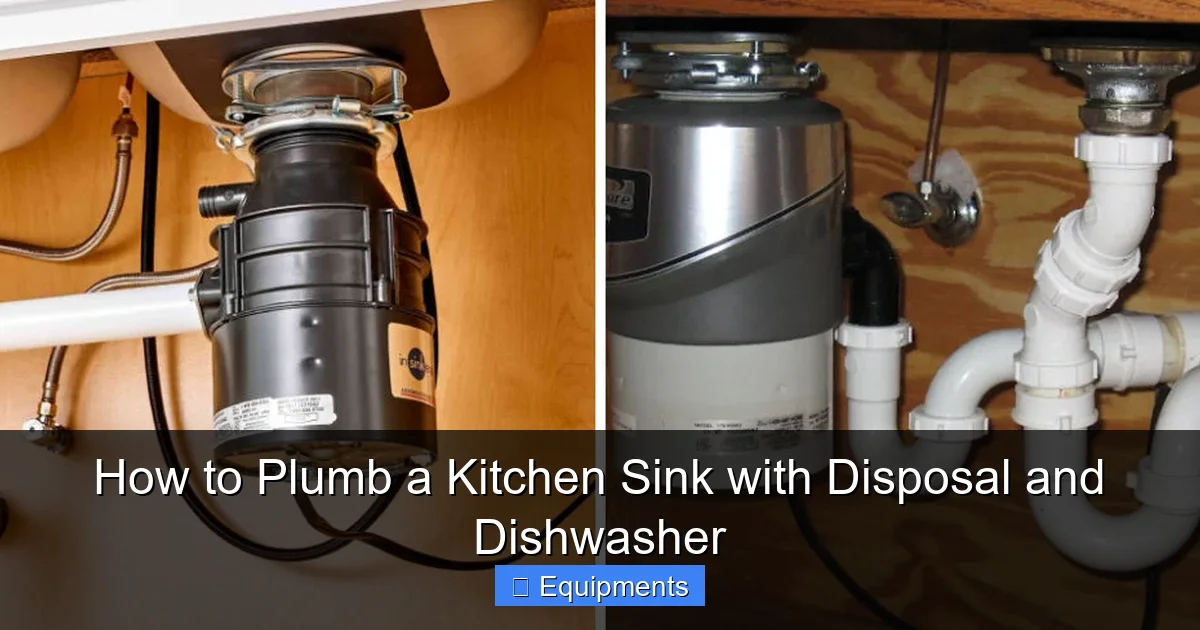
Before you start gluing and tightening, you must visualize the journey of a drop of water. This prevents the common mistake of creating a dead-end pipe or a siphon that empties your P-trap. The flow is linear but with a crucial branch for the dishwasher.
Visual guide about How to Plumb a Kitchen Sink with Disposal and Dishwasher
Image source: thekitchenix.com
The Main Highway: Sink to Sewer
Water from your sink basin flows down through the strainer, into the sink’s drain outlet. From there, it enters the garbage disposal’s inlet chamber. The disposal grinds food, and the water carries the particles out through the disposal’s drain outlet (tailpiece). This outlet pipe must slope slightly downward (about 1/4″ per foot) as it travels to the P-trap. The P-trap holds a plug of water that seals the drain, preventing sewer gases from entering your home. From the P-trap’s outlet, water flows into the wall drain tube and eventually to the main sewer or septic line.
The Critical Branch: The Dishwasher’s Path
The dishwasher’s drain hose does NOT connect to the sink strainer. It connects to a dedicated port on the disposal tailpiece or a separate “Y” fitting. This hose must first travel upward to an air gap fitting on the countertop. The air gap is a physical break in the drain line. Its purpose is to prevent water from the sink (which could be dirty, soapy, or contain disposal gunk) from siphoning back into your dishwasher, contaminating your clean dishes. From the air gap, a second short hose drains downward into the disposal’s dishwasher inlet or the main drain line. This “high point” is the only surefire way to avoid backflow.
Common Layout Mistakes to Avoid
- The Siphon: If the dishwasher drain hose runs downhill from the air gap *before* connecting to the disposal, it can create a siphon effect that empties the P-trap, letting gases in.
- The Dead Leg: A long, horizontal run of pipe with no slope creates a “dead leg” where water and gunk stagnate, leading to clogs and odors.
- Wrong Connection Point: Connecting the dishwasher hose directly to the sink tailpiece (above the disposal) means dirty sink water can backflow into the dishwasher.
Step-by-Step: Installing the Garbage Disposal
With your layout planned, start with the disposal. It’s the heaviest and most central component.
Visual guide about How to Plumb a Kitchen Sink with Disposal and Dishwasher
Image source: plumbingtipstoday.com
1. Prep the Sink and Mount the Assembly
First, clear the sink cabinet. Place a bucket under the P-trap. If you have an old disposal, disconnect it: unplug it, disconnect the drain pipes and the electrical wiring (turn off the breaker!). Remove the old mounting ring and sink flange. Clean the sink’s mounting surface thoroughly of old plumber’s putty.
Take your new disposal’s mounting assembly (the ring, fiber gasket, and screws). Apply a rope of plumber’s putty (about the thickness of a pencil) around the underside of the sink’s drain hole. Press the sink flange firmly into the putty from below. From above, attach the mounting ring, fiber gasket, and tighten the screws evenly in a star pattern until the flange is seated and the putty squeezes out. Wipe away excess putty.
2. Mount the Disposal Unit
This is a two-person job if the unit is heavy. Lift the disposal and rotate it into the mounting ring from below. You’ll feel it lock into place. Rotate it a quarter-turn until it drops and locks. Give it a firm tug upwards to ensure it’s secure. Many units have a locking tab that needs to be engaged with a screwdriver.
3. Connect the Electrical
Safety First: Ensure the breaker is OFF. Most disposals have a standard electrical box with a cable clamp. If you have an existing dedicated circuit with a plug, simply plug it in. If you need to hardwire, connect the black (hot) wire to the black, white (neutral) to white, and bare/green (ground) to the green screw or bare copper wire. Use wire nuts and tuck the wires neatly into the box. Secure the cover plate. If you’re unsure, hire an electrician. This is not the place for guesswork.
4. Connect the Drain Pipes
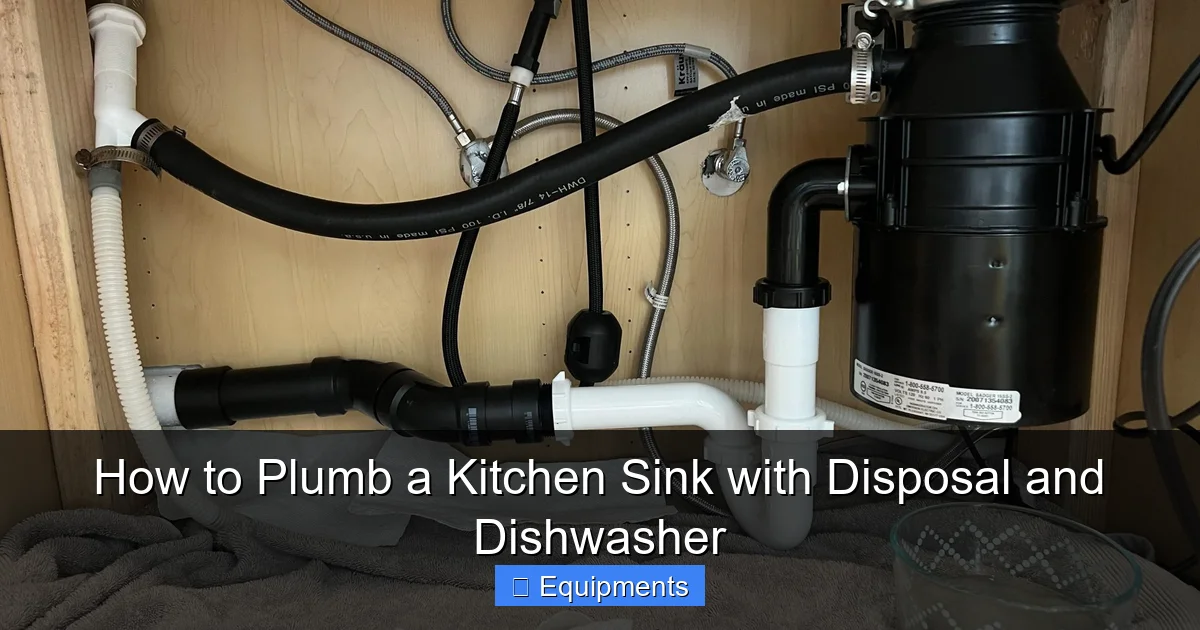
Now, connect the disposal’s drain outlet to your drain system. Slide the discharge elbow (the 90-degree bend that comes with the disposal or is sold separately) into the disposal’s outlet. Tighten the clamp. Measure and cut your tailpiece to reach the P-trap inlet. Use a slip nut and washer to connect it. At this stage, do NOT connect the dishwasher hose yet. We’ll do that after the air gap is installed. For now, cap the disposal’s dishwasher inlet with a short threaded plug if it didn’t come with a cap.
Step-by-Step: Hooking Up the Dishwasher and Air Gap
This is the most critical section for preventing cross-contamination. The air gap is mandatory.
1. Install the Air Gap Fitting
The air gap is a small chrome cylinder that mounts through a hole in your countertop, usually near the faucet. If your sink doesn’t have a hole, you’ll need to drill one using a 1-1/2″ hole saw. Place the air gap’s base on the counter, mark the hole, and drill. Deburr the hole. Apply a bead of silicone caulk around the base, push it through from below, and secure it with the nut from above. Wipe away excess caulk.
2. Connect the Discharge Hose to the Air Gap
One end of your dishwasher’s drain hose (usually the longer one) connects to the bottom inlet of the air gap. Slide a hose clamp over the hose, push it firmly onto the air gap spout, and tighten the clamp securely. This connection must be airtight.
3. Connect the Air Gap Outlet to the Disposal
From the top outlet of the air gap, run the second (shorter) hose downward. This hose connects to the disposal’s dedicated dishwasher inlet (the threaded port we capped earlier). Remove the cap. Wrap Teflon tape clockwise on the disposal’s threads. Screw on the appropriate adapter or hose connector (often a 7/8″ slip nut with a barbed insert). Tighten it. Slide the hose over the barb, position the clamp, and tighten. Ensure there is a continuous downward slope from the air gap to the disposal. Never create a loop or high point in this section.
4. Secure the Hose Path
Use zip ties or plastic wire staples to secure the dishwasher drain hose to the cabinet wall or underside of the counter. Keep it away from sharp edges, the disposal’s grinding chamber, and hot water pipes. Avoid kinks. The hose should have a gentle, downward curve from the air gap to the disposal.
Finalizing the Drain System and Testing for Leaks
Now, with the disposal mounted and the dishwasher branch connected, you can complete the main drain assembly.
Assembling the P-Trap
Measure and cut your wall tube (the pipe going into the wall) to length. Assemble your plastic P-trap: the curved “P” section, the shorter “tailpiece” going to the sink/disposal outlet, and the longer “wall tube” going into the wall. Use slip nuts and washers—hand-tighten first, then use grooveLock pliers for a final quarter-turn. Do not overtighten, as you can crack plastic fittings. The trap’s outlet should align perfectly with the wall drain pipe.
Connecting to the Wall Drain
If your wall drain is old steel pipe, you’ll need a plastic-to-metal adapter. Slide the adapter onto the wall pipe, then connect your plastic wall tube to the adapter with a slip nut. If the wall pipe is PVC, you may need to clean and prime it, then apply PVC cement for a permanent joint (if it’s accessible and you’re sure). Compression-style adapters are better for future access.
The Moment of Truth: Pressure Testing
This is the most important step. Do not skip it.
- Plug the sink drain with a wet rag or stopper.
- Fill the sink with water. About 3-4 inches deep.
- Unplug the sink. Let the water rush through the disposal and down the drain.
- Observe every joint. Get your head under that cabinet with a flashlight. Look at every slip nut connection on the trap, the connection where the disposal tailpiece meets the trap, and especially the two dishwasher hose connections (at the air gap and the disposal). Watch for any drips or seepage.
- Run the dishwasher. Start a short wash cycle. While it’s draining, watch the same connections. The disposal inlet connection is a common leak point due to water pressure from the dishwasher pump.
- Check the air gap. Ensure water flows smoothly out of the air gap’s top vent during the dishwasher cycle. If it sputters or doesn’t flow, you have a clog in the hose or the main drain line.
If you find a leak, tighten the corresponding slip nut or hose clamp a bit more. For threaded connections, a quarter-turn more on the disposal inlet may help. If a leak persists, disassemble that joint, check the washer for damage or misalignment, add more Teflon tape, and try again. Patience here prevents water damage later.
Long-Term Care and Troubleshooting Common Issues
Your plumbing job is done, and it’s leak-free. Fantastic! Now, how do you keep it that way?
Disposal Best Practices
Your disposal is not a trash can. Never put fibrous vegetables (celery, asparagus), coffee grounds, eggshells (in large quantities), or grease down it. Always run cold water while using the disposal and for 15-30 seconds after. Cold water solidifies fats so they can be chopped up and flushed away. Hot water melts grease, which then solidifies further down the pipe, causing clogs. Use citrus peels and ice cubes to clean and freshen the grind chamber.
Dishwasher and Air Gap Maintenance
Occasionally, the air gap can get clogged with food particles or mineral buildup. To clean it, remove the cap (it usually twists off), and clean out any debris inside. You can also unscrew it from the countertop for a more thorough cleaning. Check the dishwasher drain hose for kinks or high points every few months. Ensure the hose is securely clamped at both ends.
Diagnosing Slow Drains
If water drains slowly from the sink:
- First, check the disposal. It may be jammed. Use the disposal wrench (included) in the center hole on the bottom to manually turn the motor and free the jam.
- Second, check the P-trap. Place a bucket under it, unscrew the slip nuts, and clean out any gunk. This is the most common clog point.
- Third, check beyond the trap. If the trap is clear, the clog is in the wall drain. You may need a drain snake.
Important Note on Warranties: Improper installation can void your appliance warranties. Always retain your receipts and follow the manufacturer’s installation instructions precisely. For complex issues or if you’re ever in doubt, consulting a licensed plumber is the safest investment. Our service agreements, outlined in our terms and conditions, detail the scope of professional support available for such scenarios.
Conclusion: Enjoy Your Efficient, Leak-Free Kitchen
Congratulations! You’ve navigated the maze of pipes, fittings, and codes to successfully plumb your kitchen sink with a disposal and dishwasher. You’ve not only saved money on installation fees but also gained a deep understanding of your home’s vital drainage system. Remember the core principles: the disposal is the central hub, the air gap is your non-negotiable safeguard against backflow, and every single connection must be tested with water running from both the sink and the dishwasher.
A well-executed installation means you’ll enjoy a quiet, hygienic kitchen for years. Food waste vanishes with a grind, dishes come out sparkling clean, and you’ll never have to worry about mysterious puddles under the cabinet. Treat your new system with respect—use the disposal properly, avoid harsh chemicals that can damage pipes, and perform a quick visual check under the sink every few months. This proactive approach is the final step in a successful DIY project. Now, go make some coffee and admire your handiwork. You’ve earned it.
Frequently Asked Questions
Can I install a dishwasher drain without an air gap?
While some local codes may allow a “high loop” (securing the drain hose high under the counter) as an alternative, the air gap is the only method universally accepted by plumbing codes (like the International Plumbing Code) as a fail-safe against backflow. For maximum safety and code compliance, installing an air gap is strongly recommended and is the standard practice for professional installations.
What if my sink doesn’t have a hole for the disposal?
You will need to drill one. Use a 3-1/2″ hole saw kit. Carefully center the hole over the sink’s drain opening from below, using the sink’s existing hole as a guide. Place a piece of wood under the drill point to prevent tear-out. Drill slowly, keeping the saw perpendicular. Clean the hole thoroughly before installing the disposal flange.
My dishwasher isn’t draining, but the sink drains fine. What’s wrong?
This points to an issue specific to the dishwasher branch. First, check the air gap—it may be clogged. Remove the cap and clean it out. Second, check the dishwasher drain hose for kinks or a high point that is blocking flow. Third, the hose connection to the disposal inlet may be clogged with food debris. Disconnect it and clear any obstruction. Finally, the dishwasher’s internal drain filter or pump may be clogged—consult your dishwasher’s manual.
How tight should I make the plastic slip nut connections on the P-trap?
Tighten them by hand until snug, then use grooveLock pliers for an additional 1/4 to 1/2 turn. The goal is to compress the washer to form a seal without cracking the plastic nut or deforming the pipe. Overtightening is a common cause of leaks in plastic fittings, as it can crack the nut or push the washer out of position.
Can I use the same drain for a double-bowl sink with a disposal on one side?
Yes. You’ll use a continuous waste assembly. The disposal is installed on one bowl. A special tailpiece (often called a “double bowl tailpiece” or “continuous waste”) connects the disposal outlet to the other sink’s drain outlet. This single pipe then continues to the P-trap. Ensure the disposal is on the side where the drain line is located to minimize horizontal runs.
Is it okay to use chemical drain cleaners with a garbage disposal?
It’s generally not recommended. Harsh chemicals can damage the disposal’s internal components (like the seals and grinding chamber) and can be dangerous if they splash back up. For routine maintenance, use a mixture of baking soda and vinegar followed by hot water. For clogs, use a plunger or a manual drain snake. If you must use a chemical cleaner, choose one labeled safe for disposals and follow instructions precisely.