Plumbing a kitchen sink with a garbage disposal and dishwasher requires methodical steps to ensure leak-free, code-compliant connections. This guide details shutting off utilities, installing the disposal, connecting the dishwasher drain with an air gap, and thorough testing. By following these instructions and prioritizing safety, you can successfully complete this common kitchen upgrade yourself.
Key Takeaways
- Always shut off water and electricity: Locate and turn off the dedicated shut-off valves under the sink and the circuit breaker for the disposal before touching any pipes or wires.
- Use plumber’s putty for the sink flange: A proper seal between the sink and disposal flange prevents water from leaking into your cabinet. Roll it and press firmly.
- The dishwasher drain needs an air gap: This simple device, installed on the countertop, prevents dirty sink water from siphoning back into your dishwasher and contaminating dishes.
- Test for leaks obsessively: Run water through every connection—disposal, P-trap, dishwasher supply and drain—before the walls are closed up. Catching a small leak early saves massive headaches.
- Know your limits and local codes: Electrical work for a disposal often requires a licensed professional. Always check local plumbing codes, and review our terms and conditions for policy specifics on installations.
- A dedicated water supply line is non-negotiable: The dishwasher must have its own shut-off valve connected to the hot water line under the sink. Never tap into another appliance’s line.
- Secure all hose connections with clamps: Use stainless steel worm-drive clamps on all dishwasher drain and supply hoses. A loose clamp is the most common cause of dishwasher leaks.
📑 Table of Contents
- Introduction: Tackling a Common Kitchen Upgrade
- Essential Tools and Materials: Your Project Checklist
- Preparation and Safety: The Critical First Steps
- Step-by-Step: Installing the Garbage Disposal
- Connecting the Dishwasher: Drain and Supply
- Final Checks, Testing, and Troubleshooting
- Conclusion: Enjoy Your Seamlessly Plumbed Kitchen
Introduction: Tackling a Common Kitchen Upgrade
So, you’re staring at that empty cabinet space under your new kitchen sink. The dream is a seamless setup: a powerful garbage disposal grinding away and a dishwasher quietly handling the post-dinner cleanup. But the reality of how to plumb a kitchen sink with disposal and dishwasher can feel like reading a foreign language. Pipes, drains, vents, electrical—it’s enough to make anyone reach for the phone to call a pro.
But what if you could do it yourself? Plumbing a kitchen sink with a disposal and dishwasher is a classic DIY project for the determined homeowner. It’s not about being a master plumber; it’s about understanding the sequence, using the right parts, and taking your time. When done correctly, you’ll have a system that’s not only functional but also tailored to your space. More importantly, you’ll save significant money and gain a deep understanding of your home’s plumbing. This guide will walk you through every step, from turning off the first valve to that satisfying final leak-check. We’ll break down the jargon, highlight critical safety points, and give you the confidence to connect each pipe properly.
Remember, this is a plumbing and electrical project. If at any point you feel unsure—especially when dealing with electrical wiring for the disposal or complex venting—it’s wise to consult a licensed professional. Your safety and your home’s integrity come first. With that said, let’s gather our tools and get started.
Essential Tools and Materials: Your Project Checklist
Before you buy a single pipe or turn a single wrench, you need the right gear. Having everything at your feet in the cabinet prevents frustrating mid-project trips to the hardware store. This list assumes you’re starting from scratch with new fixtures. If you’re replacing old ones, you may reuse some fittings, but always inspect them for corrosion or wear.
Visual guide about How to Plumb a Kitchen Sink with Disposal and Dishwasher
Image source: fskitchensink.com
For the Garbage Disposal Installation
- Garbage Disposal Unit: Ensure it’s the correct size for your sink’s mounting assembly.
- Sink Flange and Mounting Assembly: Often comes with the disposal. The flange sits in the sink drain hole, the mounting ring locks it from below.
- Plumber’s Putty: A rope-like sealant for creating a watertight seal between the sink flange and the sink basin.
- PVC Pipe and Fittings: 1 ½” or 2″ diameter for drain lines. You’ll need a tailpiece (from disposal to P-trap), a P-trap itself, and possibly a continuous waste adapter if your sink has a double bowl.
- Pipe Wrench or Channel-Lock Pliers: For tightening the disposal mounting ring and pipe connections.
- Putty Knife: To scrape old putty and apply new.
- Screwdriver: Typically a flathead for the disposal mounting screws or a Phillips for the electrical cover.
- Hammer: For gently tapping pipes together if needed.
- Bucket and Towels: To catch water when you disconnect old pipes.
For the Dishwasher Connection
- Dishwasher Air Gap: A required fitting that mounts on your countertop or sink deck. It prevents backflow.
- Dishwasher Drain Hose: Usually 5/8″ or 7/8″ inner diameter. May come with the dishwasher or be purchased separately.
- Stainless Steel Worm-Drive Clamps: Two are needed for the drain hose (to air gap and from air gap to disposal/tailpiece).
- Dishwasher Water Supply Line: A flexible braided line, typically 3/8″ compression to 3/8″ compression, or a dedicated shut-off valve with a 90-degree elbow.
- Dedicated Shut-Off Valve: A 3/8″ angle stop valve installed on the hot water line under the sink. This is crucial.
- Teflon Tape (PTFE Tape): For sealing threaded connections on the water supply line.
- Drill with a Small Hole Saw (if needed): To drill a hole through the sink deck or countertop for the air gap or additional water line.
General and Safety
- Adjustable Wrench: For the water supply lines.
- Flashlight or Headlamp: It’s dark under there!
- Voltage Tester: To absolutely confirm the disposal circuit is dead.
- Gloves and Safety Glasses: Protect your hands and eyes from debris and old putty.
Pro Tip: Before buying any new pipes, take a photo of your existing setup and, if possible, remove one section (like the P-trap) to bring to the store. Matching thread sizes and pipe diameters is infinitely easier with the actual part in hand. Also, when purchasing a disposal, consider one with a “power cord” already attached. Models requiring you to wire in a cord add an extra step that involves the electrical panel.
Preparation and Safety: The Critical First Steps
Rushing into this job is the fastest way to flood your kitchen. Preparation isn’t glamorous, but it’s 80% of a successful installation. This phase is about making your workspace safe, accessible, and compliant.
Visual guide about How to Plumb a Kitchen Sink with Disposal and Dishwasher
Image source: thekitchenix.com
Shutting Off Utilities: Water and Power
Locate the two small shut-off valves on the hot and cold water lines that feed your sink. These are usually right where the pipes come out of the wall or floor. Turn both handles clockwise until tight. Now, go to your home’s electrical panel and find the breaker labeled “Garbage Disposal” or “Kitchen.” Flip it to the OFF position. Do not rely on a switch under the sink; you must kill power at the breaker. Use your voltage tester on the disposal’s electrical cord or the outlet it’s plugged into to confirm no power is present.
Clearing the Workspace
Empty everything from under the sink. This isn’t just for space; it’s to protect your cleaning supplies from dust and debris. Lay down old towels or a drop cloth. Have your bucket ready directly under the P-trap. This is where you’ll catch water when you disconnect the old drain pipes.
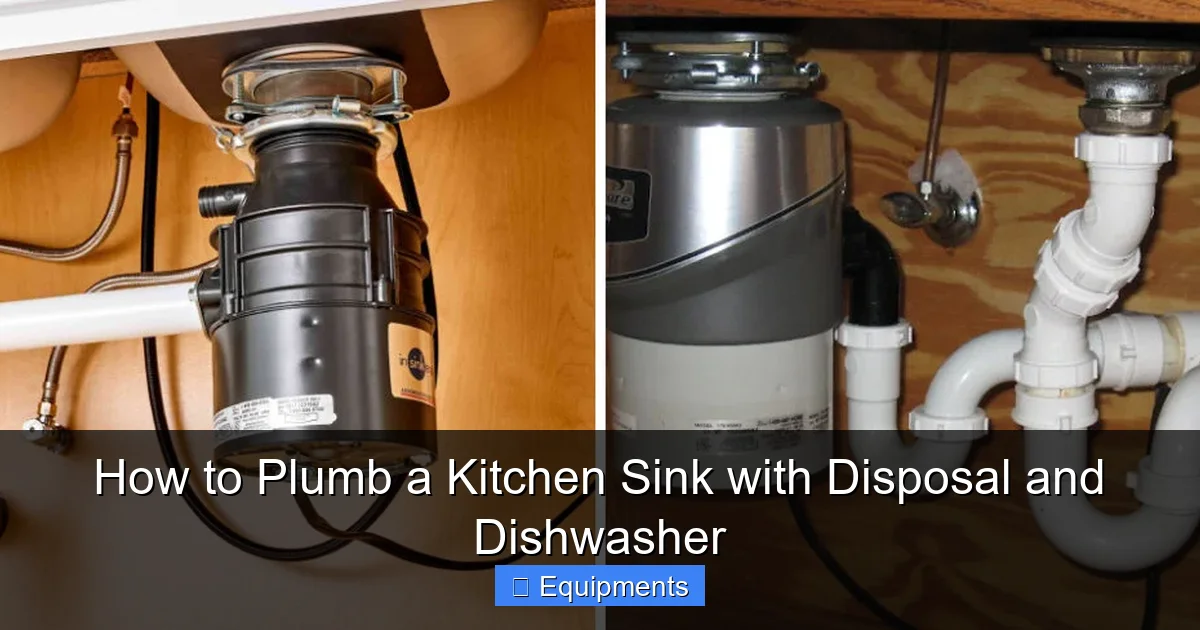
Understanding the Drain Anatomy
Take a moment to look at how your current sink is plumbed. You’ll see a continuous pipe from each sink drain that joins into a “P-trap” (the U-shaped pipe). The P-trap’s purpose is to hold water, creating a seal that prevents sewer gases from coming into your home. From the P-trap, a horizontal pipe (the “waste arm”) extends and connects to a wall vent or a larger drain pipe in the wall. Your dishwasher currently drains into either the sink’s tailpiece (the pipe directly below the drain) or into a special fitting on the disposal’s outlet. Your new setup will follow this same basic principle, but with the disposal in line and an air gap for the dishwasher.
Checking Local Codes and Permits
This is a step many DIYers skip, but it’s important. Some municipalities require a permit for new plumbing fixtures or have specific rules about air gap installation, venting, or disposal electrical connections. A quick call to your city’s building department can save you from failed inspections when you sell your home. While you’re planning, it’s also a good practice to review our terms and conditions for any specific policies regarding installation guidelines and warranty implications for self-installed products.
Pro Tip: As you remove the old P-trap, do it over your bucket. The water inside is not just dirty sink water; it’s the seal that keeps gases out. Pour it down a floor drain once you’re done.
Step-by-Step: Installing the Garbage Disposal
With the area prepped and power off, we start with the heart of the operation: the garbage disposal. Its installation dictates the entire drain layout. The key here is a perfect seal between the sink and the disposal to prevent any water from leaking into your cabinet.
Visual guide about How to Plumb a Kitchen Sink with Disposal and Dishwasher
Image source: plumbingtipstoday.com
Removing the Old Sink Flange (If Present)
From below, you’ll see a large locknut holding the old sink flange in place. Use your putty knife to loosen and remove any old, hardened plumber’s putty from the sink’s top surface. Then, using your channel-lock pliers, turn the locknut counterclockwise to loosen it. You may need to hold the disposal steady from above with one hand. Once loose, you can lift the disposal out from below and pull the old flange up from the sink. Clean the sink drain area thoroughly.
Installing the New Sink Flange
Take your new flange and roll a ½” thick rope of plumber’s putty between your palms. Press this putty rope all the way around the underside of the flange’s lip. Carefully set the flange into the sink drain hole from above, pressing down firmly. The putty will squeeze out. Don’t worry; we’ll clean it up later. From below, slide the mounting ring (the piece with three or four flat sides for tightening) up the disposal’s threaded shank. Thread the fiber gasket (if provided) onto the shank, followed by the backup washer and the hex nut. Hand-tighten the hex nut as much as you can.
Mounting the Disposal to the Sink
Now for the satisfying part. Align the disposal’s mounting tabs with the slots on the mounting ring you just installed under the sink. Lift the disposal unit and engage the tabs into the ring. You’ll feel it click or settle. Now, using your channel-lock pliers or a special disposal wrench (often included), engage the tabs and turn the mounting ring clockwise. You’ll feel it tighten and eventually become very snug. This action compresses the plumber’s putty, creating a waterproof seal. Wipe away any excess putty that squeezed out from the top of the sink with a rag.
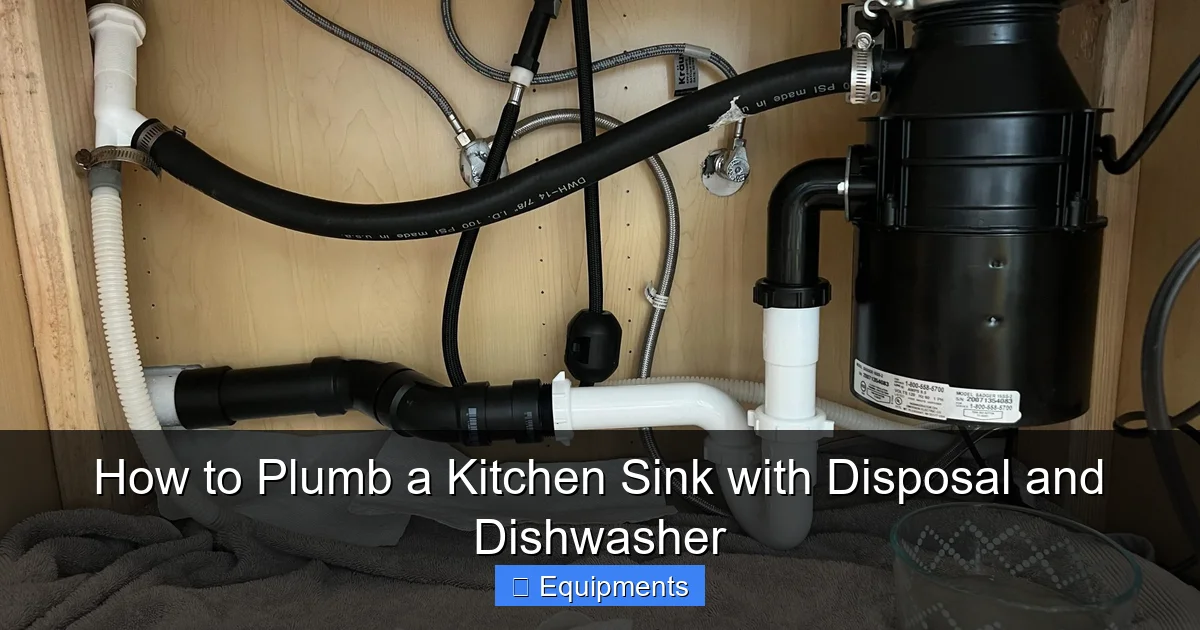
Connecting the Drain Pipes
Look at the disposal’s outlet. It will have a threaded connection. You need to attach the tailpiece that leads to your P-trap. Apply a few wraps of Teflon tape clockwise to the disposal’s outlet threads. Screw on the slip nut and washer from your tailpiece, then hand-tighten. Use your wrench to give it a final quarter-turn. Do not overtighten; you can crack the disposal’s housing. Now, connect your P-trap to the tailpiece and to the wall drain pipe in the same fashion, using Teflon tape on all threaded joints. If you have a double bowl sink, you’ll need a continuous waste adapter to join the two sides before the P-trap. Ensure all pipes have a slight downward slope toward the P-trap for proper drainage.
Important: If your dishwasher currently drains into the old sink tailpiece, you have two options. You can use a dedicated dishwasher inlet on the disposal (a threaded port near the top) or you can connect it to the tailpiece before the P-trap using a “Y” fitting. The disposal inlet is often preferred as it grinds any food particles from the dishwasher before they go down the drain. For now, leave that dishwasher hose disconnected and capped if necessary.
Electrical Connection (If Required)
If your disposal has a power cord and plug, simply plug it into a GFCI-protected outlet under the sink. If it requires hardwiring, this is the point to connect the wires (black to black, white to white, bare/green to ground) inside the electrical box, following the manufacturer’s diagram precisely. If you are not comfortable with this step, stop and hire an electrician. This is not a place to guess. Once wired, screw on the cover plate. At this stage, do not restore power yet.
Connecting the Dishwasher: Drain and Supply
With the disposal mounted and the basic drain plumbed, we turn to the dishwasher. A proper dishwasher hookup involves two critical lines: the drain hose and the dedicated hot water supply line. The drain hose must have an air gap, a small cylindrical device that sits on your countertop or sink deck. This is a code requirement in many areas to prevent cross-contamination.
Installing the Air Gap
The air gap needs a dedicated hole. If your sink has a hole for a sprayer or an extra faucet, you can use that. Otherwise, you’ll need to drill a hole in the countertop (granite/stone requires a pro) or in the sink’s deck (the flat surface behind the faucet). Use a small hole saw (typically 1 ¼” or 1 ½”). Clean the hole thoroughly. The air gap has a large nut that clamps it from below. Place the air gap’s base through the hole from above, then the washer and nut from below. Tighten it securely so it doesn’t wobble.
Connecting the Drain Hose
Your dishwasher’s drain hose is a flexible plastic tube. It will connect to the dishwasher’s drain outlet on one end and to the air gap on the other. You may need a shorter hose or to trim the existing one to length. Do not stretch the hose taut; leave a gentle loop or slack to prevent kinking and vibration noise. Slide a stainless steel clamp over each end of the hose. Connect one end to the dishwasher’s drain port and tighten the clamp. Connect the other end to the bottom inlet of the air gap and tighten that clamp. Now, from the air gap’s top outlet, you need a second short length of drain hose. This hose will connect to either the disposal’s dishwasher inlet or to the sink’s tailpiece (the pipe coming down from the sink drain) above the P-trap. Use another clamp for this connection. If connecting to the disposal, first remove the knockout plug inside the disposal’s inlet using a screwdriver and hammer.
Installing the Water Supply Line
This is a dedicated line for hot water only. Locate the hot water shut-off valve under your sink. If it doesn’t have a dedicated outlet for a dishwasher, you’ll need to install a “T” fitting and a new angle stop valve. Turn off both hot and cold water at the main if you’re unsure. Install the T and the new valve, using Teflon tape on all threads. Now, connect one end of your braided supply line to this new valve. Hand-tighten, then use an adjustable wrench for a final turn. Connect the other end to the dishwasher’s water inlet valve (usually on the front, bottom of the unit). Use Teflon tape on the threaded connection here as well. Tighten securely.
Critical Check: Ensure the supply line isn’t kinked and has a clear path to the dishwasher. Also, make sure the drain hose is looped as high as possible under the counter (the “high loop”) before it connects to the air gap. This loop acts as a backup air gap and prevents water from the sink from flowing back into the dishwasher.
Final Checks, Testing, and Troubleshooting
The moment of truth. All connections are made, but the job isn’t done until you’ve verified every single joint is dry. This phase is about patience and observation.
The Initial Dry Test
With the P-trap still slightly loose or with a bucket under it, have a helper turn on the hot water shut-off valve slowly. Watch every connection: the disposal outlet to tailpiece, the P-trap joints, the new water supply line connections, and the dishwasher drain hose clamps. Use a dry paper towel to feel for any moisture. If you see a drip, tighten that joint slightly and re-test. Once all are dry, tighten the P-trap fully.
Power and First Run
Restore power at the breaker. Plug in the disposal if it has a cord. Place the sink stopper in and fill the sink about halfway with cold water. Pull the stopper and immediately turn the disposal on. The water should swirl down quickly. Listen for abnormal grinding sounds. Check under the sink for any leaks from the disposal’s body or the drain pipes. Run it for 30 seconds.
Dishwasher Cycle Test
Now, run your dishwasher through a full cycle, preferably with a load of dishes. Start it and immediately check under the sink. Look at the water supply line connection to the dishwasher—this is a common leak point. Watch the air gap; it should drip a little during the drain cycle, but not continuously. After the cycle finishes, open the dishwasher and check for standing water at the bottom. A small amount is normal, but a full pool indicates a drain problem. Also, check the sink for any slow draining after the dishwasher has discharged.
Common Troubleshooting Scenarios
- Leak at disposal mounting flange (top of sink): Tighten the mounting ring a bit more from below. If it persists, the plumber’s putty seal may have failed; you’ll need to reseat the flange.
- Leak at dishwasher drain hose connection: The clamp is loose or the hose isn’t seated properly. Tighten the clamp and ensure the hose is pushed all the way on.
- Dishwasher not draining, water in air gap: This usually means a clog in the drain hose or the connection to the disposal/tailpiece. Disconnect the hose from the air gap and blow through it. Check for kinks. Also, run the disposal to clear any debris that might be blocking its inlet.
- Garbage disposal hums but doesn’t grind: It’s jammed. Unplug it or turn off the breaker! Use the disposal wrench (or a ¼” Allen wrench) in the bottom center hole to manually turn the motor. Once free, press the reset button (usually a small red button on the bottom).
- Slow sink draining with disposal off: A clog in the P-trap or the main drain. Try a plunger or a drain snake. Avoid chemical drain cleaners with a disposal.
When to Call a Pro: If you have persistent leaks after tightening, no hot water to the dishwasher, electrical issues (tripping breakers, burning smell), or if local code requires a permit and inspection you’re not equipped for, stop and call a licensed plumber. There’s no shame in knowing your limits.
Conclusion: Enjoy Your Seamlessly Plumbed Kitchen
Congratulations! You’ve successfully navigated the maze of pipes, drains, and connections to plumb a kitchen sink with disposal and dishwasher. You’ve shut off utilities, sealed sinks with putty, routed drain hoses with an air gap, and tested every joint until you’re sure it’s watertight. This project is a testament to the power of careful preparation, the right tools, and a methodical approach. You’ve not only upgraded your kitchen’s functionality but also gained valuable knowledge about your home’s inner workings.
As you stand back and listen to the quiet hum of the disposal and the gentle whoosh of the dishwasher draining, take a moment to appreciate the work. You’ve created a system that, with proper care, will serve you faithfully for years. Remember to run cold water when using the disposal, avoid fibrous foods, and clean the air gap screen periodically. Should any issues arise down the line, you now have the foundational knowledge to diagnose them. For any major concerns or to understand the full scope of responsibilities with your new installation, please refer to our terms and conditions. Here’s to many hassle-free meals and clean-ups in your beautifully functional kitchen.
Frequently Asked Questions
Can I install a garbage disposal without a dedicated electrical outlet?
Technically, some disposals can be hardwired directly to a circuit, but this almost always requires a permit and must be done by a licensed electrician to meet code. The safest and most common DIY method is to plug the disposal into a GFCI-protected outlet under the sink. If you don’t have one, an electrician must install it.
What’s the purpose of the air gap for the dishwasher, and can I skip it?
The air gap is a critical backflow prevention device. It creates a physical break in the drain line so water from the sink cannot siphon back into the dishwasher, potentially contaminating your dishes. Many plumbing codes mandate it. While some modern codes allow a “high loop” under the counter as an alternative, the air gap is the most reliable method and is highly recommended.
My sink has two bowls. How does that change the plumbing?
>With a double bowl sink, you’ll use a “continuous waste” or “double bowl adapter.” This is a special T-shaped or cross-shaped PVC fitting that connects the drain tailpieces from both bowls into a single pipe that then connects to your P-trap. The garbage disposal will be mounted to one side (usually the side with the larger drain hole), and the other side will have a standard strainer and tailpiece.
How tight should my pipe connections be?
All threaded connections (like on the disposal outlet or P-trap) should be hand-tight plus a quarter to half turn with a wrench. The goal is a snug seal without over-tightening. PVC slip-joint connections (with the large slip nut and washer) should be tightened firmly by hand until the washer seats and creates a seal. Overtightening can crack fittings or deform washers, causing leaks.
What if I don’t have a knockout plug in my disposal’s dishwasher inlet?
All new disposals have a knockout plug inside the dishwasher inlet port. If you’re connecting a dishwasher, you must remove it. Locate the inlet (usually on the side or top of the disposal). From inside the disposal, you’ll see a plastic plug. Use a screwdriver and hammer to knock it out into the disposal chamber, then fish it out through the top. If you leave it in, the dishwasher will not drain.
My dishwasher drain hose has a weird smell. What should I do?
A foul odor usually means bacteria or food debris is sitting in the hose or the air gap. First, clean the air gap’s cap and screen. Then, disconnect the drain hose from the air gap and the disposal/tailpiece. Flush it thoroughly with hot water and a little vinegar or baking soda. You can also run a short cycle on the dishwasher with a cup of vinegar on the top rack to clean the interior drain lines. Ensure the high loop is present to prevent sink water from sitting in the hose.