Broiling a hamburger in the oven is a simple, reliable way to achieve a juicy, flavorful burger with a delicious seared exterior, all without a grill. The key is understanding your broiler’s intense heat, preheating properly, and mastering the flip. By following a few core principles—like using the right pan, shaping uniform patties, and letting the burger rest—you can consistently create perfect oven-broiled hamburgers any night of the week.
Let’s be honest: the dream of a perfect, juicy hamburger often conjures images of a sizzling outdoor grill on a sunny day. But what about those rainy evenings, apartment living without a balcony, or simply the desire for a fantastic burger without firing up the big grill? This is where your oven’s broiler becomes your secret weapon. Learning how to broil a hamburger in oven is a fundamental kitchen skill that delivers spectacular results with minimal fuss. It’s not a compromise; for many, it’s the preferred method for achieving that coveted combination of a caramelized, crusty exterior and a pink, succulent interior. The broiler provides intense, direct radiant heat from above, mimicking the sear of a grill but in a controlled, indoor environment. In this complete guide, we’ll walk through every single step, from the meat you buy to the moment you sink your teeth into a perfectly broiled masterpiece. Forget dry, gray hockey pucks. We’re talking about rich, beefy flavor and a texture that rivals your favorite burger joint.
The beauty of oven broiling lies in its simplicity and predictability. There’s no guessing about wind direction or charcoal temperature. You set a rack position, preheat, and let the powerful heating element do its job. It’s a method that rewards attention to detail—things like patty thickness, pan choice, and timing make all the difference between a good burger and an unforgettable one. So, grab your ground beef, and let’s dive into the delicious details of mastering the art of the broiled hamburger.
Key Takeaways
- Preheat is non-negotiable: Your oven’s broiler needs a full 10-15 minutes to reach searing-hot temperatures for a proper crust.
- Patty thickness matters: Aim for uniform ¾-inch thick patties; too thin dries out, too thick won’t cook evenly under intense heat.
- Season simply and directly: Salt and pepper the exterior just before broiling; seasoning the interior can draw out moisture.
- Flip once, at the right time: Wait until you see clear juices pooling on the uncooked side and the edges look set, about 3-5 minutes.
- Cheese goes on at the end: Add cheese in the final 60-90 seconds of broiling, covered loosely with foil to melt perfectly.
- Resting is crucial: Let burgers rest for 5 minutes after broiling to allow juices to redistribute, preventing a dry bite.
- Safety first: Use a broiler pan with a rack, keep a watchful eye, and have a lid or baking sheet nearby to manage flare-ups.
📑 Table of Contents
- Why Choose the Broiler? The Indoor Grill Advantage
- Essential Equipment: Setting Up for Success
- Crafting the Perfect Patty: It Starts with the Meat
- Broiling Basics: Heat, Position, and Timing
- Mastering the Flip: Timing and Technique
- Finishing Touches: Cheese, Resting, and Serving
- Troubleshooting and Pro Tips
- Conclusion: Your Path to Perfect Oven-Broiled Burgers
Why Choose the Broiler? The Indoor Grill Advantage
Before we get to the “how,” let’s talk about the “why.” Understanding the strengths of your oven’s broiler helps you appreciate the technique and set the right expectations. Broiling is essentially grilling in reverse—the heat comes from the top instead of the bottom. This positioning is ideal for burgers because it directly targets the surface you want to sear and caramelize.
Unmatched Sear and Flavor
The broiler’s high heat (often 500°F to 550°F or more) rapidly evaporates surface moisture and triggers the Maillard reaction—that magical chemical process that creates hundreds of new flavor compounds and a beautiful brown crust. This crust isn’t just for looks; it provides a textural contrast to the tender interior and locks in a significant amount of those precious juices. While a stovetop skillet can give you a sear, it often struggles to cook the interior to the perfect temperature without overcooking the outside. The broiler’s radiant heat penetrates from above, cooking the top while the bottom sears on the hot pan, leading to a more evenly cooked burger.
Total Control and Consistency
Outdoor grilling has variables: wind, gas flare-ups, coal temperature gradients. With your oven broiler, you control the environment completely. You decide the exact rack position (which dictates heat intensity), you can easily rotate the pan for even cooking, and you can use an instant-read thermometer to hit your target doneness with precision, every single time. This makes it perfect for cooking for a crowd where you need multiple burgers to finish at the same moment. There’s no juggling different spots on the grill; you simply follow the same timed process for each batch.
No Smoke, No Smell (Mostly)
A significant benefit for indoor cooks is the relative lack of smoke compared to pan-searing or a very hot stovetop. While some fat will drip and potentially smoke on the broiler pan, it’s contained within the oven. You won’t set off your smoke alarm or fill your kitchen with lingering grease smells. Proper ventilation—using your oven’s vent or a nearby exhaust fan—is still wise, but it’s a much cleaner cooking experience.
Essential Equipment: Setting Up for Success
You don’t need a specialty kitchen to broil a great burger, but having the right tools makes the process smoother and safer. Let’s assemble your broiling toolkit.
Visual guide about How to Broil a Hamburger in Oven
Image source: seriouseats.com
The Broiler Pan: Your Best Friend
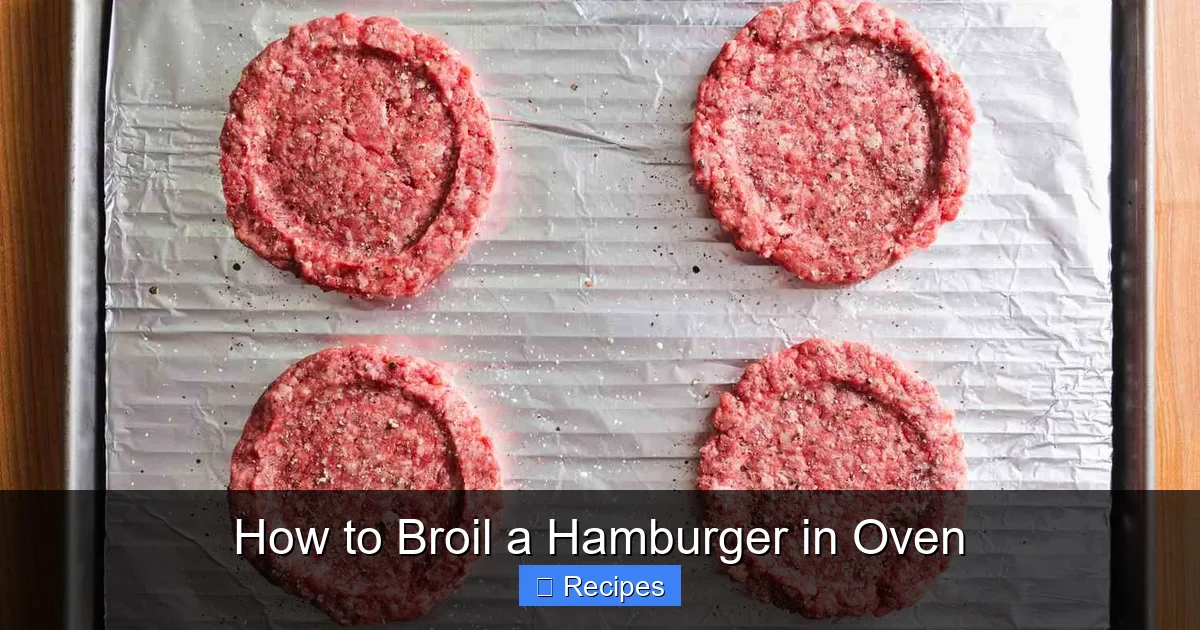
This is the single most important piece of equipment. A broiler pan is a two-part system: a shallow, slotted pan (or a rimmed baking sheet with a wire rack set inside) and a deeper pan that catches the drippings. The raised slotted or wire surface allows hot air to circulate around the burger while the fat drips away, preventing the burger from sitting in its own grease and steaming instead of broiling. If you don’t have a dedicated broiler pan, you can create a serviceable version by placing a wire cooling rack inside a rimmed baking sheet. The key is elevation and drainage.
Heavy-Duty Aluminum Foil
Line the bottom drip pan with heavy-duty foil for easy cleanup. Broiling can create a sticky, baked-on mess that is a nightmare to scrub. A foil liner means you can simply roll it up and toss it. You can also lightly oil the top rack of your broiler pan or use a piece of foil with holes poked in it to prevent sticking, though a well-preheated pan often doesn’t require it.
Instant-Read Thermometer: The Doneness Decider
Guessing doneness by time or sight is risky. An instant-read thermometer is the only way to guarantee your burger is cooked to your desired level of safety and taste. For medium-rare, you’re looking for an internal temperature of 130-135°F; medium is 140-145°F; medium-well is 150-155°F. Remember that the burger will continue to cook (carryover cooking) by about 5 degrees during its rest period, so pull it from the broiler a few degrees below your target.
Other Helpful Tools
A sturdy spatula for flipping, a small offset spatula for transferring, and a basting brush if you like to butter the buns. Having a lid or another baking sheet handy is useful for managing any unexpected flare-ups of smoke from dripping fat.
Crafting the Perfect Patty: It Starts with the Meat
You can have the best broiling technique in the world, but if your patty is poorly made, the result will be disappointing. The patty is the star of the show, so let’s build it right.
Visual guide about How to Broil a Hamburger in Oven
Image source: images-na.ssl-images-amazon.com
Choosing Your Ground Beef
The fat content is critical for flavor and juiciness. For a classic, juicy burger, an 80/20 blend (80% lean, 20% fat) is the gold standard. The fat renders during broiling, keeping the burger moist and adding incredible flavor. For a slightly leaner option, 85/15 is acceptable, but avoid 90/10 or leaner for a standard burger; it will likely be dry. If you want to get fancy, ask your butcher for a custom grind, like a blend of chuck and brisket. Always use cold meat; keep it refrigerated until the moment you’re ready to shape the patties.
The Art of Shaping: Gentle Hands Make Tender Burgers
This is where many go wrong. The goal is a patty that is cohesive but not compacted. Overworking the meat melts the fat and makes the burger tough. Here’s the method:
- Divide the meat: For a ¾-inch thick patty, you’ll want about 6 ounces (170g) of meat. Gently form it into a ball first.
- Pat it out: Place the ball on a lightly floured surface or between two sheets of parchment paper. Gently flatten it with the heel of your hand to about ¾-inch thickness. Don’t use a rolling pin or press down hard.
- Create the indentation: Use your thumb to make a shallow indentation in the center of the patty. This is a crucial pro tip! As the burger cooks, the edges shrink inward. The indentation prevents the center from puffing up into a domed shape, ensuring an even, flat burger that cooks uniformly and sits nicely on the bun.
- Season at the last minute: Right before it hits the broiler, generously season both sides with kosher salt and freshly ground black pepper. Salt draws out moisture, so seasoning too far in advance can make the surface wet and hinder the sear.
Uniformity is Key
All your patties should be as identical in thickness and weight as possible. This ensures they all broil at the same rate. If you have patties of varying thickness, the thinner ones will be well-done by the time the thick ones reach medium-rare. Use a kitchen scale if you have one for perfect consistency.
Broiling Basics: Heat, Position, and Timing
Now for the main event. This is the core of how to broil a hamburger in oven. The process is straightforward, but the details matter immensely.

Visual guide about How to Broil a Hamburger in Oven
Image source: thekitchenix.com
Step 1: Preheat Your Broiler (Seriously)
This cannot be overstated. Turn your oven dial to “Broil.” Most ovens take 5-10 minutes to get the heating element screaming hot. Set your rack position. For standard home broilers, the top rack position (about 4-6 inches from the heating element) is usually perfect for ¾-inch burgers. If your broiler is exceptionally powerful or your burgers are thinner, move the rack down one notch. Let the broiler pan you’ll be using heat up with the oven. A hot pan on contact gives an immediate sear.
Step 2: Arrange and Broil
Place your seasoned patties on the preheated broiler pan rack. Leave at least 1 inch of space between them for air circulation. Slide the pan onto the preheated rack. Close the oven door. If your oven has a “broil” setting that keeps the door slightly ajar, use it. This prevents the oven from cycling off due to overheating. If not, you may need to crack the door open a half-inch with a wooden spoon to regulate temperature and prevent the element from cycling off.
Step 3: The First Side (The Sear)
Set a timer for 4 minutes. Do not peek for the first 2-3 minutes! You want to let that intense heat build a crust. After 3 minutes, take a quick peek. You should see a deep brown, almost blackened crust forming on the top. The edges of the patty will look firm and cooked through. You’ll also notice clear, not pink, juices beginning to pool on the top surface. This is your primary visual cue that it’s time to flip. For a ¾-inch patty aiming for medium-rare, this first side typically takes 4-5 minutes.
Step 4: The Flip
Using a thin, sturdy spatula, slide it firmly under the burger and flip it in one confident motion. Try not to press down on the burger as you flip; you’ll squeeze out precious juices. As soon as you flip, you’ll hear a satisfying sizzle—that’s the second side hitting the hot pan and starting its sear.
Step 5: The Second Side and Doneness
Broil the second side. The cooking time here will be slightly less than the first side because the pan is already hot and the burger is closer to done. For medium-rare, this might be 3-4 minutes. This is where your instant-read thermometer becomes your best friend. Insert it into the side of the burger, avoiding any bone if you’re using a blend. Check the temperature at the 3-minute mark. Remember the carryover cooking; pull it out 3-5°F below your target.
Mastering the Flip: Timing and Technique
The flip is the pivotal moment in the broiling process. Do it too early, and you won’t have a proper crust. Do it too late, and you risk burning the top or overcooking the center. Let’s refine the technique.
Visual and Tactile Cues
Relying solely on a timer is a mistake because broiler intensity varies by oven. Instead, use these signs:
- Juices on top: As mentioned, clear (not pink or red) liquid pooling on the uncooked surface is the #1 indicator the first side is done. It means the proteins have set and the juices are being pushed upward.
- Firm edges: Run a spatula gently along the edge of the patty. It should feel firm and set, not soft and raw.
- Color: The top should have a rich, deep brown crust with some charred spots. If it’s still light gray, it needs more time.
The Single Flip Rule
Resist the urge to flip multiple times. Constant flipping interrupts the searing process and prevents a proper crust from forming. You only need one confident flip. Let each side do its job: the first side builds the crust and cooks the top; the second side finishes the interior and crisps the bottom.
Dealing with Thickness Variations
If your patties aren’t perfectly uniform, you’ll need to adjust. A thinner spot will cook faster. You can briefly shield it with a small piece of foil during the last minute of broiling if it’s browning too quickly while the thicker part finishes. Conversely, a very thick burger might need a minute or two longer on the second side.
Finishing Touches: Cheese, Resting, and Serving
The broiling is done, but the burger isn’t ready to eat yet. These final steps are what separate a good burger from a great one.
Adding Cheese (If Using)
This is a precise operation. American cheese is classic for a reason—it melts perfectly at low temperatures. Place a slice on the burger immediately after you flip it for the second side, or during the last 60-90 seconds of broiling. To prevent burning and ensure even melting, you can tent the entire pan loosely with a sheet of aluminum foil. The trapped gentle heat will melt the cheese without applying more direct, burning heat from the element. For other cheeses like cheddar or Swiss, you might need an extra 30 seconds.
The Mandatory Rest
This is the hardest step because it requires patience, but it is absolutely essential. Transfer the finished burgers to a warm plate or cutting board and let them rest, tented loosely with foil, for 5 minutes. During this time, the muscle fibers relax and the juices that were driven to the center by the heat redistribute throughout the entire patty. If you cut into it immediately, all those glorious juices will run out onto your cutting board, leaving you with a dry burger. Trust the rest.
Toasting Buns and Assembly
Use the last minute of your broiler’s residual heat to toast your buns! Split them, brush the cut sides with a little butter or mayo, and place them cut-side up on the broiler pan for 30-45 seconds until golden. Assemble the burger with your favorite toppings—lettuce, tomato, onion, pickles, and a good quality sauce. The structure of the perfectly broiled patty, with its crisp edges and juicy center, will hold up beautifully to all the fixings.
Troubleshooting and Pro Tips
Even with the best instructions, things can go awry. Let’s solve common problems and share insider knowledge.
Problem: Excessive Smoke
Cause: Fat dripping onto the heating element or the bottom pan. Solution: Ensure your patties aren’t overly fatty (stick to 80/20). Trim any large, hard pieces of fat from the edges. Make sure the broiler pan is clean. Keep the oven door slightly ajar to improve ventilation. Have a lid or another baking sheet ready to slide over the pan if you get a flare-up.
Problem: Burgers Sticking to the Pan
Cause: Pan wasn’t hot enough, or you moved them too soon. Solution: Always preheat the broiler pan with the oven. Let the first side develop a solid crust (3-4 minutes) before attempting to flip. Use a thin, flexible spatula and slide it decisively under the entire patty.
Problem: Uneven Cooking (Raw Center, Burnt Edges)
Cause: Patty was too thick, or broiler rack was too close. Solution: Stick to the ¾-inch thickness guideline. If your burgers are thick, move the rack down one position to increase the distance from the heat, giving the center more time to cook. You can also start the burgers on a lower rack for a minute to begin cooking the interior, then move the pan up to the top rack for the final sear.
Pro Tip: The Butter Basted Finish
For an extra layer of richness, during the last minute of cooking the second side, place a small pat of butter on each burger. The melting butter will baste the surface, adding a beautiful sheen and a deeper, nutty flavor. Tilt the pan slightly to pool the butter and spoon it over the top if needed.
Pro Tip: Elevate with Onions
Slice a large onion into ½-inch rings. Place the rings directly on the broiler pan rack next to the burgers during the last 4-5 minutes of cooking. They’ll broil into sweet, caramelized, smoky rings that are a sublime topping for your burger.
Conclusion: Your Path to Perfect Oven-Broiled Burgers
Mastering how to broil a hamburger in oven transforms your kitchen into a year-round burger sanctuary. It’s a technique that combines the primal satisfaction of a good sear with the convenience and control of indoor cooking. By respecting the process—preheating thoroughly, crafting uniform patties, recognizing the flip cues, and honoring the rest—you consistently produce burgers that are juicy, flavorful, and cooked exactly to your liking. This method eliminates the guesswork and weather-dependency of grilling, putting a perfect burger within reach any night. So, the next time a burger craving hits, don’t hesitate. Preheat that broiler, shape your patties, and get ready to enjoy one of the simplest yet most rewarding meals you can make at home. The perfect, broiled hamburger awaits.
Frequently Asked Questions
Can I broil frozen hamburger patties?
Yes, but it’s not ideal. Frozen patties will take significantly longer to cook and are more likely to have a steamed exterior rather than a good sear. For best results, thaw them in the refrigerator overnight. If you must cook from frozen, add 50-100% more time to your broiling estimate and use a thermometer to ensure they reach a safe internal temperature of 160°F.
What rack position should I use for broiling burgers?
For standard ¾-inch thick patties, start with the oven’s top rack position, usually about 4-6 inches from the heating element. If your broiler is extremely powerful or your patties are very thin, move the rack down one notch. If your patties are thicker than 1 inch, start on the second rack from the top for more gentle, even cooking before finishing on the top rack for a sear.
How do I prevent the broiler from smoking too much?
Use a broiler pan with a drip tray to catch grease. Line the drip tray with foil. Ensure your patties have a moderate fat content (80/20 is good, but not 70/30). Keep the oven door slightly ajar during broiling if your model allows, as this improves ventilation and prevents the element from cycling off. Have a lid or baking sheet ready to slide over the pan to smother any flare-ups immediately.
How can I tell when my broiled burger is done without a thermometer?
While a thermometer is best, you can use the “finger test” for doneness. Press the center of the patty lightly with your spatula. For medium-rare, it will feel soft and springy, like the fleshy part of your palm at the base of your thumb when your hand is relaxed. For medium, it will feel slightly firmer, with a small amount of give. For well-done, it will feel firm and unyielding. Always rely on clear juices (not pink) pooling on top as a primary visual cue.
Should I oil the broiler pan or the patties?
Generally, you do not need to oil either if your pan is properly preheated. A hot, clean broiler pan or rack will naturally release a well-seared patty. Oil can sometimes cause more smoke. If you find sticking is an issue, ensure you are letting the first side sear undisturbed for at least 3-4 minutes before flipping. You can also lightly brush the *cool* patty with oil before seasoning, which can help, but the preheated pan is usually sufficient.
Can I broil burgers on a regular baking sheet without a rack?
You can, but the results will be inferior. Without elevation, the burger sits in its own rendered fat, which steams the bottom instead of searing it. This leads to a pale, soggy bottom and a greasier burger. If you must, use a wire cooling rack set inside the rimmed baking sheet to elevate the patties and allow drippings to fall away.